Community Standin strategy
| Standin | |
|---|---|

| |
| Basic Information | |
| Map type: | Control Point |
| File name: | cp_standin_final
|
| Released: | July 10, 2013 Patch (Summer Event 2013) |
| Developer(s): | Ian "Scorpio Uprising" Cuslidge |
| Map Info | |
| Environment: | Alpine |
| Setting: | Daylight, cloudy |
| Deep Water: | No |
| Pyrovision Support: | No |
| Map Items | |
| Map Photos | |
| Map Overview | |
This article is about Community Standin strategy.
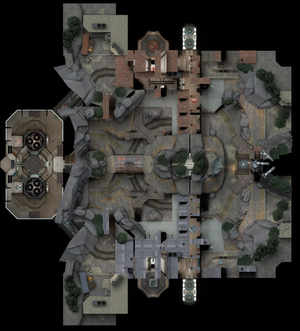
Note: It is recommended to read the main Standin article first to become familiar with the names of key map locations used in this article.
General strategy
Offense
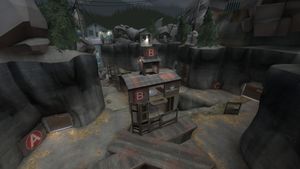
Attacking Control Point A
- This Control point is in an open area, and is dependent on position; where the enemy is and where can they be shot from. Be aware of resistance, you will often be seen a mile away no matter what entry you take to A.
- Work with your team to pressure the enemy off the point. Attacking from the A-B connector in the middle, alongside another group coming from the respective spawn exit, will often split the defense and make the point easier to access.
- Taking the high ground around the point provides an advantage, often intimidating the enemy team to retreat.
Attacking Control Point B
- Accessible from virtually all angles, the Control point is prone to 'sandwiching' and defeating any ill-prepared defense.
- Never take on the point by yourself, you will be exposed without teammates to provide strength in numbers, and will often retreat with weak results.
- Using hit and run tactics are normally very useful, as you can approach the bridge from an unwatched angle, fire a few attacks, and run back to cover or under the point.
Attacking Control Point C
- The Control point is on the low ground compared to surrounding floors, but has relatively long sight lines in certain areas.
- Making use of the walls near the point will work as adequate cover to ambush, a defense often breaks up after a successful ambush depending on the class.
- This point is weak to attacks from the B-C connector unless there is a defending Demoman. If you are able to scope out the defenders, report to your team what to look out for as it often will make or break a push.
Defense
Defending Control Point A
- This Control point is open and allows a wide view of every entry to the point.
- Having a 'watcher' to report enemy positions can defuse any pushes to attack the point unless the offenders have an ÜberCharge ready.
- Sentry Guns do not see much action here due to the open field, however if there is an Engineer setting up in the enclave, the nest can provide a safe zone in the otherwise dangerous area.
- Use the chicken wire fence as cover, know that the attackers are exposed to Snipers and long ranged attacks while you can hide in safety.
Defending Control Point B
- This point is available to be attacked from practically every angle, but most classes can only reach the point directly from the bridge itself.
- Watching through the chicken wire fences can help negate offenders ambushes coming from spawn.
- Standing on the platform adjacent to the point gives a wide view of the battlefield.
Defending Control Point C
- Defending on any nearby platform is a decent strategy, as the Control point itself does not provide a large boon to defenders.
- The main entry to C (via spawn) has a large chokepoint and is easy to spam down. It also naturally discourages players to pass through at first.
- The point is seemingly confined, but offenders will have a lot of room to back off or approach better positions mid fight. Maintaining a presence on the nearby platforms will help negate positional advantages and keep the offenders at a disadvantage.
Class-specific strategy
 Scout
Scout
- You are a prime class to capture objectives, Standin focuses on area domination rather than frag counts. You should try to be the center of your team's composition while capturing points whenever possible.
- Catch enemies off guard by taking the many flank routes available. With that in mind, as flanking is easier, consider using the Baby Face's Blaster to devote yourself towards mobility, rather than the offensive capabilities of your other primaries.
- The Crit-a-Cola will strengthen your ambushes and boost your movement speed during the duration. Equip it when attacking a point or to reach a specific objective faster.
 Soldier
- The Pain Train will be of great use here, equip it if you prioritize objectives over murder.
- All the Control points have a large airspace above them, take advantage of this with rocket jumps to have an easier time shooting down defenders.
- The B.A.S.E. Jumper compliments this very well, especially on A and C.
- While the Rocket Jumper can provide much more mobility than any other primary, stray away from it as it is often more advantageous to be versatile in case you need to defend an objective.
 Pyro
Pyro
- Consider equipping the Backburner, if an ambush is timed right, you can single-handedly wipe a defense off the point if there are no Sentry Guns in the vicinity.
- Wandering alone to point A is often suicide without teammates. Always traverse this area with teammates if you can, you are extremely vulnerable here, even with the Flare Gun.
- The Back Scratcher can scavenge more health out of health packs for you, equip the rake if your team has no Medic, as this map has few areas to reliably recover.
- Going under the bridge at point B is a great way to ambush players.
- Utilizing the extra speed from the Powerjack allows for increased mobility around each point.
- Specifically on Control point B, it is possible to jump onto the adjacent platform on the bridge from the main ground level.
- In the interior sections, using a Flare jump can prove advantageous for closing gaps. The relatively-lower height from said technique is beneficial, as sticky or rocket jumping is more likely to cause opposing classes to hit the ceiling.
 Demoman
- All the points can cater towards your arcing projectiles, smartly make use of this where you see fit.
- Most points have confined capture areas, use the Iron Bomber to deny enemies easy capturing.
- As you will often find yourself moving everywhere, consider equipping the Quickiebomb Launcher. You arguably will often be an attacker while on Standin, and the increased offense of the Quickiebomb Launcher compliments this role.
- Keep in mind to switch to other defensive secondaries if your team is down to their last point; you are a defensive class at heart.
 Heavy
Heavy
- Choosing between the Shotgun or food items comes down to your role; are you with your Medic or are you roaming with other teammates? The former is often better with a Medic in your group and a food item with teammates without a Medic.
- Using the Tomislav on point A can prove to be a traumatic/painful experience for the offenders; who expects the silently revved Heavy?
- The Tomislav also provides better accuracy across longer ranges, a commodity on this map.
- Keep in touch with your Sniper, there are many nasty sightlines to where your big head is exposed to the enemy Sniper. If possible, attack/defend objectives while in the cover of your friendly Sniper.
- There is at least one ammo kit near each point, so don't worry about wasting too much Minigun ammo.
 Engineer
- Engineer has wide roles and playstyles available on Standin, but key notes are:
- Your buildings are often able to be shot at from a distance.
- Buildings directly on a point is generally the most defensible area without assistance.
- Where you decide to build can enhance your teammates staying power, but is relatively weak for yourself.
- Keep in mind what state the map is in; play more aggressive or defensive if more points are friendly to your team, and the latter if less points are friendly.
- Despite your fragile class nature, always think of the team and how can they be benefited the most. Placing unattended buildings, such as Dispensers or Sentry Guns, and relying on your team to use/defend them may be a viable playstyle if done correctly.
 Medic
Medic
- Don't feel afraid to back out of an objective area, it is very easy for players to flank you and if all goes wrong, you can regroup safely later.
- There are many areas to ambush enemies, but this is a double-edged sword, while the Kritzkrieg strengthens your groups ambushing skills, the Medi Gun denies the same happening to you! Use what your team is comfortable with.
- The Vita-Saw is a good melee to equip if you have trouble staying alive. Ambushes are easy to perform, and so is it to kill an unprepared Medic.
 Sniper
- There are plenty of sightlines to catch people outside of cover, you can easily snipe them from a safe distance.
- This also applies while defending, you are just as valuable as other classes in this role.
- There is no deep water to extinguish players on Standin, bring Jarate along with you if enemy Pyros are in large numbers.
 Spy
Spy
- While behind enemy lines, you generally will not have easy access to any ammo kits. Use your cloak wisely.
- The L'Etranger can regain cloak without going towards a crowded Control point to regain it, just shoot from a distance.
- Decloaking by the enemy spawn rock at B is surprisingly effective; most either do not look towards the rock, or are simply not there. Besides Snipers having a chance to hear you, This is an effective decloak spot.
- Take note of players walking under the bridge at B, they are commonly there to recover health. Use your Revolver to finish them off if you can.
- Skilled players will pay more attention to their surroundings, as there are numerous routes available to flank their position. This is a full-time job to observe, so relying on your team's distractions can be even more useful to you than normally.

