Nightfall
| Nightfall | |
|---|---|

| |
| Basic Information | |
| Developer(s): | {{{map-developer}}} |
| Map Info | |
| Environment: | Alpine / Industrial |
| Setting: | Nighttime, raining |
| Hazards: | Pitfall (third stage only) |
| Map Photos | |
| Map Stamp | |
| Supporters Leaderboard | |
| “ | Nine out of ten mercenaries will tell you: If you're looking for a place to see who can push bombs into a shallow pit the fastest, there's no better location than a damp logging site, in the middle of the rain, in the middle of a forest, in the middle of the night. Nine out of ten mercenaries are idiots, though, so you might not want to put much stock in it.
|
” |
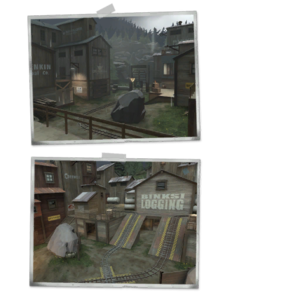
Nightfall is a Payload Race map created for the TF2Maps.net A/D CTF and Payload Race Contest. It was awarded first place in the competition, with a score of 4.07 out of 5 points, despite being unfinished at the end of the contest. It was later added to the game as an official community created map in the February 24, 2011 Patch due to its outstanding quality. Similar to Sawmill, Nightfall is set at night in a lumber company during a torrential rainstorm, with its architecture heavily influenced by Ravine.
From feedback received from gameplay on the Payload Race map Pipeline, Nightfall was designed to provide players with plenty of routes into the enemy's base in order to help overcome a strong defense. The map features neutral arenas at the center of each stage instead of chokepoints, which allows players to move more freely between the bases, and mechanics to help motivate players to complete the objective. These take the form of a round timer which, upon expiring, forces both carts to slowly roll forward until either one reaches its objective.
The goal is to escort the team's cart through enemy territory in order to reach the Control Point, while preventing the enemy team from doing the same.
Contents
Locations
Stage 1
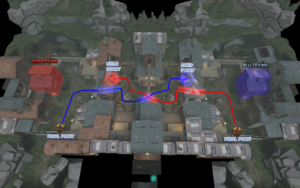
Stage 1 starts with each cart on an incline in between spawn and the middle of the map. The cart paths them make a right/left (for RED) or left/right (for BLU) series of turns before crossing over in the middle of the map. Above this crossover is a small platform and opening, offering classes like Pyros, Soldiers and Demomen a good ambush spot.
Following the crossover, each cart path makes another series of turns, opposite their first ones (right/left for BLU, or left/right for RED), before heading down the other team's starting incline. The final portion of the cart path features a right (RED) or left (BLU) turn in front of the enemy's spawn before reaching the final point. Directly before the final point is a slight incline that does feature rollback, forcing a sustained push at the end of the map to successfully capture the cart.
There are a number of paths around both cart paths, mirroring each other on both the BLU and RED portions of the map. Many of these paths are wide but have tight corners, offering Spies good places to hide and/or attack from.
Stage 2
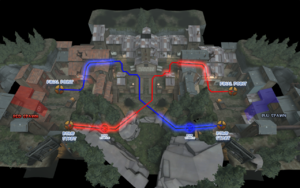
Stage 2 is designed in a similar manner to Stage 1, starting with the carts by each team's respective spawn. The path then passes through a tunnel before reaching the central arena and crossover. However, directly after the crossover, there is a pair of steep inclines, each cart path traveling up one of the inclines.
From here, both cart paths make a series of turns before beginning a downhill section toward the final point, which is located outside the enemy team's spawn room. As with Stage 1, directly before the final point is a slight incline that does feature rollback, forcing a sustained push at the end of the map to successfully capture the cart.
Stage 3
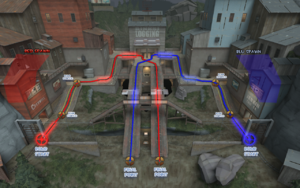
Stage 3 features an entirely different design from the first two stages. The cart path winds uphill through several turns outside each team's spawn, with one path from spawn leading directly to the top of the hill. At the top of the incline is the cross over.
The final portion of the stage features a full downhill push toward an empty pit, with both cart paths alongside each other. A bridge spans both cart paths directly before the final drop into the pit. Underneath the two cart paths is a large, open area that players can be pushed off into, as well as paths that lead back up to the main cart path.
Strategy
Gallery
Update history
February 24, 2011 Patch (Community Map Pack Update)
- The map was added to the game.
Bugs
- During the Second stage, the red cart can become stuck at the last slope. The cart then flips upside down multiple times.
- There are heavy visibility issues near the RED A resupply. When exiting the resupply area (
setpos 2513 -8270 257;setang -18 178 0), the building where the cart bridge starts (above the Binksi Logging sign) can be seen with multiple parts being invisible, and completely disappears when the player walks or turns left. If the player walks on the bridge along the rocks and trees, a window of the building with loudspeakers disappears (setpos 2309 -8550 257;setang -17 156 0).
Trivia
- Nightfall was the original name for Double Cross, but Nightfall was released as a community created map before WAR! Update launched.
See also


