Community Egypt strategy
| “Sun Tzu's got nothing on us!” This article is a Community strategy stub. As such, it is not complete. You can help the Team Fortress Wiki Community Strategy Project by expanding it. Notes: Expand the "General Strategy" section to cover map locations in more detail. Class strategies also need to be improved, both in terms of adding more content (some classes are blank at the moment) and organization. |
| Egypt | |
|---|---|
| |
| Basic Information | |
| Map type: | Control Point |
| File name: | cp_egypt_final
|
| Released: | February 24, 2009 Patch (Scout Update) |
| Developer(s): | Sean "Heyo" Cutino |
| Map Info | |
| No. of Stages: | 3 |
| Environment: | Egyptian |
| Setting: | Daylight, sunny |
| Hazards: | Ceiling trap, Fire (environmental) |
| Map Items | |
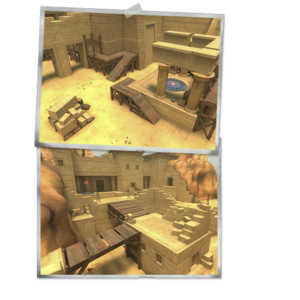
| Map Photos | |
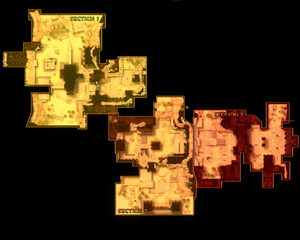
| Map Overview | |
This article is about Community Egypt strategy.
Note: It is recommended to read the main Egypt article first to become familiar with the names of key map locations used in this article.
General strategy
Offense
- Sentry Guns serve as a crucial defensive foothold on Egypt due to the elevations and cover the terrain provides. Taking them out on an offensive team is vitally important - especially later on in the game where you have to climb uphill. Spies, Demomen and Soldiers are all ideal candidates for taking Sentry Guns down.
Defense
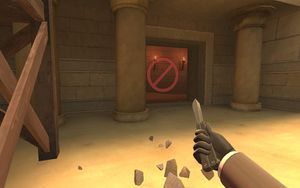
- The map contains shortcut spawns in some stages of the map. When the BLU team successfully captures the first point, anyone left in the initial spawn has a split second to get out before the doors close and the ceiling lowers and crushes everyone inside, killing them.
Class-specific strategy
 Scout
Scout
Defense
- As you may know, the Scout is not a primary class when on defense, but using the Force-A-Nature is useful for having its knock back ability to push enemies off the Control Point.
Offense
- Scout is useful on offense, not only because of his speed, but because of his capture rate. The Scout has a 2x capture rate on Control Point games, leading to faster wins.
 Soldier
Offense
- A skilled Rocket Jumper can win the game in later stages, as the terrain can slow your attack dramatically. Just be careful about the damage you take while jumping (the Gunboats help a lot with this).
 Pyro
Pyro
General
- A good way to attack as a Pyro is to deflect projectiles. Doing so on this map is easy because of its size.
Defense
- On defense, it is useful to take advantage of your compression blast to knock enemies off the control point.
 Demoman
 Heavy
Heavy
General
- Overall, Egypt is not a Heavy-friendly map. The very open environment and bright scenery make the Heavy even more of an easy target then before, and the long distances between points make traversing the map without a Teleporter somewhat dangerous, as well as slow. As such, try to keep to the darker corridors and less obvious routes to the next area. Otherwise, you may be in the prime spot for being sniped, thus forcing you to walk all the way to the front lines again upon respawn.
Offense
Stage 1, Point A
- The first point of the first stage is very difficult for a Heavy to move around in without a Medic, as either of the spawn doors will be inundated with projectile spam, Sniper sights or be well within the range of any RED Sentry Guns. Therefore, an ÜberCharge will be needed to clear out the area effectively.
- When exiting either of the spawn doors, be careful of any enemies or Spies hiding around the pillars next to each door. These shadowed areas are good hiding spots, and should not be ignored.
- A Heavy can push around the right ramp to destroy any Sentry Guns effectively (especially with a charge) and block any RED reinforcements. When doing so, make sure to pick up the maximum health and ammo kits that readily spawn in a nearby alcove.
- On the point itself, make sure you crouch in a corner or behind a pillar while capturing so you aren't picked off by enemy Snipers from the far left or right (remember, you are likely to be their first target if spotted).
Stage 1, Point B
- The last area's main door is a poor place for a Heavy to charge in through even with an ÜberCharge, as the raised nature of it means that you can be airblasted or knocked back down your side of the stairs and your charge will not last long enough to dispose of any Sentry Guns around the corner.
- The left tunnels, though, are a very logical place for Heavies to strike from, as the darkness keeps them hidden for long enough before they can jump out in ambush, and when spun up, the only revealing factor as to your presence will be the noise.
- Accompanying a push onto the point and standing in the RED team's blind spot as they come out of their spawn will let you surprise them as your team continues capturing. In the worst case scenario that the point is cleared by Critical explosives or a Spy, you will then be able to finish off the capture by jumping onto the point.
Stage 2, Point A
- The first point of the second stage is very Sniper friendly, making the two right doors (which enemies can fire and aim into easily) a no-go zone for Heavies. Your best option would be to go through the far left door and then around the left building to come up onto the point via the ramp, but watch out for Spies or Sentry Guns near the point.
Stage 2, Point B
- As soon as the first point is captured, you can rush to the last with your team and if the RED team has no defenses set up yet, you might be able to capture the point. If you stand on the side toward the enemy spawn and impede their progress with your Minigun (this works especially well with Natascha due to the slowdown quality it has), you can also buy time for your team while they capture.
- Otherwise, only move into the last point area when your team is pushing or you have a Medic with a charge ready healing you. If it's a normal ÜberCharge, go through the top right one-way gate to attack any Sentry Guns the BLU team may have and then proceed to their spawn as necessary, and if it's a Kritzkrieg, come through the far left entrance, firing from long range (as the distance's subsequent damage falloff is ignored by the Crits).
Stage 3, Point A
- The first point of the last stage is less harsh on attacking Heavies with Medics, but it can still hold some problems. Namely, both spawn doors are at the lowest point of the map and require you to ascend rapidly to reach the point. This means that if you go out into the open to climb up, you are subject to being sniped or backstabbed very easily. That said, there is an alternative route up that works well with Heavies, the dark and steep stairwell that comes out not far from the point.
- When using the stairway to advance to the point, be sure to spin up as you are coming out into the open and gun down anybody in the immediate area. If you want to stay hidden from enemies on the point, jump down and hide around either the right or left corners, but be careful as they may hear your gun spinning.
- If you are charged with a Kritzkrieg at the top of the stairs, stay on top of the ledge and keep the enemies at bay with long range Crits. This will clear the point of any RED players and whittle down Sentry Guns from afar (though the Crits will not affect the Sentry Gun so much, they may scare the Engineer away).
Stage 3, Point B
- When pushing the final point, only run out of the right and middle entrances if you are either ÜberCharged or backing up players who have already run in. This reduces the chance of you being targeted by enemy Snipers or Spies, and should give you enough time to hide behind the central monument (yet allowing you to fire around the corner at the enemy spawn area).
- Alternatively, hide in the top left one way gate and jump down to surprise any enemies in the near courtyard. This route is also good for charging into to deploy ÜberCharges from, but is vulnerable to sniping and airblasting backwards down the stairs.
- While your team is capturing the point, try to hide up towards where the RED Snipers usually stand, in the shadowed window area. Should your team fail to capture the point, you can either keep enemy Snipers at bay, or rush down to finish off the capture and win the game.
Defense
This map is better for defending Heavies as they will have the height advantage on vertically advancing maps, and ready access to any number of the hiding spots available for ambushes and the like.
Stage 1, Point A
- The first point of the first stage is good if you have a Kritzkrieg Medic as you can fire directly into the enemy spawn from long range and deal massive damage to anybody trying to come out. Otherwise though, the risk of being sniped is quite high, so stay behind the left corner, the point, or on the point itself and wait for enemies to come into your field of view.
Stage 1, Point B
- The last point's dark surrounding tunnels provide a good spot to ambush and push back BLU players, but be careful of any Sentry Guns set up around there.
- When the BLU team makes a push for the last point, hide in a corner with a Medic if possible, and wait until any ÜberCharges they used have worn off. Then, run in and block the point to stop the cap while also killing many enemies.
Stage 2, Point A
- The first point of the second stage is Sniper-friendly as mentioned before, so try to keep to the far right area to cut the BLU team off or around the bridge/pillar area to attack them from above. Waiting here at the start of the round may not be a good idea though, as the BLU team is likely to push out with an ÜberCharge (though if a Medic healing you has one ready, stay and ask him to use it when they charge in).
- The high stairs leading up to the point are ideal places to pick off any ascending enemies, as they are wide open and offer little escape aside from dropping back down into the open yard. When peering over the edge to find these enemies, however, be careful of Snipers aiming up at you from inside the BLU spawn doors.
- Use the high ground to your advantage, dropping down on unsuspecting enemies to kill them quickly. This strategy works especially well if you have the K.G.B. and can spot a weakened enemy to hit, as you can earn some Crits to slaughter anybody too close with them.
- The point itself is difficult to defend without actually standing on it as it is so enclosed. It is for this reason that if the point is rushed and any defensive Sentry Guns are destroyed, you should retreat to the last point area.
Stage 2, Point B
- You can flank the BLU team as they try to set up a base at the first point by going through the right passage, being rarely used due to how dangerous it can be for BLU players. If you can, organize an ÜberCharge to do this with, as it is very likely they will have a Sentry Gun with Teleporters set up.
Stage 3, Point A
- Defending the last stage's first point is tricky as the enemies come from very low spawn doors in comparison with how high the point is. As such, only go down to kill enemies when you have support or a Medic, as it will not be worth the risky trek back up the hill if you only kill one or two people.
- This point favors attacking Snipers somewhat as they can get into relatively safe positions and aim directly at the point. Therefore, try to stay behind cover when you know of an enemy Sniper's presence, and flank them quietly if possible.
- The raised area connecting the bridges is a good place to stand as a defensive Heavy, as you can crouch below the edge of the brick wall (making you somewhat safe from Snipers) and fire slightly up at the point to surprise any enemies trying to make a stealthy capture.
Stage 3, Point B
- The last point is very Heavy-friendly in comparison with anywhere else on this map, as there are few doors for the BLU team to snipe out of, and there is a lot of cover to hide behind in case of an enemy push. Some good examples are the central monument's pillars, behind the wall above the point, and to the far right behind the cliff.
- When clearing out the areas between the first and last points, don't forget that there is a one-way gate on the upper right with health and ammo kits. If you can get behind the BLU team and take this area, it is a vital asset for limiting the BLU team's movements.
 Engineer
Offense
- Consider setting up a Teleporter once your team has secured a foothold near/outside the second control point of each stage. The increased waves of healthy, fully loaded and reinforced attackers will put the enemy team under serious pressure. Just make sure the team is looking out for your equipment and you keep them well stocked.
Defense
- Engineers will provide a great defensive boost to the defending team since the varied elevations and cover allow for many Sentry Gun placements. Set up your Sentry Gun, upgrade it to at least level 2 and do your best to light up the targets your Sentry Gun is shooting at. Place your Dispenser and Teleporters at the defensive front, so your team can use them, and then occasionally go to repair them. If your Sentry Gun is destroyed, rebuild a new one somewhere else, never build in the same spot to prevent the enemy from adapting.
- For Stage 3, equip the Wrangler. This is because both points contain huge sightlines. This is relatively less necessary on Point 2 however.
- For Stage 3, an interesting place to put your sentry is to put it a few meters right of the opening (top side). Your sentry should be able to see the wooden bridge (path 1), the top end of one of the ramps (path 2), and the exit of the stairs (path 3), covering all three paths that reach point A. You can also use the stone bricks as cover to hide yourself & your Dispenser from at least one side. Plus you've got a health pack & ammo pack not too far (in the cell).
 Medic
Medic
 Sniper
- Battles on Egypt are usually fast-paced, rendering a decent Sniper useless here, as they cannot keep up while scoped in. Veterans will be able to use the Sniper rifles and still help out their team, but beginners should use the Huntsman as their primary weapon to keep up with fast-moving targets.
 Spy
Spy
- Overall, Egypt is a map with many, many hallways and close spaces, which can be dangerous to a Spy, because a trapped Spy is a dead Spy. However, there are lots of secluded corners in the map for you to decloak in, which is always good for coming up behind the capture point and picking people off or recharging your Cloak and Dagger.
Offense
Stage 1, Point A
- On the first capture point, get behind enemy lines and stab people as they're going to the point. Alternately, just wait with the Cloak and Dagger for someone to come by, and then uncloak and stab him. Be sure to check his back to see if others are coming, first.
Stage 1, Point B
- On the second capture point, things can get really cluttered around their spawn, so be careful to stay near the front lines, but not too near.
- You can try to go for a suicide stab-sap on the Engineers that build Sentry nests near their spawn.
Stage 2, Point B
- It may be difficult to get past the front lines in the second capture point, but keep trying. A good way is to go left through the little tunnel (while cloaked) and jump through the little hole in the wall. However, be careful of enemies trying to go through the tunnel as well.
Stage 3, Point A
- On this stage, as you move out of the spawn be careful to dodge the fire that may be coming from above.
- Be an asset to your team, and stab the Heavies making their way to the front line. This can provide a few extra seconds to push, as the opposing team does not have its strongest firepower.
Stage 3, Point B
- Be an even bigger asset to your team, and go and sap the Sentry Guns that are placed on the battlements behind the final capture point. The best disguise to do this with is Sniper, because the battlements are an ideal place for a Sniper to go.
- There are lots of corners between the two capture points. Use this to your advantage.
Defense
Stage 1, Point A
- For this area, try to get behind their lines and stay behind their lines, backstabbing the stragglers.
- Always destroy enemy Teleporters to make sure they do not have a stream of people running to the capture point.
- During setup, a good place to wait for the left door to open is to the left of the door, between the pillars or behind the scaffolding. A good place to wait for the right door to open is to the right of the door, on top of the blocks of sandstone.
- Go for Engineers first, so they don't set up close to your capture point, building Teleporters.
Stage 2, Point A
- For this area, wait close to their spawn, and walk with the enemy for a while, until they get to the front lines. Then, when they're all distracted, go on a stabbing spree! (It's best not to disguise as a Medic for this strategy, because they will get suspicious when you're not healing them. Also, don't bump into any enemies or they will more than likely discover you're a Spy.)
Stage 2, Point B
- A good place to hide for a while if you need to is across the bridge and behind the pillar, plus there is also a Health pack and some Metal around that area.
- The bridge is also a good place to wait for leaping stabs, with you being almost undetectable to enemies below you.
Stage 3, Point A
- A good but somewhat obvious place to wait during setup is the hole in the floor near BLU spawn, being able to easily jump down to pull off a leaping stab right as they come out of spawn.
Stage 3, Point B
- Since Engineers like to build Sentry Guns on the battlements behind the point, a lot of times enemy Spies try to sap their buildings. Disguise as a friendly class, and then try and stab the potential Spy in the back.
