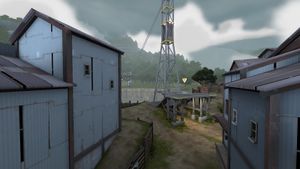
Community Brazil strategy
| “Sun Tzu's got nothing on us!” This article is a Community strategy stub. As such, it is not complete. You can help the Team Fortress Wiki Community Strategy Project by expanding it. Notes: Expand the "General Strategy" section to cover map locations in more detail. Potentially look at the class-specific strategies as well. |
| Brazil | |
|---|---|

| |
| Basic Information | |
| Map type: | King of the Hill |
| File name: | koth_brazil
|
| Released: | October 20, 2017 Patch (Jungle Inferno Update) |
| Developer(s): | Jérémie "RaVaGe" Nicolas Tyler "Yyler" King Sean "Heyo" Cutino Nassim "NassimO" Sadoun |
| Map Info | |
| Environment: | Jungle |
| Setting: | Daylight, overcast |
| Hazards: | Pitfall |
| Bot support: | Yes |
| Map Items | |
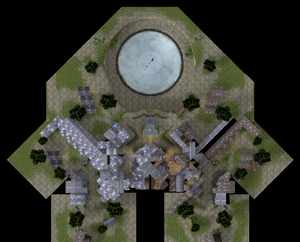
| Map Overview | |
This article is about Community Brazil strategy.
Note: It is recommended to read the main Brazil article first to become familiar with the names of key map locations used in this article.
General strategy
See also: Community King of the Hill strategy
Nesting
- The Coal House is a strategic position for an Engineer nest and a team priority. Maintaining a Dispenser and Teleporter here is essential to establishing dominance over the point in the enemy's forward positions. It is close to the point, has good communication with the spawn, and has protective cover. The location does not see many ÜberCharges as the Medic and the Pocket have to survive crossing a lot of open ground next to an open pit. However, being that far forward and connected by two straight roads to the enemies Coal House means that it will be subject to repeated frontal assault. It will also be subject to repeated flanking up the Main Stairs by Scouts, Spies, and Demomen. The Engineer will need a Heavy and a Pyro to cover him while he sets up the nest. And in general, the teammates need to help keep the surroundings of that building free of the enemy.
- The Ammo pickin's are mighty slim around the Coal House (as is the case almost anywhere else on this map), so leave the Ammo Cases and the Ammo drops from kills in or near the room for the Engineer to use, at least until the Dispenser is Level 3.
- The second nest can be placed in the Vault Room, in the Stairwell, or around the Hurg Perch depending on how aggressive or defensive the team wants the Engineering position to be against controlling the Hurg Perch.
Flanking
- There is an upper-story and a ground level short route for flanking from one team's side into other team's rear area without getting very close to the point.
- The upper-story short route is where the two teams' Inside Routes link at the Hurg Perch.
- The ground level short route is the run-around in front of the Hurg sign from one Alley to the other.
- Either short route is a path from a player's spawn into the flanking doorways of the other team's routes for ambushes. The upper route may be more secure from observation, but it can also be more crowded and more likely have a Sentry Gun somewhere.
Controlling
- In comparison with other King of the Hill Maps where most of the team can be fighting on or right near the point for the control, on Brazil most of the team should be somewhere else than on the point.
- Most of the team should be concerned with, in turn, securing the team's Coal House, gaining control of the Hurg Perch, suppressing the enemy's Coal House, and flanking into the enemy's Alley.
- While that is being taken care of, only a minimal crew of a couple players is needed to cap the point, particularly faster classes that can get up there and back out quickly.
Class-specific strategy
 Scout
Scout
- The Control Area is the one place on this map open enough for your Strafing style.
- Monitor the success of your team in controlling the area, risking yourself on the capture only when it seems your side has the upper hand.
 Soldier
- Although your skilled Jumping can get you up onto the point faster or from a longer distance away, your Rockets aren't particularly effective at attacking or defending the point; consider helping take the battle past the point and into the enemy's buildings.
- Skirmishes on the point is very ideal. Bombing the point can do a lot of damage to enemies, creating an advantage for your team to win the right.
 Pyro
Pyro
- You can be particularly useful in protecting the corridors -- they have many narrow ambush locations.
- The importance of the team's Engineer nest in the Coal House should not be neglected, and you can be essential to its protection.
- Because of its nearness to the point and the enemy spawn, it can experience nearly continuous attack from the Dish side by Pyros, Soldiers, and Demomen and from the lower rooms up the Main Stairs by Demomen, Spies, and Scouts.
- You really have to be aware of both directions: Pop out to the Dish side to see who is coming but then turn around and Spycheck the Main Stairs.
- If when checking the Dish side you are surprised by someone close, light them up; but, then try to Air Blast them into the Dish. It is a bit of a distance, you might have to Juggle a bit.
- Until the Dispenser is up in the Coal House, that Health Kit is your best friend; when an enemy rushes this position, drop back when you have taken damage to tap the Kit or the Dispenser and countercharge the enemy.
- The Pyro has certain advantages in capturing or defending the point.
- The enemy cappers are forced onto the small platform where everyone is in range of their Flamethrowers.
- The Pyro can use compression blast to simply push or keep the enemy off of the point.
- The longer ranges that Projectiles must be fired to reach this elevated point plays to the Pyro's ability to reflect them.
- If you are going to play ambushes in the corridors, then you could equip with the Backburner; but, if you are going to play Pybro in the Coal House or play around the point, then you should use the stock Flamethrower for the Compression Blast.
- The best way to deal with ÜberCharges around the Control Area is to Air Blast them right into that big Pit.
 Demoman
- With some care, you can get your grenades and stickies up onto the point from the ground or further.
- You might prefer to attack Engineer positions in the narrow flank hallways by bouncing Grenades through windows and doorways.
- Spread your stickies widely along the back road with the hope of knocking enemies into the Dish.
- Capturing or defending the point is certainly a close fight, so you should use your melee weapons there, but there is no real room for a charge on the point.
- On the other hand, the openness of the area around the point is just about ideal for charging. Just don't miss and end up in the Dish.
- When it is time to capture or defend the point, Charging can get you out to the Control point stairs quickly and get you away from the point just as quickly.
 Heavy
Heavy
- Capping the point probably should not be your priority. The point is too exposed for you stand and hold once it is controlled and you are too slow to get on the point quickly and get off quickly.
- However, you can stay on the ground and fire on any enemy rushing in to defend or retake the point.
 Engineer
- See: Nesting.
 Medic
Medic
- There is a lot of open ground to cover to carry your ÜberCharge to the nest in the enemy Coal House without dropping it before you get there. You will need some team cooperation to build your ÜberCharge and to get it close enough to the target to do some good with it.
- Build your charge around your Coal House or your Vault Room.
- Use the Back Road or run through the Hurg Perch to get into range to use your ÜberCharge.
 Sniper
- You can camp just outside your Coal House and snipe across at the enemy coming out of their Coal House.
- The Catwalk can get you a clear shot on the point; but otherwise your field of fire is very narrow.
- The open end of the Alley can be far enough from the action and give you unexpected shots at enemy running around in the Control Area. Just remember, enemy Scouts and Spies like to run through that location.
- The Hurg Perch, with its commanding view of the Control Area, may seem an attractive place to camp, however it is a high traffic and often heavy combat location. Don't camp there unless there is a strong Engineer nest to keep the enemy away.
 Spy
Spy
- Use the enemy's Alley to sneak into their buildings.
- Cloak and Dagger: If the enemy has pushed your team out of the Control Area, the point will be out of the way for you to stand and look for victims.
- Uncloaking briefly to start a capture can pull forces from attacking your team.
