Community Coal Town strategy
| “Sun Tzu's got nothing on us!” This article is a Community strategy stub. As such, it is not complete. You can help the Team Fortress Wiki Community Strategy Project by expanding it. Notes: Expand the "General strategy" section to cover map locations in more detail. Potentially look at the class-specific strategies as well. |
| Coal Town | |
|---|---|

| |
| Basic Information | |
| Map type: | Mann vs. Machine |
| File name: | mvm_coaltown
|
| Released: | August 15, 2012 Patch (Mann vs. Machine Update) |
| Variants: | Halloween |
| Developer(s): | Valve |
| Map Info | |
| Environment: | Desert |
| Setting: | Daylight, sunny |
| Hazards: | Pitfall |
| Map Items | |
| Map Photos | |
| Map Overview | |
This article is about Community Coal Town strategy.
Note: It is recommended to read the main Coal Town article first to become familiar with the names of key map locations used in this article.
General strategy
- The most intense combat will take place out in the open, in front of the robots' spawn area. As such, close combat classes tend to have a hard time here without strong team support. They are still important for collecting credits, though.
- There are many good places for Sentry Guns in Coal Town, so they (Sentry Guns) and their Engineers must be protected. If any Sentry Busters get the best of them, your team’s ability to defend will quickly be cut short.
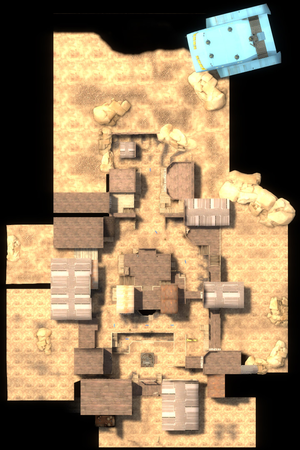
- There are two hazard areas on the map. One is on the left of the center building (relative to the players' spawn point) and one is behind the center building.
- Knocking enemies will into these areas automatically collects the cash upon their death.
- Knocking the bomb carrier into one of them will reset the bomb.
- The central building's roof makes a great sniping position, especially if you invest in piercing shots. Just watch out for Spies, as you’ll usually be the first target they come across.
- The building closest to the robot's entry point can be a good way to ambush robots from behind. Hide behind the wooden shields on the roof, and jump at the robots as they pass your hiding spot.
- Do be aware that some support robots and giants spawn behind this building. Watch your back and abandon the area if a wave of robots spawns behind you.
- CPU Slaughter and Cataclysm contain Sniper Robots who equip the Sydney Sleeper, which can be very problematic if not taken care of quickly.
- It should be noted that Sniper Robots are capable of trapping the players in their own spawn if they camp on the center building overlooking the bomb site, making them a high-priority target.
Class-specific strategy
 Scout
Scout
- The open terrain of this map generally suits a Scout, because he can make the most of his dodging ability.
- Because many classes will set up a kill zone just outside the robots' spawn point, many of the piles of cash can be found along the first incline. However, Coal Town (especially on the Advanced difficulty) sends tough robots that are lethal up close. It would be wise to invest in some resistances to keep you alive as you collect the cash.
- Take note of where the Tank gets destroyed. If it is by one of the holes and cash appears to be missing, it may have fallen in. The only way to get it is for a Scout to fall down the hole to retrieve it. Other classes can do this too if the Scout is not aware or around, but because of the Scout's increased credit radius and instant respawn times, he is the most qualified to go after the cash that falls down the hole.
- Another solution to prevent this is to have the Scout stand on top of the Tank as it passes the center building. When the Tank is about to die, the Scout double jumps straight up, pulling a majority of the cash to him just as it spawns from the destroyed Tank.
 Soldier
- The buildings on either side of the robot spawn area are good places to get a high ground advantage. There are also large ammo boxes on each building to keep soldiers fully stocked with ammo.
- The Beggar's Bazooka excels here, especially when upgraded. It will allow you to launch a volley of rockets on robot mobs, killing weaker targets and softening up giants for your teammates. Critical hits canteens while fully loading the Beggar's Bazooka to do massive damage to tanks and giant robots.
- The building directly opposite of the robots' spawn is also an excellent location to fire rockets from, although you'll become an easy target for enemy Robot Soldiers and Robot Snipers.
- Another good bazooka for this map is the Direct Hit. This functions similarly to a Sniper Rifle, just with a slower speed of projectile and an explosive factor. Fire one rocket into the crowd of robots and expect to receive a guaranteed kill.
- Here, team oriented weapons such as the Concherer and the Buff Banner helps your team out when you are fighting against a tank or large robot. The Buff Banner in particular is not hard to activate through firepower and will grant your teammates mini-crits, brilliant when fighting the tank.
 Pyro
Pyro
- The open space can prove difficult for a Pyro unless a player buys certain upgrades. Purchasing an upgrade to gain health upon a kill will greatly improve your survivability.
- If it’s too difficult to get close, use one of your Flare Guns to rack up some damage and soften up the horde. The Detonator and Scorch Shot are very effective due to their explosive flares.
- In contrast, using the Shotgun with penetrating rounds allows you to hit multiple targets from further ranges. It can be viable to soften targets this way, wait around a corner, and attack.
- The compression blast is an essential for Mann vs Machine as it is able to push bomb carriers back and can prove to be the table-turner if used correctly. It proves to work extremely well in Coal Town by pushing bomb carriers into holes, resetting the bomb. Investing in ammo capacity and airblast force can make a very big difference.
- Using one of the previously mentioned holes, airblasting a Robot into the pit will automatically reset the bomb. Don't worry about credits, any robots that die from the pit will automatically add to the credit count.
- Because of this map's wide open areas, especially at the start, Pyros can push the bomb back great distances, buying their teammates time to set up.
- Due to the wide open areas and combination of Soldiers and Demomen, Pyros can use well timed airblasts to send a barrage of rockets back to their senders, inflicting massive damage. It would be wise to invest in Explosive Resistance before attempting, as you will no doubt take some damage if too many robots fire upon you at once.
- As a reverse of the above tactic, using the Backburner to ambush the robots (either by teleporting behind them or by hiding behind one of the buildings, such as the one immediately to the left of the robot drop-down area when facing the Tank shaft) can be effective, if the rest of the team can draw the robots' fire. This is a high-risk strategy, however, as timing it wrong often means certain death.
 Demoman
- Your Stickybomb Launcher generally fares better than the Grenade Launcher in the wide-open spaces. The latter still proves very useful against Giant robots and Tanks, though.
- The Scottish Resistance fares even better, allowing you to set up multiple traps along the first choke point, weakening if not killing a wave of robots easily.
- Detonate the stickybombs to take out Robot Medics before they can deploy an Über on its patient. This is very useful for instantly killing Robot Medics in the final wave.
- The left stairwell on the starting stretch of the map makes for a perfect place to set up and maintain a Sticky Trap, running the width of the road. This is very useful for stalling the bomb as well as taking out Medics and heavily damaging giant Soldiers and Heavies.
- Demoknights can very easily rack up kills against weaker robots. However, Coal Town's open areas can make it difficult for Demoknights to flee from a fight. Investing in Bullet Resistance and Health on Kill can increase a Demoknight's chance of survival should a situation become too much to handle.
- A viable strategy for dealing damage without the risks from getting too close is to stand at the top of the hill and rolling grenades down to the bottom, large amounts robots will be hit by the splash damage. Continuosly spam grenades down the path way at the salt rock roof as the robot's spawnpoint are in front of there and you can easily duck behind the sign evade any incoming projecties and bullets, you are bound to hit something when the robots come.
- There is a large health kit and ammo box so you wont run out of ammo and health quickly, if hurt, replenish it before another critical bullet or projectiles hit you. Any little health matters!
 Heavy
Heavy
- If you can coordinate with an Engineer to have access to his Dispenser, the wide open areas will allow the heavy to simply fire his Minigun at closer targets without having to worry about running out of ammo.
- Effective areas to place the Dispenser would be at the top of the hill behind one of the fence wall areas, which will protect the Dispenser from ranged attacks by the robotic horde.
- Ask the Engineer to spend credits in the Dispenser range to give you the ability to strafe while firing in the event of Soldiers or Snipers.
- Heavies should invest in Minigun Penetration and Rage. The Rage will build quickly against hordes due to the Penetration, allowing you to push back Giants from a safe distance.
- Heavies standing at the top of the hill facing the robots spawn should take advantage of the two walls for cover, standing in the middle of them leaves you very exposed to not only Sniper fire but also large amounts of robots all attacking at once.
- As with all Mann vs Machine maps, the Brass Beast is perhaps the best weapon of choice for a Heavy. Its overwhelming firepower will easily stop a wave of Scouts or cause massive damage to tanks, and if combined with the 'Increased Ammo' upgrade is devastating. With the Bullet Penetration upgrade, the weapon can destroy multiple targets at once.
- Deflecting projectiles is a good option when a wave is full of Soldier Robots or Demoman Robots. You can protect your teammates and you when the Medic doesn't have enough cash to purchase the projectile shield/ the shield is recharging. (Note: firing speed/more accurate shots are preferred with the upgrade as it takes 5-10 bullets to deflect 1 projectile)
- Seldomly you will use your melee so upgrading it is pretty unreasonable.
- Also, wasting money on secondary is also pointless and the secondary you most likely to be using is the Sandvich , which won't make much of a difference if you upgraded.
 Engineer
- There are many good places for Sentry Guns in Coal Town. The building to the right of the robots' spawn (from players' perspective) fares well in most cases. A tried and true strategy is getting the mini-sentry upgrade, then setting yourself up in the little passage between the robot-spawn wall and the building to the left (player’s perspective, named "Judgement Shed"). It is safer since robots rarely head back. The Mini-sentry can create damages to almost every robot passing by. Set up everything, get a Pyro to come with you, and the Engineer gets half the kills. One problem, though, is the sentry busters. Pick up your main sentry if one is alerted, and move to the pre-suggested roof. You will get protection from the house while you are building the sentry in a wave of attack.
- The Wrangler is exceptionally powerful in this level. Place a Sentry Gun on the building directly opposite the robot spawn, and you can deal a lot of damage from a safe distance. Few things can match the sheer power of a Wrangled Sentry at that distance.
- A well-placed Sentry Gun on the building opposite of the robots' spawn can completely negate Soldier robot rockets. Because Soldier robots tend to shoot at the feet of their target and the building can cover the sole of your Sentry Gun - its "feet" - they will only shoot the wall, while your Sentry Gun can damage them continuously.
- Always note the path that the robots are taking as placing a Sentry Gun near those lanes can be extremely effective, even if the Sentry Gun is not Wrangled.
- There are several Large Ammo Boxes all around the level, including the previously mentioned Sentry Gun areas. This allows you to build your Dispenser closer to your teammates since metal will not be an issue.
- When setting up to defend the Hatch, there are several alcoves that that are perfect for hiding a Sentry Gun. Each alcove has a Large Ammo Box and Large Health Kit with a clean view of the hatch. Set up here if the Robots push towards the hatch.
- Sentry Busters can be dealt with very easily on this map without having to bait or trick the Sentry Buster, especially when placed on the center building. Since the Sentry Buster must run straight towards the Sentry Gun though the long path from the robot's spawn point, it is likely to be caught in the crossfire of your teammates and can be destroyed before it has a chance to get to the Sentry Gun. Coordinate with your teammates to slow it down in some way to keep your Sentry Gun alive and working against the rest of the horde.
- To avoid the blast from a Sentry Buster you should run off with your sentry as it begins to self-destruct. Some of your other buildings may be destroyed, but your attack power is still online.
- You can still save your other buildings if you have your sentry while holding closer to the sentry buster soon as it self destruct. Run away with the sentry to save the other buildings and your Sentry Gun
- If you use a Wrangled Sentry Gun on the building at the end of the shooting alley you will be able to shoot at everything coming down the alley. Use the rockets and machine guns to seriously damage the enemy robots from afar.
 Medic
Medic
- Medics with a Kritzkrieg are best to pair with Heavies with penetration enabled or Demoman or Soldiers with large clips. Heavies will penetrate multiple targets at maximum damage without worrying about fall off, and the Projectile based classes will be able to deal splash damage to multiple targets easily. Use upgrades to increase Übercharge duration and charge rate.
- Medics on this stage can be very effective with the right brand of Medi Gun. To make the most of this Über Buddy, it is best you coordinate your Medi Gun choice and upgrades with his by either complementing his weaknesses or furthering his abilities.
- Medic can buy Share power ups on their Medi Gun to then power up the person they are healing with that power. When using this, buy Critical hit canteens to then deal more damage on tanks and giant robots.
- Projectile Shield is recommended. Having at least 1 point of it before a wave with many Soldier Robots and Demoman Robots can save plenty of credits and time for destroying robots.
 Sniper
- The open look over the robot spawn and player spawn are very effective for Snipers. Be wary of Snipers and Spies when their alerts appear.
- Because there are several choke points in this map, it's best to invest in the Explosive Headshot upgrade to soften up multiple targets.
- It might also be wise to get Jarate upgrades or use the Sydney Sleeper with penetration to soften multiple targets.
- Snipers should upgrade Explosive Headshots to destroy a large amount of robots at once. This will also do a large amount to damage on giant robots depending on how much your Sniper Rifle is charged.
 Spy
Spy
- The left and right forks leading from the robot spawn make good choke points if you need to sap a group of robots and backstab them all by yourself because your teammates are otherwise occupied.
- Snipers will tend to spawn from the alleys to the left and right of the main robot spawn ledge; watch for them and eliminate them as quickly as possible.
- The stairs leading to the rooftops on either side of the starting robot path are excellent escape routes if you need breathing room to redisguise and your Cloak watch isn’t charged. The center rooftop complex between the starting street and the bomb site is good too, but support robots will sometimes use that area so be careful.
- If there are Razorback Snipers on the map, that can be a problem. It's better to pick them off with an Ambassador headshot.

