Community Erebus strategy
| “Sun Tzu's got nothing on us!” This article is a Community strategy stub. As such, it is not complete. You can help the Team Fortress Wiki Community Strategy Project by expanding it. |
| Community Erebus strategy | |
|---|---|

| |
| Basic Information | |
| Developer(s): | {{{map-developer}}} |
| Map Info | |
| Environment: | Halloween |
| Setting: | Night |
| Hazards: | Pumpkin bombs, Pitfalls, Skeletons |
| Map Photos | |
| Map Stamp | |
| [[File:Item icon Map Stamp - Template:Dictionary/common strings/map name community erebus strategy.png|170px|link=Map Stamp]] | |
| Supporters Leaderboard | |
This article is about Community Erebus strategy.
Note: It is recommended to read the main Erebus article first to become familiar with the names of key map locations used in this article.
Contents
General strategy
See also: Community Attack/Defend strategy
See also: Community Skeletons strategy
This Halloween map features pumpkin bombs and Halloween pumpkins; see Community Halloween maps strategy.
Offense
Stage 1
Checkpoint A
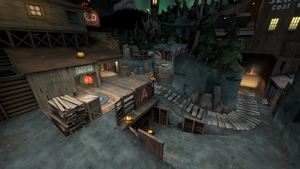
- The best way to immediately take over the checkpoint A would be to attack from two directions. One attack should be launched from the Lower Area, while the other should come from the Tree Stumps, thus completely enveloping the Lumber Yard.
Checkpoint B
- Once the previous point is captured, a portal to an underworld will open up. Due to relatively short distances between the two checkpoints, taking this portal is recommended, as the effects granted by escaping the Underworld can be used when assaulting checkpoint B.
- If breaking through the Sawmill proves to be too difficult, then making use of one of the two flank routes, those being the Mines, is advised for.
- Control point B has a very short cap time. Because of this, it might be more beneficial to simply avoid all the enemies and go straight for the point.
Stage 2
Checkpoint A
- The best way to approach the checkpoint A would from the Cliffs. The Ravine, on the other hand, places the attacking team at a height disadvantage, something which should be avoided.
Checkpoint B
- This particular section of the map offers multiple ways to reach the Point B. Those who want to harass the defenders from a far can do so from within the Sniper's Deck, while anyone preferring a flank orientated playstyle will surely make use of the appropriately named Left Flank.
Stage 3
Checkpoint A
- The fastest route to the Elevation would be via the Building 237.
- However, this doesn't mean that every single Blu member should pill up in the aforementioned Building. Certain classes can also make use of the Yard, through which can can discretely sneak up to the first point.
Checkpoint B
Defense
Stage 1
Checkpoint A
- Majority of the attackers are going to pour out of the Right spawn exit and into the Lower Area, so make sure to primarily concentrate on that. However, the Red team should also not forget about the Tree Stumps, which could be easily exploited by any flankers.
Checkpoint B
- Sawmill's tight corridors and hallways make it an excellent holding place for stopping the Blu's advance.
- At least one person needs to be on the point at all times, due to the control point's B very fast capture rate.
Stage 2
Checkpoint A
- Try to establish control of the Cave, as it can be used to pull of ambush attacks and deny the attackers an important shortcut.
- Red teammates should also focus on defending the Cliff, since without it, they are at a high ground disadvantage.
Checkpoint B
- Rather the clumping up inside the cramped Church and allowing themselves to be slowly grinded down, the defenders should instead spread out and cover every possible route, thus establishing a "buffer zone" in front of the control point
Stage 3
Checkpoint A
Checkpoint B
- It is important to prevent the Computer Room from falling into Blu hands, as it the most direct route to the final checkpoint and offers significant High ground advantage.
