 | Articolo unavailable in your language
This page is not currently available in your language. As a result, the English version is being displayed instead.
Are you fluent in English and Italian? Help us translate (Inglese)!
|
| “Sun Tzu's got nothing on us!” This article is a Community strategy stub. As such, it is not complete. You can help the Team Fortress Wiki Community Strategy Project by expanding it. Notes: Expand the "General strategy" section to cover map locations in more detail. Expand the mostly-empty class-specific strategies as well. |
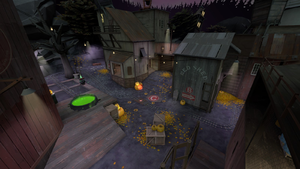
| Gravestone | |
|---|---|

| |
| Informazioni di Base | |
| Tipo di mappa: | Carrello |
| Nome del file: | pl_rumble_event
|
| Rilasciato: | Patch del 19 ottobre 2018 (Scream Fortress 2018) |
| Sviluppatore/i: | Tomi "ICS" Uurainen Riley "Sheltr" Aanestad Michał "AsG_Alligator" Byczko Zach "Exactol" Matuson Liam "Diva Dan" Moffitt |
| Informazioni mappa | |
| Ambientazione: | Halloween |
| Scenario: | Nighttime, overcast |
| Pericoli: | Bubbling Cauldron, Saw blades, Pumpkin bombs, Ghosts, Skeletons, MONOCULUS, Pitfall, Horseless Headless Horsemann, Visual effects only: Steam, Shake |
| Hazards (Underworld): | Health drain (Island and Graveyard), Stygian waters, Merasmus (Bumper Car Race), Skeletons (Bumper Car Race) |
| Acqua profonda: | No |
| Bot support: | Sì |
| Oggetti della mappa | |
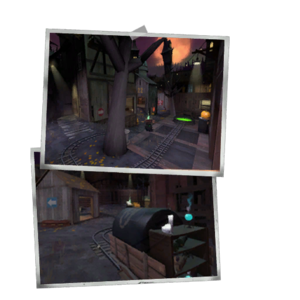
| Foto della mappa | |
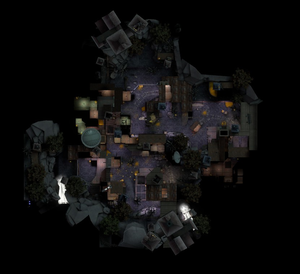
| Vista dall'alto | |
This article is about Community Gravestone strategy.
Note: It is recommended to read the main Gravestone article first to become familiar with the names of key map locations used in this article.
General strategy
Vedi anche: Community Payload strategy
Vedi anche: Community Skeletons strategy
This Halloween map features pumpkin bombs, Halloween pumpkins, magic spells, and the Ghosts; see Community Halloween maps strategy.
- General Community Payload strategy applies, but with the added complication of scheduled monster spawns.
- As disruptive as they can be, the infrequent monster spawns are generally a neutral factor.
- Attack only those Skeletons that chase your team; waste no fire on any other monster.
- There are only Rare Magic Spells are available only through the Island and Graveyard Underworlds; know where they are and when they unlock.
- The Underworld Island rare spell respawns in just 10 seconds, easily more than 10 times during a Witching Hour.
- There are 5 rare spells in the Graveyard when MONOCULUS dies. If looks like other team is about to defeat MONOCULUS, attack those enemies close to the portal that is about to open and get the spells yourself.
Class-specific strategy
 Esploratore
Offense
- Make use of the Scout's mobility on the Tick Tock Cloak Hill, which is entirely open.
- You can jump onto the Shack from Blu's middle spawn exit, stealing High ground advantage from enemy Soldiers.
- The Jim Jam is excellent for flanking around Red's Sentry Gun positions on the first checkpoint.
- Flanking through the Kitchen is not recommended, as its one-way gate can easily trap you in an unfavourable position.
- The close-quarters nature of Binski logging increases the effectiveness of your Scattergun, but also limits your maneuverability.
- Area surrounding the final checkpoint is usually filled with Sentry Guns and other defensive entrenchments. So tread carefully!
- However, defenders can be lured away from their positions and into the Backyard, where you can engage them on your terms.
Defense
- Open areas, such as the ones found on checkpoints A, C and D, are excellent grounds for the Shortstop.
- Launching Wrap Assassins and Flying Guillotines down the Loading Dock will discourage any Blu members from traversing it.
- When inside the Binski logging sawmill, you can use the Force-A-Nature's increased knockback to push approaching attackers into the Haunted Sawblades.
- Also, attackers attempting to capture checkpoint B will be forced to clump up together, leaving them vulnerable to your Mad Milk.
- There are plenty of obstacles and platforms within the Pumpking Patch, on which you can jump on and make yourself a harder target.
 Soldato
Offense
- When pushing out of spawn, your first priority should be to take over the Shack, as it offers valuable High ground advantage.
- The Loading Dock and the Red Barn often contain contain enemy Sentry Gun emplacements, which you can easily destroy from within the Jimi Jam.
- There is a platform which overviews the entire Binski Logging sawmill, thus allowing you to rain down rockets on its defenders. It can be accessed via the Loading Dock.
- As a Blu member, pushing into the Binski Logging sawmill can prove to be quite difficult, sometimes requiring the use of the Battalion's Backup for a successful push.
- Also, the Direct Hit shines really well inside the said Binski Logging, mostly due to it's close-quarters nature and sentry-busting potential.
- The area of the final checkpoint, that being the Pumpkin Patch, opens up quite a lot of Rocket Jumping potential, for both the Red and the Blu Soldiers.
Defense
- Blu Soldiers and Demomen are likely to try and capture the Shack's roof after exiting the spawn, so be ready for an incoming swarm of blast-jumping attackers.
- In this situation, the Direct Hit's ability to Mini-Crit airborne players can come in handy.
- In the case that you have been pushed back from the Shack, you can still occupy the building adjacent to the Jimi Jam and continue bombarding the Cart from there.
- On the final checkpoint, carefully patrolling the Alleys, as wells as spamming down the Binski Logging sawmill, should be your main priority.
 Piro
Piro
- Your relative stamina and speed gives you a little time to linger in the Underworld Island and Air Blast enemy into the Deadly Waters, if you get there first.
- Having the Overheal Spell definitely gives you more time to ambush here.
- Be sure to cut and run with a rare spell before you die and give up the buff and the Respawn delay.
Offense
- The Jimi Jam flank offers an alternative route around the Red Sentry Guns.
- You can quickly reach the Log inside the Binski Logging Sawmill with the use of the Detonator.
- The Alleys on checkpoint D allow you to sneakily move around without getting noticed by hostile Sentry Guns.
Defense
- A perfectly timed Phlogistinator charge on checkpoint B can melt apart the entire enemy team.
- Bonus points if you are ÜberCharged during your rampage.
 Demolitore
Offense
- Charging up your stickies allows them to be launched further away, an useful trait in the long, open areas of checkpoint A.
- This openness also allows the Sticky Jumper to shine, even if it does no damage.
- Make use of your Projectiles' arches in order to destroy the Red defenses hiding in front of the Red Barn.
- The Loch-n-Load's increased damage and projectile speed will come in particularly handy inside the tight spaces of the Binski Logging Sawmill.
- Unless an allied Medic ÜberCharges you, there is not much you can do to destroy the Sentry Guns within the Pumpkin patch. Other then to chip away at them from the Alleys.
Defense
- Just like with your Blu counterpart, charged up Stickies perform excellently on the first checkpoint. Especially the ones fired by the Quickiebomb Launcher.
- The Binski Logging Sawmill only has three entry ways dedicated to the Blu team, two of which lead to a similar place. Due to this, the Scottish Resistance can truly shine here.
- A Demoknight orientated Demoman is best utilized in the small corridors of the Alleys.
- The final part of the map offers an excellent environment for the Base Jumper, since it is very open without containing good Sniper spots for the Blu team.
 Grosso
- Your Health and Lunchbox Items give you extended persistence in the Underworld Island.
- Your Second Banana recharges and heals you faster than the Underworld Health Drain.
- You can use this time to farm for the best rare spells or you can just keep picking them up to deny them from the enemy.
- You can shoot the enemy, denying them both the Rare Spell and a Respawn time, saving the rare spell respawns for yourself or your teammates.
- About 90 seconds after the portals open, the Underworld Island kills everyone there, so don't stay there that long -- get out before it kills you and you lose the buff and Respawn time.
Offense
- The Tomislav's increased accuracy comes in handy when pushing up the Tick Tock Cloak hill.
- You can use the Gloves of Running Urgently for the purposes of quickly reaching the Jimi Jam flank, assuming you prefer such a sneaky playstyle.
- Do note however that attempting this will make you vulnerable to Snipers for quite some time.
- When attacking the Binski Logging Sawmill, you should preferably approach it from the Loading Dock, as this will surprise the defenders and give you an upper hand.
- Make use of the numerous boxes and pumpkins found within the Pumpkin patch in order to shield yourself from Red Snipers.
Defense
- On the first checkpoint, it is recommended that you position yourself further back than usual, so that you do not end up attracting the attention from Blu Snipers.
- The Loading Dock offers an excellent ambush position, in which you can patiently wait for the incoming attackers to arrive.
- Surprisingly enough, the Huo-Long Heater is extremely powerful inside the Binski Logging Sawmill, where your "ring of fire" can easily catch out many unaware opponents.
- This is further enforced by the Log, a very good position on which you can sit, before dropping down on the Cart below.
 Ingegnere
Offense
- The first section of this map is very open, so be mindful of Snipers when Hauling your buildings.
- You can use the Wrangler to fend off any Soldiers or Demomen camping on top of the Shack, as well as for harassing enemy Snipers near the Red Barn.
- If you are stealthy enough, you might be able to flank past the Jimi Jam and set up a Sentry Gun in the Bend, thus preventing Red defenders from retreating back to Point B.
- The generally chaotic nature of the Binski Logging Sawmill makes it very unfriendly towards Engineer's buildings, so avoid pushing into it until your team has cleared it out.
- Avoid putting a Teleporter inside the Kitchen. That position is a death trap for the attackers.
- Establishing a Sentry nest in the Alleys is akin to putting a big thorn in the Red's left side, thus drastically increasing your chances of winning.
Defense
- For the first checkpoint, you should set up your Sentry nest just in front of the Red Barn, where it is safe behind cover while still being able to watch the point.
- Under the assumption that your team is doing a good job of defending, you could get away with moving up your Dispenser to an aggressive position behind the Shack.
- Inside the Binski Logging Sawmill; your Sentry Gun should ideally be placed on the Forward-Blu-spawn's overlook, where it can overview the entire structure.
- Also, it might be a good idea to bring the Rescue Ranger when defending checkpoint B, as its long-range healing capability allows you to stay outside of the chaotic Sawmill.
- There are a couple of boxes within the Pumpkin Patch on which you can plot down a Sentry Gun.
 Medico
Offense
- Be careful when exiting your spawn on the first checkpoint, since there are numerous Sniper sightlines present.
- Luckily, you should be able to avoid most of them by hiding behind the Shack.
- Due to the first point's openness, Scout, Soldiers and Snipers are the most dominant there, so make sure to prioritize healing them.
- Any Blu team will have a hard time pushing through the Binski Logging Sawmill without a proper ÜberCharge from your end.
- If you want to surprise the final point's defenders with an ÜberCharge, then making use of the Alleys is your best bet for achieving that.
Defense
- You should generally hang around the Red Barn on the first point, as it is a pretty safe position while still being effective.
- However, if your team happens to be doing well, then pushing up to the Shack is not a bad idea.
- When retreating to the second checkpoint, watch out for flankers cutting you off at the bend.
- The Amputator's area-of-effect healing ability makes it quite potent inside the Binski Logging Sawmill, where your teammates are likely to bunch up together in one spot.
- Meanwhile, the Crusader's Crossbow's long-range heals are useful in the open areas of the Pumpkin Patch.
 Cecchino
Offense
- Your first priority on checkpoint A should be to take out the opposing Red Snipers, since their presence prevents the attacking team from advancing up the Tick Tock Cloak Hill.
- Red Snipers are usually located either inside the Red Barn, or next to the Jimi Jam flank.
- After they are neutralized, you should turn your attention to enemy Soldiers commonly located on the Shed's roof.
- Red Snipers are usually located either inside the Red Barn, or next to the Jimi Jam flank.
- The Binski Logging Sawmill is an enclosed space, making it difficult to operate in it as a Sniper, especially on offense.
- You can utilize the rows of concealed Alleys in order to get a good angle on enemy Engineers fortifying the final checkpoint.
- And if things do not got according to plan, you can always seamlessly retreat into the Backyard.
Defense
- The Jimi Jam flank offers a relatively good sniping position for the first few minutes of the round, at least until enemy Scouts start rushing you down.
- A more "conventional" sniping spot can be found inside the Red Barn, which also provides a slight Height advantage to its occupants.
- You should make use of the Jarate when defending the Binski Logging Sawmill, where you will be able to splash multiple attackers at once.
- The Loading Dock on checkpoint B is essentially one long sightline, allowing you maintain a close eye on the flanks.
- However, due to its enclosed nature, it might be a wise idea to bring either the Classic or the Huntsman when positioned in it.
 Spia
Spia
Offense
- The left spawn exit, as well as the Jimi Jam flank, should be your main infiltration route on the first checkpoint.
- Jimi Jam also contains a large Ammo pack. An useful thing to keep in mind when using the stock Invis Watch.
- A cheeky strategy you can employ would be to sit in the Loading Dock, below the Shortcut, and wait for spawning defenders to practically drop "onto" your Knife.
- Of course, this tactic can only be utilized before the first point is captured and the Shortcut sealed off.
- Noise produced by the Haunted Sawblades (found inside the Sawmill) can temporarily mask your decloak and backstabs.
- Not to mention that they can quickly dispose of any opponents blindly chasing you.
- There are a couple of boxes within the Pumpkin Patch on which you can sit with the Cloak and Dagger and wait for an opportune target.
- The Backyard and the Alley are your best friends when it comes to sneaking behind the Red lines on the final checkpoint.
Defense
- There is little ammo to be found on the Tick Tock Cloak hill, other then inside the cramped and frequently-used Shack. Due to this, the L'Etranger is recommended here.
- Once checkpoint A is captured, attackers will usually use the Loading Dock and the Cart's tracks as their main route, leaving Jimi Jam flank unattended.
- Inside the Sawmill, you can outsmart any potential Blu flankers by camping besides the Kitchen.

