Community Wutville strategy
Revision as of 09:16, 15 August 2022 by GrampaSwood (talk | contribs)
| “Gotta move that gear up!” This article may contain content that is out of date. You can help improve this article by updating the content as necessary. See the wiki style guide. Notes: Incomplete |
| “Sun Tzu's got nothing on us!” This article is a Community strategy stub. As such, it is not complete. You can help the Team Fortress Wiki Community Strategy Project by expanding it. |
| Community Wutville strategy | |
|---|---|

| |
| Basic Information | |
| Developer(s): | {{{map-developer}}} |
| Map Info | |
| Environment: | Smissmas |
| Setting: | Night, Town |
| Hazards: | Pitfalls, Payload Cart explosion |
| Map Photos | |
This article is about Community Wutville strategy.
Contents
General Strategy
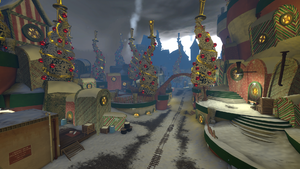
- Wutville's layout is exceptionally dominated by long corridors with long sight lines. While there are flanks, they are mostly narrow paths that parallel the main route.
- Due to this narrowness of the map, Sentry Guns and Sticky Traps are all great tools for the defending team.
- In place of wide flanks, there are several cul-de-sacs to the sides of the route, each sheltering pickups or Spawns, that are large enough for several players and nests to be hidden from the main sight lines.
- The final point lies below high ground that has plenty of Health and Ammo packs to the attacking team, should they push up the left flank ramp, securing this route can easily turn the tide.
Class-specific strategy
 Scout
Scout
 Soldier
 Pyro
Pyro
 Demoman
- The many long and straight angles available between chokes can be exploited by Demoknights.
 Heavy
Heavy
 Engineer
 Medic
Medic
 Sniper
- This map can be good for Snipers of any skill level due to the large sightlines on both Offense and Defence.
- The Hitman's Heatmaker has a quieter, suppressed firing sound. Given the large size of the map, a good Sniper can utilize the quieter sound to further mask his position from the enemy.
- Prefer taking angles from a high/overhead spot that leads to a wide open angle for you to easily snipe any wandering enemies.
 Spy
Spy
- The L'Etranger's extended cloak duration is highly recommended to traverse this large map, especially with the cloak drain penalty of the Your Eternal Reward.
- The Dead Ringer can be used to brute force through enemy lines quickly, allowing the Spy to gain an advantageous position. Be sure to decloak in a spot where it's not too far from the enemy spawn, but not close enough that the enemy can hear the loud decloak of the Dead Ringer.
- The Ambassador can help take care of the high amount of Snipers in the map when they're using the Razorback, with the added benefit that it can help with close to mid range duels.
- Due to the large size of the map, the Diamondback, provided it has crits stored, can dish out 102 damage from any range. Use this to pick off distant Snipers, forcing them to retreat or to finish off retreating enemies.
- The Big Earner's speed on kill can be beneficial to traverse the map and escape unwanted situations.
- The Your Eternal Reward can cause havoc amongst the enemy team due to how large the map is and how everyone is scattered around. It could be difficult to pinpoint who the Spy has stabbed and disguised as among the ongoing chaos.
