Community Mannworks strategy
| “Sun Tzu's got nothing on us!” This article is a Community strategy stub. As such, it is not complete. You can help the Team Fortress Wiki Community Strategy Project by expanding it. Notes: Expand the "General strategy" section to cover map locations in more detail. Potentially look at the class-specific strategies as well. |
| Mannworks | |
|---|---|

| |
| Basic Information | |
| Map type: | Mann vs. Machine |
| File name: | mvm_mannworks
|
| Released: | August 15, 2012 Patch (Mann vs. Machine Update) |
| Developer(s): | Valve |
| Map Info | |
| Environment: | Alpine |
| Setting: | Night |
| Map Items | |
| Map Photos | |
| Map overview | |
This article is about Community Mannworks strategy.
Note: It is recommended to read the main Mannworks article first to become familiar with the names of key map locations used in this article.
General strategy (All Classes)
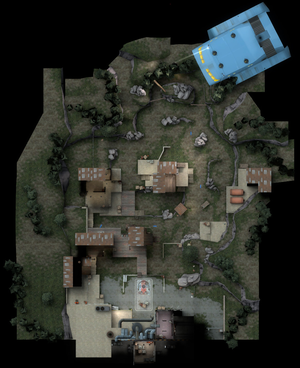
- Watch those arrows before each wave to see where the robots will go, either left or right of the frontmost building. It is costly to move defenses to the correct side if you are wrong.
- Before choosing a class, keep in mind that Steel Gauntlets spawn on this map. They have more HP than regular Heavy Robots and have a resistance to ranged weapons, so your team should have classes that can deal immense damage to make up for the resistance, a player with buffs or who can apply status effects, or hardy/quick players to melee the robots.
- The large landscape of the map allows enemy Soldiers and Demomen to shoot their weapons even at long distances. Though it may not pose a problem if the opposing group is minuscule in size, the harm it would deliver is grand when a couple of them are able to aim at a single target, commonly at a Sentry Gun or a Heavy. A way to easily counter this is for a Heavy to utilize the Deflector upgrade, and keep close to a nearby Dispenser.
- Tanks have two paths they can travel on. Whenever a tank spawns, take note which entrance the tank travels through. This will reveal which path the tank will take. Sometimes two tanks will spawn simultaneously, with one from each entrance.
Class-specific strategy
 Scout
Scout
- Focus on collecting all dropped money. The Scout should upgrade Movement Speed to collect credits more efficiently.
- Use your speed to do quick hit-and-run attacks on the Steel Gauntlets with the Fan O'War.
- Once you have Movement Speed and Jump Height upgraded, draw fire from the projectile firing bots, like the Giant Rapid Fire Demoman.
- Über Canteens should be used in order to get to money that is laying down in the front of the map.
 Soldier
- Upgrade your firing speed and reload speed to quickly destroy giant robots. This is most useful to do this on the Beggar's Bazooka or the default Rocket Launcher
- Using the Buff Banner is recommended to buff your entire team with Mini-Crits. This makes it easier to destroy Tanks and Giant Robots.
- Crit canteens should be used to destroy Tanks and Giants.
 Pyro
Pyro
- Due to the map's fairly large entry point for robots, a common strategy is to have Pyro airblast Sentry Busters into a Sentry Gun's sights, while keeping them from getting too close to the nest.
- There is a small blind spot beneath each of the cliffs that the robots spawn from. By standing in these blind spots, players who often use the Backburner can deal large amounts of damage to robots as soon as they drop off the cliffs.
- There are several points where a Pyro can airblast the bomb carrier back to a lower elevation, forcing them to walk back to the path. Using these opportunities can give your team the extra time they need to prepare defenses or eliminate high priority targets. Be sure to upgrade Airblast Force to ease the process.
- Using Über Canteens is recommended to airblast Critical hit rockets and grenades back towards robots. They can also be used by circling around the robot while firing at them.
 Demoman
- The Scottish Resistance is great for setting up multiple traps. These multiple traps are most useful on Expert Wave 3 whenever you need to destroy the Medic Robots that spawn with the Giant Heavies.
- The Loose Cannon can also be used to push robots back. If you are planning on using this, then it would be suggested to aim the shot so the robot will be pushed back into the pit that is located in the middle of the map.
- Using Crit Canteens is recommended which is needed to be able to destroy multiple tanks and robots.
- Demoknights are especially effective against Steel Gauntlets, as their sword does double the damage against them. Combined with a Crit Canteen, Steel Gauntlets can be taken out in two hits from any sword.
 Heavy
Heavy
- Due to the abundance of the Major League Scouts in the default mission on this map, and the relatively short distance most Sentry Busters travel to the standard location for Engineer nests, the Brass Beast works well as a way to assist your teammates.
- The spread of your Minigun makes things difficult here, and ammo pickups are somewhat spaced out. As such, having a Shotgun as your secondary could pay off.
- Upgrading Knockback Rage will allow you to knockback robots by clicking your set taunt key whenever your rage meter becomes full. This rage meter fills up by doing damage to robots. The fastest way to fill your rage meter is to have Critical hits on Giants or Tanks.
- Using Crit Canteens is recommended to destroy Giants and Tanks quicker.
 Engineer
- For easy missions, a Sentry Gun near the building closest to the robots' entrance on the side of the arrow-marked path can cover the entire field. Watch out for Sentry Busters though, since they will take a shorter route to reach your Sentry Gun. Another good Sentry Gun location is to the right of the bags of quicklime on the front building. The Sentry will cover most of the field and the quicklime will provide a good cover. For more advanced missions, the Sentry should be in a less aggressive spot in the proper choke point, or it will be destroyed too easily.
- If your Engineer bought the Disposable Sentry upgrade for some reason, ask him to put it at the hatch to prevent Scouts that slipped past your main defense from dropping the bomb. This will prevent it from popping Über Medics at inopportune times.
- Engineers should use Upgrade Buildings Canteens to fully rebuild or fix their Sentry Guns, Dispensers, and Teleporters all at once.
 Medic
Medic
- The Medic should always upgrade Share Canteens on his Medi Gun. If you are using the default Medi Gun, then you can buy Crit Canteens to use while you are using an ÜberCharge on a teammate. If you are using the Kritzkrieg, buy Über Canteens and do the same thing as explained with the Medi Gun.
- The Medic should always be using ÜberCharges on powerful classes such as a Heavy, Soldier, Pyro, or Demoman. This will make the powerful classes even more powerful by doing so.
- Mannworks, in particular, can favor the Kritzkrieg's ÜberCharge on a Pyro, due to small spaces. ÜberCharge accordingly to fit each situation!
 Sniper
- While the front building may seem like a good sniping spot, Robots will usually target this area first if most defenders are located there. Setup at the outcropping on the right, or the building on the left, depending on the bomb path.
- Snipers should mostly be going for headshots on Robot Medics and Giants. The Sniper should have Explosive Headshots upgraded in order to kill other robots around the robot the Sniper has headshot.
- When playing Sniper on Mannworks, Canteens will not really matter. At the most, a Sniper should get either Return Home or Ammo Refill.
 Spy
Spy
- Mannworks missions tend to have large numbers of Pyros and Razorback Snipers. In addition, the map geography is not very conducive to Spy play. Only skilled players should attempt to play Spy on this map.
- The rock formations near the robot spawn are excellent for dodging fire from Giants whose Medics you just chainstabbed.
- Evade Pyros and then run into the central house to get a Health pack if you get set on fire. Try to pop your Dead Ringer after you get out of range in order to extinguish yourself. Robots target burning Spies.
- Focus on collecting money and assassinating key targets like Giants and Medics. Don't risk your life unnecessarily. The only time that it's important for you to be stabbing large numbers of robots is when there are Steel Gauntlet Heavies.

