防守
| 此页面正在被翻译成简体中文。 如果您能熟练地运用简体中文,请在讨论页上留言或与为此页面贡献的作者讨论(通过浏览页面历史)。 |

| “ | 我必须一个人守这个点?!
点击试听 (英语)
— 医生对他无能队友的话
|
” |
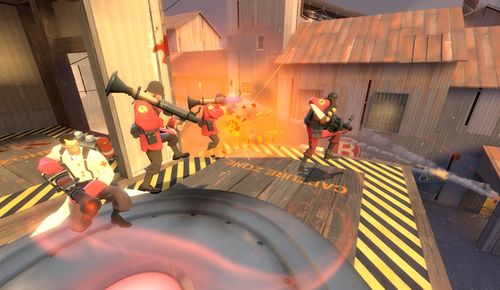
一项 防守得分,会在一名玩家以某种方式阻碍敌对玩家达成目标时获得,有多种触发的条件,详情如下:
- 击杀最后一个正在占领控制点或推战车的敌人。如果有多名敌人正在占领或推车,你必须全部击杀才能获得防守分。
- 当敌方玩家正在推车时站在战车旁。此行为也会导致战车停止前进(再次以此方式获得防守分需要等一段时间)。
- 当敌方玩家正在占领控制点时站在控制点中。此行为也会导致占领进度停止增长,但是玩家只能在占领进度大于一半时阻止才会获得防守分。
- 击杀携带情报箱的敌方玩家。
玩家可以在医生的无敌加持下阻止占领,但是无法在原子能饮料的效果下阻止占领。伪装也不会阻止占领。
目录
防守策略
防守 同时也是 《军团要塞2》中的一种策略,通常包括阻止敌人到达特定点或完成他们的目标。优秀的防守对几乎每支队伍都至关重要;如果不注重防守,一个队伍很容易失败。
以下是一些防守策略:
每个兵种的防守策略
侦察兵的防守策略可以浓缩为骚扰强力职业,然后解决掉弱小或受伤的职业。自然之力给予了侦察兵很强的的“打完跑”的能力,能够近距离秒杀基本所有职业。二段跳让侦察兵能够抵达一些其他职业不能到达的点位,让侦察兵更好的解决敌方狙击手,进而前后包抄敌方玩家,或者可以摧毁敌方的传送门入口。睡魔球棒可以用来击晕重点职业像机枪手或者士兵这种可以对你的队伍造成很大威胁的职业。此外你的高移动速度允许你抢夺敌方资源(医疗包和弹药包),简而言之就是给你自己用。
士兵是一个比较全能的职业;他在任何场景都很有用,在前线可以选择蹲点或者推进。除了机枪手外,士兵基本是敌方最不想单独面对的职业。一个士兵的存在甚至可能会逼迫敌方撤退并再寻道路。火箭跳给予士兵在侧方偷袭敌人和占领高地来获得火力优势的能力。精确打击者在防守时的用途比较有限,但是也可以用来清除敌方医生和在远处的狙击手。
火焰兵在防守中的作用主要就是帮你的工程师更好的控制这片区域。查间谍是火焰兵最擅长的,给你见到的每一个人一些火焰来降低间谍的威胁。拆迁者在移除间谍的电子工兵时很有用。火焰兵也可以用他的压缩空气来清理黏弹地雷区或者把有无敌加持的玩家吹走,前提是有一个补给器为他们提供弹药。如果敌方的间谍不多或者间谍不敢来威胁工程师,火焰兵可以不再防守工程师而是去偷袭敌方玩家,通过走比较偏的路来绕到敌方阵地后面然后大杀四方,没有被你干掉的玩家也会不断因为烧伤而变得更脆弱。你甚至有可能会让敌方医生提早使用他的无敌,让敌方无法组织强而有力的攻击。火焰兵也可以通过点燃敌方玩家来让他变得更显眼,让你的队友及时发现他的存在,同时也会让敌方玩家慌张,逼迫他们撤退。 Also, enemies on fire are far more likely to retreat and heal rather than to continue a push, especially without nearby Medics.
Very obvious choice, his stickies work well on Control Points and in narrow hallways. Stickybomb traps can also be used to kill unaware attackers as they rush towards their objective. His Scottish Resistance works particularly well in this role, as the addition of six more stickies active as well as the ability to set multiple bomb traps allows for near-complete defense of an area. Demomen are also good at destroying forward bases with his grenades from around corners or through windows.
Makes a great "Anvil" for a defense as the enemy team attempts a rush. The Heavy works best with a Medic or Dispenser keeping his health high and ammo full. Natascha is particularly useful if the opposing team is using fast-moving classes like Scouts and Pyros to try and rush past the other defenses. The Heavy's slow speed renders attempts at flanking a hit-or-miss idea, as he can easily be killed while attempting to maneuver into position. However, the Heavy does not always have to expose his position; the Tomislav allows him to hide around corners with his weapon silently primed, ready to ambush anyone who crosses his path.
The bread of a defender's Sandvich, the Engineer (and his Sentry Gun) is usually the one to hold off wave after waves of opponents, but only if his team protects him from certain attacks. A well-timed ÜberCharge can easily destroy your sentry nest without a Pyro using compression blasts to knock it away or explosive classes to separate the Medic. Spies are always a danger to the lone Engineer, but they are easily countered by keen observation and a good Spy-checker. If you have multiple Engineers it's recommended to build you Sentry Guns in different locations so that not both can be taken down that easily by a spamming demo or Soldier.
Both a Medic & Patient combo and a "Combat Medic" are good choices for a Defense. A Kritzkrieg may also be more valuable for a defense role than the Medi Gun. While an ÜberCharge will put a temporary stop to an enemy offensive, wise opponents will retreat from the ÜberCharged team to regroup. A well-placed ambush Kritzkrieg, however, will quickly destroy the majority of an assault. ÜberCharges are still very useful, however, in countering opposing ÜberCharges and in destroying the attackers' forward bases.
A Sniper's role on defense is obvious: sniping. If you see an enemy force heading towards your base, try and get as many headshots as possible, diminishing the amount of support the enemy team has in their attack. Consider switching from the Sniper Rifle to the Huntsman if there is limited cover and the map focuses on close quarters. Jarate is very effective on defense, as the attackers frequently move as a team. A well-placed throw can allow your team to quickly destroy what may have been a successful push. When sniping, Medics are of the highest priority, especially those with ÜberCharges ready. A single headshot to an enemy Medic can sometimes mean the difference between success and failure. Heavies are a devastating offensive force, but your rifle can lay them to waste.
While the Spy is made for support, he does well on defense. Sneaking behind an attacking mob of enemies and backstabbing key targets such as Medics and Heavies can sometimes save your team. Like the Sniper, backstabbing Medics close to an ÜberCharge can cripple an opposing team's offense. Heavies and Soldiers are also good front-liners, and both of them, due to their slow walking speed, will fall easily to a backstab from your knife. Stabbing Demomen while they are focused on destroying Sentry Guns can also be an effective way to save your Engineers and their buildings. In addition, Spies are well equipped to destroy the offensive team's Teleporters, slowing their reinforcements.
General Defense
- Watch every entrance. There's almost always a way into your base that your team isn't going to watch, making it easy for Spies and Pyro/Medics to get in and tear your team to bits. Keeping an equal defense at every area is the key to success.
- Every map has points at which open spaces narrow down into passages. These 'choke-points' can be camped to effectively shut the enemy team out.
- Ambushing is another good Defense tactic. Crouching next to a doorway or behind a corner on the way to an Objective is an effective way to take down classes with more firepower than you. For example, a Heavy caught by surprise is almost invariably doomed.
- Flanking also works just as well on defense as on offense. While the enemy team pushes against the team's defense, a small strike-force can come around behind them and cripple, or even kill, the entire offensive push.
- On "Push" five control point maps such as Badlands and Granary, the best defense is often a good offense. "Suiciding" key players such as Medics, Soldiers, and Demomen is a very effective strategy to delay if not prevent an offensive push altogether. Suiciding involves getting in close to the opponent and killing key players even if your own death is inevitable. This is usually performed by a Scout, Spy, or Pyro. This may seem reckless, but if you remove enough of the core opposition before they can attack, they will often abort an attack and give your team to regroup also.
- Having more team members than your enemy is always useful in a defensive situation. If you huddle together, however, players such as the Soldier and Demoman will find it easier to break through your defense, so spread out.
- A Spy behind enemy lines can devastate even the most unbreakable defenses. Regular Spy checks will ensure that you don't get backstabbed while trying to defend.
- Keep moving. Standing still makes it easier for the offensive force to hit you, especially Snipers.
- If the offensive team's Medics manage to trigger an Übercharge on players such as Heavies, Soldiers, Pyros, or Demomen, your defense will be annihilated. The enemy Medics also keep the offensive team healed and therefore able to fight for longer. To prevent these from happening, target enemy Medics right away.
Related achievements
 侦察兵
侦察兵
| 阻断达人 阻止敌人占领控制点 50 次。 |
 士兵
士兵
| 汉堡山 守住控制点 30 次。 |
 爆破手
爆破手
| 负隅顽抗 杀死 25 名防守控制点或战车的玩家。 |
 机枪手
机枪手
|
|
 医生
医生
| 预防药物 使用 ÜberCharge 帮助队友阻止敌人占领控制点。 |


