Difference between revisions of "Community Projectile Shield strategy"
(Category:Projectile Shield and some Invuln specific) |
(→Other classes: learning from MCandRBfan) |
||
| Line 42: | Line 42: | ||
== Other classes == | == Other classes == | ||
| − | * Understand what your Medic needs to build Energy | + | * Understand what your Medic needs to build Energy; keep a practical safe distance while building, but close to striking range for the activation. |
| + | |||
* With a good Projectile Shield Medic, the Heavy's position is in the direct path of the Robots; pick a place to stand where you would not be overrun before the charge runs out. | * With a good Projectile Shield Medic, the Heavy's position is in the direct path of the Robots; pick a place to stand where you would not be overrun before the charge runs out. | ||
| + | |||
| + | * Soldier's splash damage hitting multiple robots recharges the Projectile Shield ''much'' faster than any direct rocket hit on a single robot. | ||
| + | |||
* Understand what you need to do for both you and the Medic to survive the expiration. | * Understand what you need to do for both you and the Medic to survive the expiration. | ||
** Watch out for the expiration, be in reach of cover. | ** Watch out for the expiration, be in reach of cover. | ||
Revision as of 22:15, 30 December 2019
| “Sun Tzu's got nothing on us!” This article is a Community strategy stub. As such, it is not complete. You can help the Team Fortress Wiki Community Strategy Project by expanding it. |
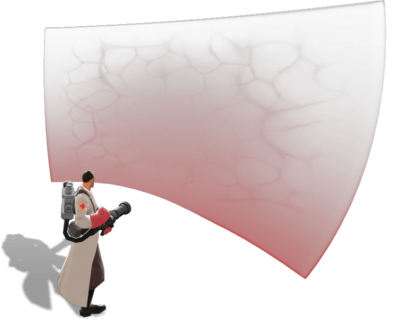
This article is about Community Projectile Shield strategy.
Medic
- Be wary of your surroundings, especially when in a defensive posture against Soldier and Demo Robots.
- Rockets hitting walls and props behind you or your sides can splash you.
- Grenades can bounce back towards you.
- Splashes from explosions cannot be blocked on non-flat surfaces.
- Flames will pass through the shield, including Dragon's Fury's fireballs.
- Doorways can be effective places to defend with the Projectile Shield, since you can both block Robots getting past you and be safer from splash damage.
- Blocking critical-boosted Robots, most notably Soldier or Demoman Robots, especially spamming giants, is essential to your team's survival.
- Pay attention to when these spawn and have a Projectile Shield ready, you may need more than one charge to take down the really big ones.
- If caught without a charge, hold back as those Robots advance while you find a teammate in a safe location, possibly run back towards Spawn, especially if you know your Pockets are coming from there.
- The Projectile Shield can be used as a fall-back option if your team cannot handle the robots, or if most of your team is down, use it to save your ÜberCharge.
- Or use your Invuln ÜberCharge to save your Energy charge, often your well-timed Projectile Shield can contribute much more than an ÜberCharge.
- Any damage your patient deals, and any damage they take, will all contribute to making the Projectile Shield recharge faster.
- Be wary of temptations to charge Robots just to kill them with your Projectile Shield, you risk being too far forward without support and often flanked when the charge is exhausted.
- Lighting up a Vaccinator resistance when you charge Robots with the Projectile Shield can protect you and your Pocket if they can fire through.
- Reviving dead teammates's reanimators will not help you gain Projectile Shield charge. Heal others to refill your charge if you need to.
- However, using the Vaccinator's shield bubbles on a dead teammate's reanimator will fill a huge amount of charge for your Projectile Shield. Reviving classes with higher health will almost fully refill your Projectile Shield immediately instead.
- The Projectile Shield moves closer to you if you look up or look down. You can exploit this to bodyblock giant robots without any threat of them firing back.
- Medic Robots cannot heal their patient if the human Projectile Shield is between them: this may be useful to temporarily make their patient lose the Übercharge's effects.
- This also affects other Medics on your own team.
- Since the Projectile Shield charges based on healing, the Quick-Fix will help you in charging the Projectile Shield quicker.
- Using the Quick-Fix's Megaheal will refill your Projectile Shield's charge quickly.
- Because teammates play nearer to you as a Projectile Shield Medic, practice Überring two or three teammates simultaneously.
- Effectiveness of the Kritzkrieg charge is enhanced by Crit-boosted teammates shooting from safety behind the Projectile Shield.
- The Medi Gun's Invuln ÜberCharge is usually redundant behind the Projectile Shield, pop it before or after you use your Projectile Shield.
- After the Pybro, the Projectile Shield is your best Spy checker.
Other classes
- Understand what your Medic needs to build Energy; keep a practical safe distance while building, but close to striking range for the activation.
- With a good Projectile Shield Medic, the Heavy's position is in the direct path of the Robots; pick a place to stand where you would not be overrun before the charge runs out.
- Soldier's splash damage hitting multiple robots recharges the Projectile Shield much faster than any direct rocket hit on a single robot.
- Understand what you need to do for both you and the Medic to survive the expiration.
- Watch out for the expiration, be in reach of cover.
- If a Medic is attempting to revive you and is using a Vaccinator, consider letting him revive you before you decline a revive, as he could be wanting to use an Übercharge on you in order to recharge his Projectile Shield.
| ||||||||||||||||||||||||||||||||||||
