Bezkonny Bezgłowy Jeździec
| Ta strona jest w trakcie tłumaczenia na język polski. Jeśli mówisz po polsku, napisz na stronie dyskusji lub porozmawiaj z użytkownikami, którzy wnieśli wkład do strony (sprawdź jej historię). |
| Bezkonny Bezgłowy Jeździec | |
|---|---|

| |
| Podstawowe informacje | |
| Ikona: | Brak |
| Typ: | NPC |
| Zdrowie: | 3000+ |
| Szybkość: | 133% |
| „ | To jest mój świat! Nie jesteś mile widziany w moim świecie!
Kliknij, by odtworzyć
— Żołnierz o nieumarłych bezkonnych jeźdźcach
|
” |
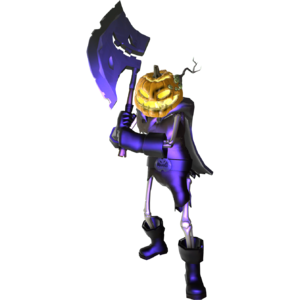
Bezkonny Bezgłowy Jeździec jest neutralnym przeciwnikiem (nazywanym "pierwszym bossem w Team Fortress" na stronie aktualizacji) pojawiającym się w Mann Manor i wydanym wraz z aktualizacją Scream Fortress. Jako nie całkiem martwa forma Sylasa Manna, postać ta pojawia się na aktualnie zajmowanym punkcie kontrolnym po zdefiniowanym z góry czasie i będzie zabijał najbliższych i losowych graczy z obu drużyn, aż zostanie pokonany. Ilość obrażeń, jakie zadaje Bezkonny Bezgłowy Jeździec, jest równa podwójnej liczbie aktualnego zdrowia atakowanego celu.
Gracz przebywający zbyt blisko Jeźdźca w chwili, gdy kogoś zabija, zostanie oznaczony jako "On", stając się dzięki temu głównym celem. Aktualny "On" jest oznaczony symbolem czaszki i skrzyżowanych kości (taki sam symbol, jak ten używany przez G.R.U.). Osoba oznaczona "Nim" może przekazać swój status poprzez zaatakowania gracza z przeciwnej drużyny bronią do walki wręcz lub przemieszczając się w pobliże punktu odradzania się RED lub BLU. Po 30 sekundach Jeździec zaprzestanie pogoni "Jego", po czym wybierze pierwszego gracza w swoim zasięgu jako nowego "Go".
Jeśli nikt nie jest "Nim", może on wykonać drwinę "Boo". Kuca on wtedy i prostuje ramiona, wydając głośne "BOO!" i przestraszając każdego w zasięgu 500 jednostek. Jest to efekt podobny do efektu Ducha i także zapewnia odblokowanie osiągnięcia Wystraszony na śmierć. Noszenie Głowy Bezkonnego Bezgłowego Jeźdźca lub Maski Saxtona Hale'a zapewnia odporność na efekty przerażenia.
Wzięcie udziału w zabiciu Bezkonnego bezgłowego Jeźdźca nagradza osiągnięciem Jeździec bez głowy oraz czapką Głowa Bezkonnego Bezgłowego Jeźdźca. Jeśli gracz zada przynajmniej jedno trafienie z broni wręcz, otrzyma także Nawiedzony metal ze złomu, szczególnie wtedy, gdy Jeździec "trzęsie się" tuż przed śmiercią lub gracz jest przynajmniej jedym z trzech ostatnich graczy, którzy atakowali Jeźdźca. Wzięcie udziału w jego śmierci nie jest powiązane z bronią do walki wręcz czy obrażeniami z dystansu. Zadawanie obrażeń w każdej formie nagradza cię uznaniem za jego śmierć, jeśli akurat żyłeś podczas jego śmierci.
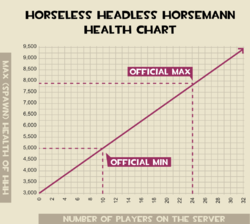
Bezkonny Bezgłowy Jeździec posiada podstawową ilość 3000 zdrowia, która zwiększa się o 200 za każdego gracza na serwerze, zwiększając jego maksymalne możliwe zdrowie do ogromnej liczby 7800 (na serwerze z 24 graczami) lub nawet jeszcze większej liczby 9400 (na rozszerzonym serwerze z 32 graczami). Jeździec nie pojawia się, jeśli na serwerze znajduje się mniej niż 10 osób; oznacza to, że jeśli nie został przywołany ręcznie za pomocą konsoli, jego minimalne możliwe zdrowie jest równe 5000. Jeździec pojawia się co każde ok. 8 minut (± 1 minuta).
Strategia
Ogólne wskazówki
- One basic strategy for the player designated "It" is to act as bait for the Horsemann while all other players inflict as much damage as they can.
- The Horsemann runs as fast as a Scout.
- The Horsemann's target can trap him by standing on the ledge behind the wall of the shack on the rock outcrop. Standing there while targeted makes the Horsemann attack the wall of the shack and ignore all other players, including those attacking him with melee weapons. Using this method the "Gored!" ghostchievement can be easily obtained. Another way of easily obtaining the "Gored!" achievement would be to run up to him,hit him once with a melee weapon, then run away and don't die before he is defeated. This will credit with a melee kill to earn the Gored! achievement.
- Like a building, the Horsemann does not activate any on-hit effects such as the Buff Banner's rage building, the healing of the Black Box or Blutsauger, or the damage text and hit sound.
- The Horsemann appears to be completely immune to most, if not all, status ailments such as being coated in Jarate, Mad Milk, afterburn, Natascha slowdown, The Sandman's ball and knockback. However, the Horsemann is affected by Critical damage and damage ramp up/falloff.
- The control points are still active while the Horsemann is out. You may wish to use this time to take control of the point while the enemy is distracted.
- A strategy regarding RED on C is to stay as close as possible to spawn and retreat into the spawn as soon as a player on said team is "IT." This way, the HHH will spend most of the time chasing BLU, thus defending your point. This strategy works great with Sentry Guns aiming at the point.
- The Horsemann can see through the Spy's Cloak.
- Though the HHH can chase the player designated "It" onto the roof of B, he cannot chase a player onto the roofs of the buildings near it, therefore it is still possible to deal damage without the risk of being killed.
Strategia dla Skauta
- It might be a good idea for a Scout who is "It" to flee while the Horsemann pursues him away from your team's spawn room. If anything, lure the Horsemann towards the enemy team's spawn room to provide a distraction.
- A Scout can keep the Horsemann running back and forth at the Control Point nearest to Red team's spawn by jumping over the bottomless pits, and then jumping back over them when the Horsemann gets close.
- Playing as Scout while being 'It' allows you to dodge the Horsemann's attacks and pursuits due to your agility and ability to double/triple jump. As a Demoman, using the Chargin' Targe it is also possible to outrun him by charging repeatedly in a single direction across open ground.
- As a Scout you can use Bonk! Atomic Punch if you are "It" to distract the Horsemann, thus aiding your team. Caution is advised, however, as Bonk has a limited use time.
- The Horsemann has a specific search radius around the active control point. It is possible to stop him chasing you by running away from the control point and evading him until he loses interest in you. This will cause him to attack someone else, or if there is nobody in his search radius, to run back and stand upon the control point to await more victims or to execute a "Boo!" attack.
Strategia dla Żołnierza
- Rocket jumping over the Horsemann while "IT" will cause him to hesitate while changing directions.
- Direct hits with the Black Box do not result in gained health, but splash damage against nearby enemies will, so try timing shots for shortly before he strikes, rather than after.
- Repeated rocket jumping can keep you well outside of the reach of his attacks, thus giving you the opportunity to either make an escape or draw the Horsemann into a group of enemies.
- The Buff Banner cannot generate charge by damage to the Horsemann. It is not recommended that you take this to battle with you. Use the Shotgun instead, making the switch to it when you run out of ammo for your primary weapon. This layout allows you to deal the most damage to the Horsemann.
Strategia dla Pyro
- Because the Horsemann does not suffer afterburn damage, using the Pyro against the Horseless Headless Horsemann is not recommended. In addition, the short effective range of the Pyro makes attacking head-on a very deadly prospect. However, using the Backburner while he is distracted can be effective in defeating him.
Strategia dla Demomana
- Using the Scottish Resistance, the Demoman can deal a considerable amount of damage with multiple stickybombs. Use the increased firing rate of the Scottish Resistance to your advantage. You can also plant stickybombs to the Horsemann's spawning point before he appears. This would deal a huge amount of damage in an instant. This strategy is particularly effective with a Kritzkrieg charge.
- Another potential Demoman strategy is to plant a large number of sticky bombs at the threshold of the point where the Horseless Headless Horsemann will stop chasing the player. Once tagged "IT", the player can stand at this threshold. When the Horsemann is near, the player backs up and the Horsemann stops chasing him. He will either pause for a moment or begin chasing another player. During this window of opportunity the bombs can be detonated for massive damage.
Strategia dla Grubego
- Have a Heavy/Medic pair camp the control point where he will spawn next, building up a Kritzkrieg charge, and unleashing it upon him while he is spawning which subsequently kills him after his spawn animation is complete.
Strategia dla Inżyniera
- The Horsemann will attack anything blocking his path, this includes untargeted players and buildings. Keep in mind wrangled Sentry Guns can survive a few hits, allowing you and your team to profit from the distraction.
- As the Engineer, Sentry Guns will not target the Horsemann. However, you can use the Wrangler to hurt the Horsemann. The Horsemann is not affected by the Sentry Gun's knockback. Also note that the Wrangler's slight auto-aim will not activate, rendering it slightly more difficult to keep the Sentry Gun's fire on-target.
Strategia dla Snajpera
- The Huntsman deals extra damage on headshots against the Horsemann, of which the same is yet to be confirmed for the Sniper Rifle or the Ambassador.
Strategia dla Szpiega
- A Backstab to the Horsemann will not result in an instant death or a Critical hit.
Powiązane osiągnięcia
|
|
Galeria
Ikona zabicia
Ciekawostki
- The Horseless Headless Horsemann is a parody of the Headless Horseman from the story "The Legend of Sleepy Hollow" by Washington Irving.
- A belt identical to The Horsemann's is attached to the Ghastlier Gibus.
- The Horseless Headless Horsemann's mechanics are similar to a community made mod called VS. Saxton Hale, in which everyone is on RED except Saxton Hale, who is able to instantly kill anybody with a single hit, as well as startle groups of enemies.
- The VS. Saxton Hale Mod has a random chance each round to replace Saxton Hale with the Horseless Headless Horsemann.
- The animation the Horsemann uses when walking changes depending on how much health he has. After he loses a certain percentage of health (currently not known, presumably 50%) he stops using the Eyelander/Skullcutter walk animation (two handed) and starts using the Bottle/Pain Train/Frying Pan walk animation (one handed).
- The Horsemann will not cause damage notifications to show up on any player's screen (the same applies with the hit sound).
- The Horsemann leaves a purple glow, perhaps indicative of the fact that he is on neither RED or BLU and, therefore, targets both teams. Additionally, he leaves a trail of smoking purple footprints, allowing him to be easily tracked.
- By using the console command ent_create headless_hatman, it's possible to spawn the Horseless Headless Horsemann in any map (requires cheats). However, like other bots, he won't move or attack unless the map has nav meshes. Another command to spawn the Horseless Headless Horsemann is the following command: tf_halloween_force_boss_spawn (requires cheats).
- By using the former code to spawn multiple Horsemenn at once they will attack each other as well as players.
- Note: These commands do not work outside of the annual Halloween Event.
- By using the latter code to spawn multiple Horsemenn, each separate Horsemann's health is calculated by the formula: (3000 + ([# of players on server] * 200)) / [# of HHH spawned].
- The Horsemann kills count as environmental deaths. Therefore achievements such as Foul Territory for the Scout can be achieved by stunning some one about to be killed by the Horsemann.
- The Horseless Headless Horsemann is referred to in the game files as "Hatman", presumably because of his role in providing the players with a free hat, should they kill him.
- The Horsemann has several unused animations that can be found in the game files. These include the "Cheers" thumbs up action and Medic calls. This is due to the Horsemann using many of the Demoman's original animations.
- There is also an unused jump animation, also left over from the Demoman. This animation is unused as the Horsemann never actually jumps, though he will fall from a higher level if he is chasing someone. He will otherwise walk around height obstacles or change his target.
- Originally, it was possible to evade the Horsemann by staying on the roof of point B, as he would fall through the playerclip ladder. This was fixed in an update on October 28, 2010.
- Bots will not attack the Horsemann and completely ignore him.
- The Horsemann will instantly destroy any Buildings that are in his path. Their destruction is not added to the kill feed.
- As of November 8th 2010, it is no longer possible to force spawn the Horsemann on maps other than Mann Manor. Attempting to do so will result in a fatal crash.
Demonstracja
| |||||||||||||||||||||||||


