Swiftwater
| “动作快!动作快!” 本条目可能包含已过期的内容。 你可以通过更新所需要的内容来帮助改进此条目。详见维基编辑格式指南。 注释:Page contains a lot of outdated info. |
| 此页面正在被翻译成简体中文。 如果您能熟练地运用简体中文,请在讨论页上留言或与为此页面贡献的作者讨论(通过浏览页面历史)。 |
| Swiftwater | |
|---|---|

| |
| 基本信息 | |
| 开发者: | 未知 |
| 地图资料 | |
| 环境: | 高山 |
| 设定: | 白昼,晴天 |
| 地图俯视图 | |
| 地图邮票 | |
| 支持者排行榜 | |
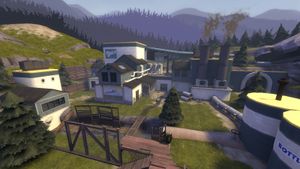
Swiftwater是一张社区制作的单阶段推车模式地图。这张高山风地图共有4个检查点并鼓励蓝队不断推进来冲破红队的防线。
与蓝队基地内播放的影片相同,在该地图上,蓝队正通过给饮用水装瓶来赚外快。不过,红队发现了蓝队的小计划并打着红色星球化学行动(Red Planet Chemicals operation)在红队基地内持续对蓝队水源投毒。因此,蓝队就需要通过把装有炸弹的战车推到红队基地中来摧毁红队基地和他们的投毒计划。
Swiftwater是被投稿到Steam创意工坊的,并于棋逢对手更新中被添加到官方地图池中,该地图经常用于竞技性9v9模式中。
目录
位置
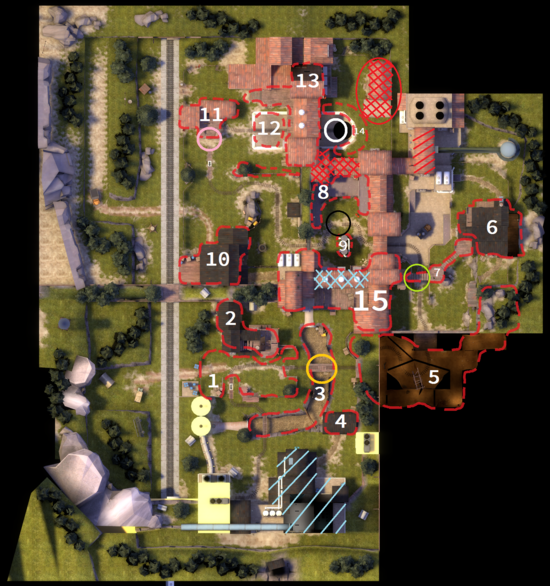
注:如果你无法找到下方列出的位置,你可以向下滚动到辅助俯瞰图板块,以查看它们在地图上所标记的确切位置。
Checkpoint 1
- Ditch: As the cart starts moving forward it crosses a bridge over a ditch which cuts the area of the first checkpoint in two. The ditch begins at the mouth of a large, grated pipe slightly left of this bridge and continues to the right until it reaches a small shack. There the ditch takes a 90-degree turn left and continues until it reaches another large, grated pipe leading into the barn, carving out an L-shape in the area of checkpoint A. Tall fencing surrounds portions of the top of the ditch, and a log crosses the ditch roughly at its corner.
- Shack: There is a small shack positioned at the corner of the ditch, directly in front of the right-most BLU spawn door. It is initially open only from the side opposite of BLU spawn, with a shuttered door blocking the near side, and has open windows overlooking the ditch.
- Main House: Once the cart crosses over the bridge, it takes a sharp S-bend to the left. It then climbs a slight incline before making a turn to the right. After this turn, the cart goes by a large, two-story house which occupies a significant portion of this area, referred to as "Main House". Atop the house sits a Sniper's nest.
- Front yard: The area in front of the Main House is called "The Front Yard". This yard is a common defensive spot for RED as there is a large fence with stairs attached which helps shield the Yard from BLU attacks while giving RED a vantage point.
- Checkpoint A: After crossing the Front yard, the cart crosses a second bridge over the ditch. This bridge is the location of checkpoint A. Once captured, the shuttered shack door opens for BLU.
Checkpoint 2
- Tunnel: As the cart finishes crossing the checkpoint bridge it now enters a tunnel. In the tunnel, the cart makes some wild twists and turns around corners before finally exiting the tunnel facing the same direction it faced when it originally started out at the beginning of the round.
- Catwalks: As the cart exits the tunnel it enters the "second area", another wide open area which contains the second checkpoint. The most prominent feature of this area is the Catwalks, tight wooden platforms hanging in the sky, connecting two main buildings of the second area: the Barn and the Sawmill
- Sawmill: There is a large wooden building, right on the left of the first Red spawn.
- Red spawn: The first Red spawn is positioned directly opposite of the tunnel exit, right across the second checkpoint.
- Barn: A huge building on the right side of the second checkpoint and in a general middle position of the entire map. This building connects the first, second, and third checkpoints and the areas they reside in.
- Second checkpoint: The second checkpoint is positioned on the left side of the Barn, right under one of the Catwalks.
Checkpoint 3
- Silos: Once the third checkpoint is captured, the cart starts rolling down a small incline, make an abrupt turn to the left and enter the area of the third checkpoint. In the middle of the now much more enclosed area are three tall silos springing up from the ground.
- Checkpoint C: The checkpoint C is itself positioned in between the three silos on its left side and the Red Front Area on its right side.
- Front Area: There is a large area in front of the second Red spawn which is commonly used as a defensive holdout.
Checkpoint 4
- Railway Building: As the cart passes over the checkpoint C, it goes through a chokepoint and find itself in a much more open field. As it enters this field, it makes a turn to the right, hugging the walls of the previous RED spawn which is on its right and passing by a small building called the "Railway Building" on its left.
- Wall: After the cart climbs up an incline, it proceeds to make yet another turn, now to the left where it passes by a low, but long wall on its right.
- Corner house: The cart peacefully cruises next to the aforementioned wall for some time. Once it reaches the wall's end, the cart makes a complete 180-degree turn in order to go around it, passing by yet another house called "The Corner House".
- Checkpoint D: Once it passes the Corner House, the cart only needs to go a few more meters to reach the fourth checkpoint which sits just before a steep decline.
Checkpoint 5
- Steep decline: After capturing checkpoint D, the cart now starts descending downwards.
- Battlements: Once the cart completes its descend, it evens out on flat ground and past under the Battlements, a long building above it which stretches all the way from the topmost edge of the map, to the previous RED spawn.
- Pit: Going under the battlements puts the cart just a few meters from the Pit, the final checkpoint, and consequently the cart's final destination.
- Cliffs:Surrounding the Pit from three of its sides are the cliffs. High and steep elevated position which serve as the final obstacle to BLU.
辅助俯瞰图
1.Front Yard
2.Main House
3.Ditch
4.Shack
5.Tunnel
6.Sawmill
7.Catwalks
8.Front area
9.Silos
10.Railway Building
11.Corner house
12.Steep Decline
13.Battlements
14.Cliff
15.Barn
Unmarked area on point C: Wall
Blue/red diagonal lines: Blu/Red first spawn
Blue/red double diagonal lines: Blu/Red second spawn
Blue/red double diagonal lines w/ a circle: Blu/Red third spawn
Yellow circle: First checkpoint
Green circle: Second checkpoint
Black circle: Third checkpoint
Pink circle: Fourth checkpoint
White circle: Last checkpoint and the Pit
战术
更新历史
2016年7月7日补丁 #1 (棋逢对手更新)
- Swiftwater was added to the game.
- Fixed using the wrong thumbnail images for
pl_Swiftwater.
Changelog
This is the changelog of the map before it was added to the game.
更改日志:
Build 12 Changes
- Bug fixes
- Removed Rollback (from build 11)
Build 11 Changes
- Stage 1 layout significantly changed
- Added a CP before the final CP. More fighting takes place in courtyard now.
- Reduced amount of time awarded for CPs.
Build 7 Changes
- Tons of changes. Most important:
- Blue Spawn remade - doors not stay open on map start
- CP4 tweaked to give red an advantage again. Buildings in upper area have a Sniper vantage and a good shortcut behind blue.
- Fixed getting stuck in red spawning areas.
- Red can exit spawn anywhere after round starts.
Old Fixes
- Fixed Engy exploit at CP2
- New Red Spawn layout - more straightforward and should be less campable at cp3 and cp4. Shortened spawn times to compensate for slightly longer travel. (The changes should improve gameplay on insta spawn servers as well)
- New spawn exit from CP2 to prevent camping.
- Vastly increased frame rate.
漏洞
- If a member of RED team is standing in the way of one of the spawn room gates as it deactivates, that player becomes stuck in place until they die.
画廊
Advertisement for Red Planet Chemicals' toxic product, DDT.
Panels of "The Swift Plan" seen in BLU's first spawn on the map:
| ||||||||||||||||||||||||||||||||


