Steel is a community-created Attack/Defend Control Point map added in the Heavy Update. Steel is one of many community maps added to the game by Valve as honorary official maps due to their high quality.
Unlike most Control Point maps, capturing a control point modifies the layout of the map, opening, and closing routes for each team. As a result, the offensive team has a wide variety of tactical choices to influence how they play, including:
- Capturing A opens additional paths to B and E.
- Capturing B moves RED's spawnroom and also opens an additional route to C.
- Capturing C extends bridges to E.
- Capturing D blocks RED from easily reaching E, and extends guardrails on the bridges.
Unlike normal linear Control Point maps, Steel allows the attacking team, BLU, to capture the final point, no matter how many other points have been captured. However, the more points BLU captures, the more ways they can access the final capture point, as well as pushing back the RED team's spawn and closing off their routes. One point and 3 minutes of time are awarded for each point captured. If E is captured, then the BLU team scores 5 points overall for the round, regardless of how many of the preceding points were captured.
The setup timer is 60 seconds.
Introduction video
Locations
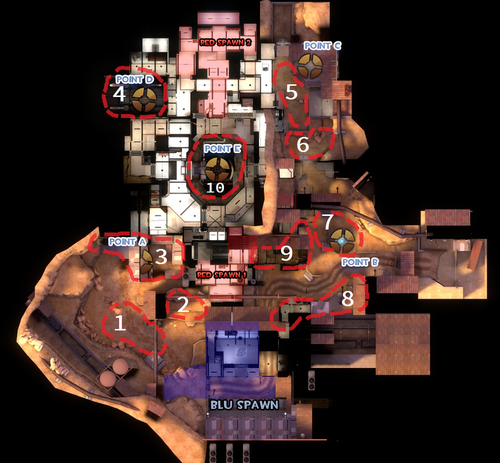
Note: If you are having trouble with finding the locations listed here, see the Helpful overview section to see their exact position marked on the map.
 The following locations are described from the BLU perspective.
Spawn areas
- BLU Spawn: A train station just north of RED's Initial Spawn. The base has three exits, two to control point A (one providing a straightforward route to the point and the other a ledge leading to a drop down onto RED from behind), and one to control Point B. Immediately upon spawning, the player's orientation is such that Point A is to the right and Point B is to the left. Additionally, the patch of open ground immediately outside the spawn room allows BLU Engineers to construct their buildings during setup time.
- RED Initial Spawn: A small room located in the middle of the map, with three exits leading to Points A, B, and E respectively. From RED's perspective, A is to the left, B is to the right and E is dead ahead. Once A get's captured, the exit to that Point is closed.
- RED Second Spawn: After BLU captures Point B, RED is forced to spawn in a room on the opposite end of the map from BLU spawn, between Points C and D. From RED's perspective, C is to the left, D is to the right and the exit to E is once more forward, at the bottom of some stairs. After BLU captures Point D, the exit to E is closed off, leaving RED with three remaining exits.
Exterior of BLU's spawn (Engineers can build here).
One of BLU's exit to Point A.
Point A
- Shipping Dock: Point A is a shipping dock located directly to the left of RED's initial spawn. BLU is required to climb up a short hill that wraps around a building to get to the control point at the top, while a couple of walls surrounding the point prevent RED from directly firing onto the point from their spawn. The higher exit from BLU's base leads to the top of the Cliff. When captured, RED's spawn door to A is sealed.
- Health Pack Shack: Right outside the BLU spawn is a large clearing, found within which is a small wooden shed containing a large health pack.
- Cliff: The theoretically fastest route from BLU spawn towards Point A is sealed off by a tall, stone wall; forcing BLU to go around the left flank near the Rocks in order to reach the point. The wall itself can be scaled thanks to some gentle slopes adjacent to it, but only from the BLU side.
- Rocks: The main avenue to Point A is broken up by several large boulders, forming natural cover.
- A/B Connectors: Capturing Point A immediately opens a door to the right of the point that leads to a long hallway extending all the way to Point B. The hallway ends in a small dropdown at the bottom of which is a large health pack.
- Big Door: Located behind the first control point is a massive steel gate, which slowly begins opening up once Point A is captured. Found immediately behind the gate is a short hallway that leads to Points E and D and contains a medium health and ammo pack.
- Lemon: This is a small, elevated room located near RED's spawn exit towards A. It has two windows that look out onto the final control point. The windows can be shoot through, but are not large enough for players to fit through themselves.
The Cliff from BLU's side.
RED's exit towards A (left) and A/B Connector (right).
Point B
- Truck Yard: Point B is located to the right of RED's initial spawn and is partially protected by a low wall facing the RED spawn. There is only one path leading to B from BLU spawn; until point A is captured, at which moment the A/B Connector is open. Following Point B's capture, RED is booted out of their initial spawn and moved elsewhere.
- Valley: BLU's spawn exit towards Point B diverges into two paths. The left-most path leads to the base of a gentle hill which BLU must climb in order to reach Point B. The aforementioned A/B Connector also exits out here.
- Elbow: The right path leads to a flight of stairs that ascend to a narrow platform overlooking the Valley and the second control point. Found on the platform is a miniscule wooden shack next to which is a medium ammo pack.
- RED shed: RED's entrance to Point B leads into a 2-story building with a window at the top, from which the whole B area can be overviewed except for a blind spot caused by the small wall covering half of Point B.
- B/C Connector: To the rear and right of control point B is an outdoor passage leading up a gentle incline that ends at a chain-link gate. The gate, which begins slowly opening following B's capture, leads to a cliff overlooking C.
- Wishbone: Left of Point B, outside the only exit from the RED Shed, is a small staircase leading to a white-padded room. This is the central hallway of the map, which connects Points B, C and E together. Found here as well is a medium health pack.
The Platform connected to the Elbow.
Point C
- Canyon: Point C is located on an elevated platform north of point B. Due to the peculiarity of the map, point B is actually closer to E then it is to C. There are two sets of stairs to get onto the platform holding C, one on the outside with no cover, and one on to the right which is a small enclosed staircase. Capturing C causes three catwalk to extend to point E very slowly, bridging the pit between the point and the surrounding area.
- Massif: The aforementioned B/C Connector leads to an elevated cliff, below which lies a section of low ground stretching all the way to the platform holding the third control point. Several large rocks are found here, providing cover and making scaling the Massif from RED's side difficult. The low ground in front of C can additionally be accessed from Wishbone and Lower.
- Balcony: RED's exit to Point C diverges into two paths. The right one leads directly to the point, while the left one goes to a small balcony with a medium health pack, from which Point C and the ground beneath it can be viewed.
- Lower: Directly below the Wishbone is a long but narrow room featuring a large health and ammo pack. This area is accessible in two ways: the first one are some stairs that are next to the central pit, while the other entrance is through a doorway located at the base of the Massif, near Point C. The part of Lower facing towards the final point is missing its wall, exposing it to the pit and allowing players on Point E to shoot into the Lower; and vice-versa.
A view from checkpoint C.
The Massif, seen also are doorways to Wishbone and Lower.
The stairs leading to Lower.
Point D
- Storehouse: Point D is located directly next to RED's second spawn, on the opposite side of C. Capturing D raises guardrails on the catwalks connected to the final point and also seals off RED spawn's exit to E.
- C/D Connector: A narrow hallway, with a small ledge that holds a medium health pack, connects points C and D; it is located right in front of RED's second spawn allowing RED to observe anyone moving here through a window above their exit to point E, but the window becomes closed off at the same time the exit does.
- Small Balcony: The C/D Connector ends at a ledge overlooking Point D. Found here is also one of the RED's second spawn exits.
- Lobby: Alternatively, the D Point can be accessed from a completely different direction; the Point A. This is achieved by passing through the Big Door, which leads to a large and spacious room that connects points A, D and E.
- Control Room: Located in one of the Lobby's corners is a partially separated area that houses a large health and ammo pack. The area has large window panes that look directly onto the final control point.
The C/D Connector (RED's second spawn to the right).
Path from the Lobby to Point D.
Point E
- Launch Pad: Point E is located in the center of the base, on a small platform above a deep pit that surrounds it on all side. At first, only Scouts, Soldiers, Demoman, and Pyros using the Detonator, Scorch Shot, or Thermal Thruster can easily reach it, but once C is captured, three catwalks appear, permitting all classes to access the point. Point E is available from the start of the round, but capturing all the other points makes E easier to capture. If RED successfully defends E to the end of the round, the rocket above the point starts to blast off, pulling in and killing anyone caught in its exhaust path.
- Pipe: Lining the walls of the pit is a white pipe that can be stood on. Quick-thinking players that fall into the pitfall can latch onto said Pipe and use it to climb back up.
- D/E Connector: A short hallway containing a medium health pack connects point D to RED Battlements.
- RED Battlements: Found in front of RED spawn is an open area with many ledges and perches that directly overlook the final control point.
- Lime: To the back of the RED Battlements is a small room containing a medium health and ammo pack.
The Pipe and a part of Lower.
The Lime (located on the opposite end of Point E from Lemon).
Point E with the extended catwalks.
Point E with the raised guardrails.
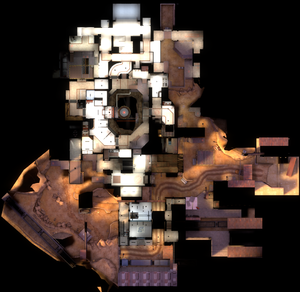
Helpful overview
1.Rocks
2.Cliffs
3.Shipping Dock
4.Storehouse
5.Canyon
6.Massif
7.Truck Yard
8.Elbow
9.RED Shed
10.Launch Room
Strategy
Control Point timing
| Control Point A
|
×1
|
|
| ×2
|
|
| ×3
|
|
| ×4
|
|
| ×5
|
|
| Control Point B
|
×1
|
|
| ×2
|
|
| ×3
|
|
| ×4
|
|
| ×5
|
|
| Control Point C
|
×1
|
|
| ×2
|
|
| ×3
|
|
| ×4
|
|
| ×5
|
|
| Control Point D
|
×1
|
|
| ×2
|
|
| ×3
|
|
| ×4
|
|
| ×5
|
|
| Control Point E
|
×1
|
|
| ×2
|
|
| ×3
|
|
| ×4
|
|
| ×5
|
|
Update history
August 19, 2008 Patch (Heavy Update)
December 21, 2010 Patch
- Fixed Steel not loading properly, as it would return the user to the Main Menu instead.
January 26, 2012 Patch
- Localized the team goal strings
July 10, 2013 Patch
- Fixed players blocking Blu's spawn exit door leading to capture point B
- Fixed collision on ledge near capture point B
- Players can no longer build inside Red spawn room.
- Blu spawn point over grate removed.
July 12, 2023 Patch 1 (Summer 2023 Update)
- Prop collision cleanup and improved player clipping
- Explosive splash bug collisions on stairs, props, etc., around the map
- Spawn point issues (collision, prop blocking, clipping, etc.)
- Fix Pyro door exploit on A
- Fix choke and spam issues into Blu & Red spawns
- Fix Pixel walk collision issues
- Fixing ceiling clipping and stuck spots including exploits
- Clean up geometry in spawns, the spawn locations and their exits
- Fix roof readability issues, with sticky and rocket jumping
- Fix rare double death bug when falling into pit
- Fix Cliff stuck spots and ledges in E pit
- Removed head glitch tele spawn on A-B connector
- Fix rare Overtime cap bug
- Fix Red team getting stuck in spawn door to A
July 20, 2023 Patch 1
- More blockbullet /clipbrush(sic) swaps where needed
- Fixed some stairs/ramp brushes needed to be extended to the bottom of the ramp
- Fixed more small unnecessary prop collision/clip removals
- Fixed blatant texture misalignment
- Addressed perch spot outside Red spawn on wood beam
- Closed some accidental holes in geometry
- Additional fixes to a sticky/shooting exploit through and under Red's E platform area
- Increased pit damage to kill some certain class loadouts in a single trigger
- Moved Blu spawns forward a little to previous distance
- Extended projectile blocker brush along the top side of the Blu spawn building's roof
- Fixed Sniper sightline into Red's first spawn points from E
July 25, 2023 Patch
- Fixed missing glass from bullet blocked windows
- Removed some more ceiling light collisions
- Improved clipping around B -> C building
- Small safety improvement to Blu flank balcony to B
- Some extra block bullets around B floor
August 31, 2023 Patch
- Added additional clipping where needed
- Fixed some windows clip and trip spots
- Adjusted Red respawn base times to not go over 10 (could get to 11 and 12)
- Capture point HUD layout now matches its map kin (Gravelpit(sic) and Sulfur)
- Updated map menu images to the present day (1970)
- Reduced one-way door speed to stop ejecting players into orbit
- Rebuilt B Red spawn exit to a cleaner style to alleviate spawn trapping and potential camping
- Fixing some props that fade too early
- Moved medium healthpack to the side between D->E to avoid accidental pickups
- Reduced speed of handrail deployment so it doesn't overtake the bridges in the rare case that Blu captures C and D in quick succession
Bugs
- If an Engineer builds a Dispenser in front of the supply locker in BLU spawn, and any class switches their loadouts to completely different weapons, the player goes into Civilian mode. This also can be done on Frontier.
- Additionally, if a Heavy changes his melee weapon while standing inside the Dispenser while equipping the Buffalo Steak Sandvich, they are left with no melee weapon. If the Steak Sandvich is eaten, the Mini-Crits are granted to the Heavy's Minigun instead. This can also be done on Frontier.
- If a player attempts to go on the Launch Pad while one of the bridges is extending, they may be caught between the bridge and the control point, resulting in them being pushed inside the point. Being inside the control point counts as defending it on RED team, and counts as capturing it on BLU.
- It's possible to build on the higher level of the BLU spawn.
Trivia
- The initials of Jamie "Fishbus" Manson, the map's designer, can be found in one of the upper rooms overlooking point E. It can only be reached with the noclip command.
- The increasing advantages awarded to the BLU team for capturing point A through to D were inspired by the Unreal Tourament 2004's assault map AS-Convoy and the side objectives that made it easier to attack the final objective.[1]
Gallery
The map designer's initials above point E.
Rocket blasting off following RED's victory.
References

![]() The following locations are described from the BLU perspective.
The following locations are described from the BLU perspective.


