User:Primrose~/2fort Desert2
| Primrose~ | |
|---|---|

| |
| Basic Information | |
| Developer(s): | Unknown |
| Map Info | |
| Environment: | Desert/Egyptian |
| Setting: | Daylight, sunny |
| “ | [[Media:Spy_DominationSoldier05.wav|They can bury you in the tomb of the un-skilled Soldier!]]
Click to listen
— The Spy in regards to the tombs
|
” |
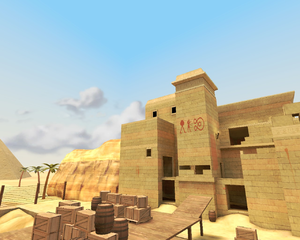
2Fort Desert V2 is a Community made, Custom Capture the Flag map and the subsequent remake of the original Capture the Flag map in the games release; 2Fort. Two similar forts oppose each other, separated by a small puddle of water and a large empty crevice. A covered bridge which has an accessible roof from two adjacent ladders propped against the right side, the bridge's roof is scattered with crates and other miscellaneous boxes, providing great cover from Snipers and other incoming classes. The bridge has a small ramp which allows easy access into the base it faces, but only to those with advanced jumping maneuvers
There are three main entrances into each fort, and three secondary entrances which lead to the bases intelligence room. Not all lead to the same area or are easily navigable due to small space. The primary entrances are the two openings on the ground level. The Secondary entrance is a large sewer underneath each base, it is accessed from underneath the bridge and has a secondary entrance to the intelligence through an opening in the ground; it is a viable hold point due to no other entry aside from within the base. The third entrance is on the battlements of each base, accessible by the small ramp on the roof of the bridge, generally only easily crossed by classes with advanced jumping maneuvers such as the Demoman, Soldier, or Scout.
The three secondary entrances have much harder to access and make entry into spots on the map, and often lead to a spot which is only beneficial to a few of the classes. The First (In no chronological or ease of entry order) is a small opening to the left of each main sewer entry; it is a small rectangular hole which leads to a small area which has branching pathways to either your intelligence or the enemy bases's intelligence; the second entrance is another small hole in the grounds in the small break of the sewers, it goes down and leads into a pathway which can branch to the the opposing base or to the intelligence again. Both are difficult to block or keep shut off due to their access and branching sections. The Third and final entrance is a opening on the upper left of each base's battlements, it is accessed either inside of the base or through either a sticky jump or rocket jump off of the battlements. Both lead to the roof top of each base, Blu's being much more open and harder to hide from the enemy team, and Red's being much more confined but with a much more dense protection.
2Fort's bases are the easiest to defend of all stock CTF maps due to the long, easily-blocked passages leading to and from the enemy team's flag room. Every capture will require a substantial amount of team coordination, especially when the player count is high.
To win, your team must capture the opposing team's Intelligence continuously until you reach the game's capture limit, while preventing the enemy from achieving that same goal.
Contents
Locations
Outside locations
- Bridge: The bridge connecting the two forts. Much like the original 2Fort it has a roof which can be walked upon, only unlike it's counterpart the bridge in 2Fort Desert2 is much easier to access due to an adjacent pair of ladders propped against the right side, allowing so every class can take an alternate route then underneath the bridge or bridge's roof. It is scattered with various crates and allows for great protection. On the left of each bridge on the roof there is a small ramp leading towards the battlements of each base; it does not go all the way to the battlements and acts only as an advantage for classes with greater jumping distance such as the Scout
- Classes who walk across the roof of the bridge are susceptible to enemy fire from Snipers and members of the enemy team crossing the bridge, the crates come in handy as a protective source, allowing for cover from fire and the advantage of an obstacle to shoot around.
- Entrance: After crossing the bridge, there are two ground entrances into the base. The "Entrance" extends from those two doorways into the base a short distance. From here, the layout of the entrance is a T-shape. Turning left brings the player to the stairs that leads down to the sewers, as well as the narrow corridor linking the Battlement Resupply room to both the entrance and the Courtyard (there is a trapdoor in the ceiling allowing players to drop down from the Resupply room). Turning right leads you into a medium-sized room with a door at the opposite end which also provides access to the courtyard. This room is heavily trafficked by both teams, as it is the most direct way to reach the courtyard from the main entrance. Engineers can set up small camps in here if the enemy is attempting to push through the entrance. In addition, because the room is large, it is often a hiding place for Spies. In many other parts of the map, corridors are too narrow to provide much cover for an invisible Spy, but this room is an exception, allowing them to move past battles occurring in the entrance undetected.
- Battlements: The Battlements are on the front of the second floor of each base and have a center "bunker" section. This section has large glass-less windows and is a roofed structure. The windows allow almost unbroken lines of sight into the area. In TF2, the battlements are also often referred to as the "balcony," as well as the "Sniper ledge," or "Sniper deck," due to their main purpose as a platform or vantage point for Snipers. Snipers generally camp the ledges, which give them an excellent view of most of the exterior of 2Fort, with the exception of the bridge and the water beneath it.
- Roofs: The Roofs is a large area on top of each teams base, they are immediately open to sticky jumping Demo's, rocket jumping Soldiers, but are also accessible to every other class due to an opening on the upper left of each base. They are excellent spots for Sniper's to take potshots and headshots at the enemy team due to a huge clearance of view over the battlefield. The BLU team has a much wider and larger roof, but little cover from enemy Snipers and projectiles, with only two small pillars to the far right of the rooftop; whereas the RED roof is much smaller and cramped in terms of movement in comparison to BLU's. It has multitudes of large blocks which the player can duck behind and be protected from on-coming fire.
Fort locations
- The Sewers: The tunnels under each base, leading from the small puddle of water beneath the bridge to the "Entrance", are generally referred to as "The Sewers". They are severely dog-legged, creating numerous extra blind corners around which to fight, giving Pyros a defensive edge. In each sewer, there is a room recessed into a corner in such a way that it is impossible to gain line of sight to 100% of the room from inside the tunnels, in these corner rooms there is a Medium Health Kit and a Medium Ammo kit on the left side wall. Also in the room there is a small hole in the ground which allows access into the Intelligence room, and or the enemies base. On the water-side of the room, the tunnel has two 90 degree bends, but on the base-side of the room there is one long unbroken stretch of tunnel. The long tunnel provides a long-range line of sight between the room and the sewer exit. The rooms in the sewers are often camped by Engineers, who use Teleporters to allow their team to quickly access the enemy base. Otherwise, the sewers are generally used as a way of entering the enemy base free from the attention of the Snipers above. The narrowness of the sewers makes it difficult for Spies to sneak past enemies who are also using the tunnels.
- Courtyard: The Courtyard is the main means of transition between the ground floor and the second floor in each base. It is an enclosed, roofless space inside each base, next to the main spawn room and on the player's right when they come through the entrance. It is bounded on three sides by high ledges, and there are doors connecting to the spawn room, a staircase leading down to the Intelligence room on the second floor, and a door from the entrance and from the balcony spawn corridor on the ground floor. A pair of staircases allow access from below to the upper level. Engineers often use the space as a major defensive point, as it provides the only means of access to the Intelligence for most classes. By setting up a Sentry Gun, an Engineer can successfully provide effective defense against assaults on the intelligence, particularly if positioned so as to cover the Battlements' doorway.
- Grate: This is the small room with the grated floor right above the entrance of each base. It is connected directly to the upstairs area, and as a result is often used by players to gain quick access to battles in the entrance. Demomen, Soldiers, Engineers and Scouts can jump up to the second story through this, providing another means of access to the second floor. Classes such as the Engineer and Demoman can also camp above the grate, limiting enemy access through the front entrance. the RED base has an uncovered roof and allows access to the roof using a large enough jump, ala Sentry Jumping, Rocket Jump, or Sticky Jump.
- Upstairs: This is the large room on the second floor, adjacent to the main resupply room. The Upstairs area has an exit to the Battlements, "Grate", "top of the Spiral", and "Courtyard". This room is heavily trafficked as it is a major crossroads in the map, connecting practically every area of the base. It is often used by Scouts who have jumped to the balcony, as it provides a direct route to the Intelligence via the spiral ramp. In both bases this room also has a small stair-esque pile of bricks which a Sniper or any other class can use to access the hole above the Battlements.
Main base locations
- Spiral: The Spiral ramp that leads from the Basement up and out of the base is one of the four access points to the Intelligence room. Like the Sewers, the Spiral is a narrow corridor with frequent right-angles. This tends to result in closequarters fighting, much like in the actual 2Fort map, and due to the confined space it is fairly easy to block enemy access with a Dispenser, Sentry Gun, or Heavy. At the top, the Spiral connects to the upstairs area via a small room in which there is a small Health Pack and Ammo Pack, as well as a large opening where one may place a teleporter which could remain hidden; as well as two small corners in which Spies often hide much like in the actual 2Fort. A direct line of sight can be drawn from the upstairs area along the top length of the Spiral, allowing Snipers to eliminate enemies with the Intelligence as they climb the Spiral.
- L-Shaft: This room is a long ramp running from the back of the courtyard into the basement. It is the another escape point for a stolen Intelligence. It is named the "L-Shaft" because it contained an elevator in previous incarnations of the 2Fort map. It is often called the "back stairs", "long stairs", "straight stairs", "stairs", or simply "straight".
- Basement: This is the space downstairs between the Spiral ramp and the L-Shaft. It leads to the Intelligence room and a resupply point exists at the end nearest to the L-Shaft. There is a Health pack and Ammo box in on the right side up against a wall of the Basement. The addition of these pickups has made camping the Intelligence harder, and attacking the Intelligence slightly easier.
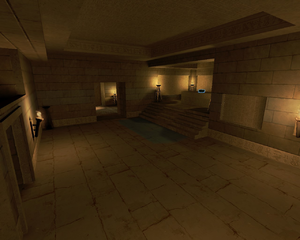
- Intelligence room: This is the room that has the Intelligence. It has two entrances from the Basement, and two from the Sewers. This is the primary defensive point of 2Fort, and as such it is frequently camped by Engineers, Demomen, and other classes, but due to the multitude of different access points it is much more difficult then in it's official in game counterpart. To successfully capture your opposition's Intelligence, you must return it to the Intelligence room in your own base. The Intelligence is on top of a sarcophagus towards the left corner of the room. The way the room is laid out makes it very difficult for campers to entrench themselves, and can often be easily dealt with if the spot is lightly camped and can be taken out without the use of an ÜberCharge.
Trivia
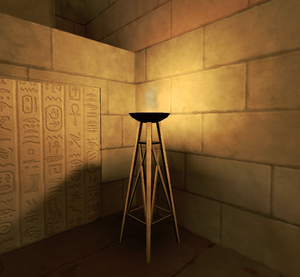
- This map makes multiple uses of the pre-existing hyrogliphs in the Map Egypt, as is seen in various spots throughout the map
- Oddly enough the trimmings in a few area's don't have any TF2 glyph's, but rather actual realistic ones.
- There are multiple torches scattered throughout the map to light area's, but they are also able to cause slight damage at around 5dps
See also
| ||||||||||||||||||||||||||||||||||||||||||||||||


