Community Suijin strategy
This article discusses community strategy for Suijin.
| Community Suijin strategy | |
|---|---|

| |
| Basic Information | |
| Developer(s): | {{{map-developer}}} |
| Map Info | |
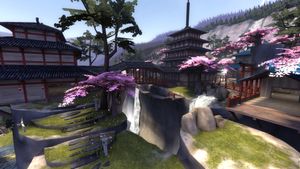
| Environment: | Japanese cliffside |
| Setting: | Daylight, sunny |
| Hazards: | Pitfall |
Contents
General strategy
- The map is filled with catwalks, allowing for quicker movement across the map.
- If you're taking a beating, retreat to the island on the side. The area is filled with health kits and little activity.
- There are many hiding spots in this map, such as in the trees.
- Health packs on this map are scattered and are in hazardous locations. Be careful when trying to restore your health.
Class-specific strategy
 Scout
Scout
- Scouts can move quickly across the catwalks and provide harassment near the enemy spawn.
- The Mad Milk can be greatly useful when used around the Control point (objective).
- Flanking play-styles that involve weapons such as the Back Scatter or Pretty Boy's Pocket Pistol will work excellently on this map.
- Weapons that boost jump height, such as the Soda Popper, Winger, or Atomizer, can be good choices for getting on top of the various buildings around the map.
- There are few good Sentry Gun spots other than near the Control point. If on the flank, the Bonk! Atomic Punch may not be necessary to equip, freeing up space for any of the other Secondary Weapons the Scout has.
 Soldier
- Sitting in the room above the capture point is a good way to take prospective cappers by surprise. You can get here via designated routes or Blast Jumping.
- The Health Packs on this map are poorly positioned for a mobile Soldier, and there are none on the rooftops. Use Weapons such as the Black Box, Gunboats or Concheror if survival is a priority.
 Pyro
Pyro
- Long sightlines and tall buildings can make dealing with Snipers, Soldiers, Demomen, and even Engineers, more difficult than usual. It is important to take flank routes, such as routes under the bridges or along the sides of the map, in order to survive these Classes on Suijin.
- One side of the map is lined with cliffs. Use this to your advantage and airblast enemies to their deaths.
- The Flare Gun, Detonator, Manmelter, and Scorch Shot can be spammed into the point, from the "calligraphy temples" side of the map, with high success.
- The Neon Annihilator will gain guaranteed Critical hits when used in the water at the bottom of the map.
 Demoman
- The control point room is extremely small, making for a good place to lay sticky traps.
- The Loose Cannon can be great for knocking enemies off the cliffs on Suijin.
- Use your Blast Jumps in order to get to the roof faster. Be aware of the lack of Health packs, however. Alternatively, take the designated (but longer) routes.
- Long, narrow paths allow Demomen using the Splendid Screen or Chargin' Targe to easily trap enemies with their charges.
 Heavy
Heavy
- Assist your team in capturing the point, as in the event of a firefight you'll be able to serve as a tank in the capture.
- The long sightlines and high rooftops make playing as a Heavy extremely hazardous. Use flank routes and cover to avoid taking damage.
- The health packs on this map are widely spread out and are in positions that are not easy to access quickly or safely. You can greatly assist your team by giving them your Sandvich, Dalokohs Bar, or Buffalo Steak Sandvich, as Health.
 Engineer
- A good vantage point is to set up a sentry nest on the second floor above the point. It provides good cover, and is difficult to take down. Be aware that you can still be ambushed from the windows.
- There are a lot of small hiding places to put a Teleporter Exit, so be sure to experiment with possible locations.
- There are few good Sentry Spots other than near the Control point. It may be a good idea to use the Combat Mini-Sentry that the Gunslinger provides.
 Medic
Medic
- Medics should keep close support of their team when attempting to capture, as the point can be tricky to capture.
- Due to the lack of good Health pack spots, you can greatly benefit your team by healing them. This is especially true when on the rooftops.
- Using the long sightlines can allow the Crusader's Crossbow to be of great use.
 Sniper
- The map is filled with balconies, second floors, and general lookouts. This will give you lots of possible places to shoot from.
- Be aware, that although all the catwalks give you lots of range, it also makes you an easy target.
- The control point room is very small, making Jarate extremely effective.
 Spy
Spy
- With all the catwalks and roofs you can easily ambush the enemy team from above.
- The second floor of the control point is a known defensive position for whichever team controls the point. Assist your team by harassing their position and destroying sentry nests.