Difference between revisions of "Community Skirmish strategy"
Fisherboy800 (talk | contribs) m (→General Strategy (All Classes): mc, consistency) |
|||
| (2 intermediate revisions by 2 users not shown) | |||
| Line 25: | Line 25: | ||
{{TOC limit|3}} | {{TOC limit|3}} | ||
| − | == General | + | == General strategy (All Classes) == |
{{See also|Community Versus Saxton Hale strategy}} | {{See also|Community Versus Saxton Hale strategy}} | ||
* The Upper Walkway can be used as a place to hide from Hale, as he likely would not go out of his way to check there. It can be reached through explosive jumps or [[Versus Saxton Hale#Wall climbing|wall climbing]]. | * The Upper Walkway can be used as a place to hide from Hale, as he likely would not go out of his way to check there. It can be reached through explosive jumps or [[Versus Saxton Hale#Wall climbing|wall climbing]]. | ||
| Line 33: | Line 33: | ||
=== {{class link|Scout}} === | === {{class link|Scout}} === | ||
* In addition to its regular use to get health back, the [[Mad Milk]] is extremely useful for putting yourself or your teammates out when they are [[Fire|on fire]] from the lava. | * In addition to its regular use to get health back, the [[Mad Milk]] is extremely useful for putting yourself or your teammates out when they are [[Fire|on fire]] from the lava. | ||
| − | * The [[Force-A-Nature]]'s self-knockback can be used to save yourself after being pushed by Hale into the [[Environmental death#Crocodiles|Crocodile pit]], alongside being able to knock Hale into the Crocodile pit itself. | + | * The [[Force-A-Nature]]'s self-knockback can be used to save yourself after being pushed by Hale into the [[Environmental death#Crocodiles|Crocodile pit]], alongside being able to knock Hale into the Crocodile pit itself. |
=== {{class link|Soldier}} === | === {{class link|Soldier}} === | ||
* The [[Concheror]]'s healing can help negate the damage taken from being set on fire by the Tram's lava. | * The [[Concheror]]'s healing can help negate the damage taken from being set on fire by the Tram's lava. | ||
| − | |||
=== {{class link|Pyro}} === | === {{class link|Pyro}} === | ||
| Line 60: | Line 59: | ||
=== {{class link|Sniper}} === | === {{class link|Sniper}} === | ||
* The Upper Walkway is a good spot to snipe Hale, as Hale must go out of his way to attack you from its high ground, wasting precious time. | * The Upper Walkway is a good spot to snipe Hale, as Hale must go out of his way to attack you from its high ground, wasting precious time. | ||
| − | * The [[Cozy Camper]] can help negate the damage taken from being set on fir from the Tram's | + | * The [[Cozy Camper]] can help negate the damage taken from being set on fir from the Tram's lava. |
=== {{class link|Spy}} === | === {{class link|Spy}} === | ||
| − | * The [[Spy- | + | * The [[Spy-Cicle]] can be used to protect yourself from the Tram's lava, but this will leave you in a bad spot if Saxton is nearby, as you are without a [[melee]] weapon. Thus it's most advantageous if you have a clear escape route or if Hale is distracted. |
| − | * With the [[Cloak and Dagger]], the Tram has several hiding spots if Hale is | + | * With the [[Cloak and Dagger]], the Tram has several hiding spots if Hale is pursuing you after a succesful backstab. |
=== {{class link|Saxton Hale}} === | === {{class link|Saxton Hale}} === | ||
* If you are fighting a player while in the lower half of the Food Court, the Crocodile pit can be used to instantly kill players by knocking them into it. | * If you are fighting a player while in the lower half of the Food Court, the Crocodile pit can be used to instantly kill players by knocking them into it. | ||
* If several players are [[turtling]] in the security room, your [[Versus Saxton Hale#Mighty Slam|Mighty Slam]] can weaken their buildings significantly. The [[Versus Saxton Hale#Sweeping Charge|Sweeping Charge]] can be used to charge through any buildings blocking the entrance. | * If several players are [[turtling]] in the security room, your [[Versus Saxton Hale#Mighty Slam|Mighty Slam]] can weaken their buildings significantly. The [[Versus Saxton Hale#Sweeping Charge|Sweeping Charge]] can be used to charge through any buildings blocking the entrance. | ||
| − | * You can use your [[Versus Saxton Hale#Brave Jump|Brave Jump]] to | + | * You can use your [[Versus Saxton Hale#Brave Jump|Brave Jump]] to avoid falling into the Crocodile pit and the Tram's lava. |
* A combination of Sweeping Charge and Mighty Slam can destroy the mercenaries' defence on the Upper Walkway. From there, they could fall off the walkway, isolating them and giving you an easy pick. | * A combination of Sweeping Charge and Mighty Slam can destroy the mercenaries' defence on the Upper Walkway. From there, they could fall off the walkway, isolating them and giving you an easy pick. | ||
{{Map Strategy Nav}} | {{Map Strategy Nav}} | ||
Latest revision as of 22:40, 28 September 2025
| “Sun Tzu's got nothing on us!” This article is a Community strategy stub. As such, it is not complete. You can help the Team Fortress Wiki Community Strategy Project by expanding it. |
| Skirmish | |
|---|---|

| |
| Basic Information | |
| Map type: | Versus Saxton Hale (Community) |
| File name: | vsh_skirmish
|
| Released: | July 12, 2023 Patch (Summer 2023 Update) |
| Developer(s): | John "MilkMaster72" Worden Lizard Of Oz Jason "Yaki" Herman Szabó "Maxxy" Attila Joaquim "JPRAS" Silva Matthew "MegapiemanPHD" Simmons James M. Maxim "VellyVice" Streltsov Aeon "Void" Bollig Louie "bakscratch" Turner |
| Map Info | |
| Environment: | Jungle, theme park, caves |
| Setting: | Dusk, sunset |
| Hazards: | Crocodiles, Lava fire |
| Map Items | |
| Map Photos | |
| Map overview | |
This article is about Community Skirmish strategy.
Note: It is recommended to read the main Skirmish article first to become familiar with the names of key map locations used in this article.
General strategy (All Classes)
See also: Community Versus Saxton Hale strategy
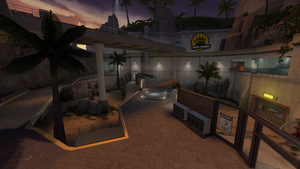
- The Upper Walkway can be used as a place to hide from Hale, as he likely would not go out of his way to check there. It can be reached through explosive jumps or wall climbing.
- If Hale is on the Upper Walkway, avoid crossing the Main Walkway when possible. He may use this position to bait mercenaries into isolating themselves, then ambush them with a surprise Ground Pound.
Class-specific strategy
 Scout
Scout
- In addition to its regular use to get health back, the Mad Milk is extremely useful for putting yourself or your teammates out when they are on fire from the lava.
- The Force-A-Nature's self-knockback can be used to save yourself after being pushed by Hale into the Crocodile pit, alongside being able to knock Hale into the Crocodile pit itself.
 Soldier
- The Concheror's healing can help negate the damage taken from being set on fire by the Tram's lava.
 Pyro
Pyro
- If Hale is caught on fire after walking through the Tram's lava, use the Axtinguisher on Hale to deal extra damage and gain a speed boost.
- Use your airblast to push Hale into the Crocodile Pit.
- Your airblast can also be used to defend the Upper Walkway from Hale's attacks.
 Demoman
- You can set up a stickybomb trap hidden around the entrances from the Food Court and Tram to the security room to deter Hale from attacking Engineer buildings inside.
- The Catwalk can give you high ground to set up a stickybomb trap at setup time, as if you do it around the Transport Elevator you are vulnerable to isolation.
 Heavy
Heavy
- The Sandvich can be used to help burning teammates after being caught on fire from the Tram's lava.
 Engineer
- A good spot to build a nest is in the security room and the Upper Walkway. The Upper Walkway is high ground advantageous, and with the help of a willing Pyro, you can use their airblast to defend your buildings, wasting Hale's time.
 Medic
Medic
- As you can't normally get to the Upper Walkway without an Engineer's Teleporter, the Quick-Fix's blast jump mirroring can be used with the help of a willing explosive jumper to reach the area.
- The Catwalk is a good base to do this, as it's closest to the Upper Walkway.
 Sniper
- The Upper Walkway is a good spot to snipe Hale, as Hale must go out of his way to attack you from its high ground, wasting precious time.
- The Cozy Camper can help negate the damage taken from being set on fir from the Tram's lava.
 Spy
Spy
- The Spy-Cicle can be used to protect yourself from the Tram's lava, but this will leave you in a bad spot if Saxton is nearby, as you are without a melee weapon. Thus it's most advantageous if you have a clear escape route or if Hale is distracted.
- With the Cloak and Dagger, the Tram has several hiding spots if Hale is pursuing you after a succesful backstab.
 Saxton Hale
- If you are fighting a player while in the lower half of the Food Court, the Crocodile pit can be used to instantly kill players by knocking them into it.
- If several players are turtling in the security room, your Mighty Slam can weaken their buildings significantly. The Sweeping Charge can be used to charge through any buildings blocking the entrance.
- You can use your Brave Jump to avoid falling into the Crocodile pit and the Tram's lava.
- A combination of Sweeping Charge and Mighty Slam can destroy the mercenaries' defence on the Upper Walkway. From there, they could fall off the walkway, isolating them and giving you an easy pick.

