| Steel
|

|
| Información básica
|
| Desarrollado por: |
{{{map-developer}}}
|
| Información del mapa
|
| Entorno: |
Industrial
|
| Escenario: |
Día, soleado
|
| Peligros: |
Pozo
|
| Imágenes del mapa
|
|
|
| Vista general
|
|
|
| Sello de Mapa
|

|
| Puntuación
|
Steel es un mapa de Atacar/Defender bastante complejo y único. A diferencia de otro mapas de Team Fortress 2, al capturar un Punto de Control, la apariencia del mapa cambia, abriendo y cerrandose diferntes rutas para ambos equipos, dando varias posibilidades de ataque. Distinguiendose de otros mapas lineares, Steel permite al equipo atacante, BLU, capturar el punto final sin necesidad de capturar el resto de los objetivos.
El objetivo de Steel para el equipo BLU es capturar el punto E. El punto E esta siempre disponible, aunque obteniendo A, B o C se facilita su captura.
Steel fue elegido por Valve como un mapa honorario oficial debido a su gran calidad.
Video de Introducción
Lugares

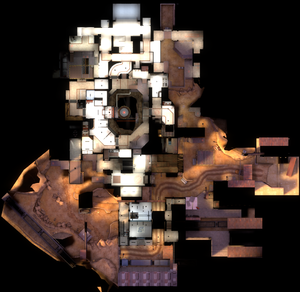
Vista aérea. (Large file)
Spawn Areas
BLU's Staging Area: A train station at the very bottom of the map. The base has three exits, two to Command Point A (one low and one high), and one to Command Point B. From spawn orientation, Point A is to the right and point B is to the left.
RED's Initial Spawn: A small room with exits leading to A, B and E. From spawn orientation, A is to the left, B is to the right and E is forward.
RED's Second Spawn: After BLU captures point B, RED is forced to spawn between points C and D. From spawn orientation, C is to the left, D is to the right and E is forward. After BLU captures point D, the exit to E is closed off.
Puntos de Control
Shipping Dock (Point A): Point A is a shipping dock located directly to the left of RED's initial spawn. BLU is required to climb up a short hill to get to the point at the top, while a couple of walls surrounding the point prevent RED from directly firing at the point. The higher exit from BLU's base leads to the top of a wall. Capturing point A immediately opens a door to the right of the point leading to B, as well as a slow-opening door directly on the point that leads to D and E. RED spawn's door to A becomes sealed.
Truck Yard (Point B): Point B is located to the right of RED's initial spawn and is partially protected by a small wall facing the RED spawn. There is only one path leading to B before A is captured, while capturing A opens up another. RED's entrance to point B leads into a small 2 story building with a window at the top that can shoot out onto the whole B area except for the closest half of point B. Blue's spawn exit has a passageway off the side which leads to a small overlook and a shack that Snipers may use in attacking B. To the left of point B and just off of the building in front of RED's spawn is a passageway that leads to point E and then a ledge in the C area. Capturing point B causes a door to slowly open to point C and also moves RED's spawn to the opposite side of point E.
Canyon (Point C): Point C is located on an elevated platform north of point B. The hill leading up from B spikes down into a canyon. Several large rocks provide cover from incoming fire on the B side. There are two sets of stairs to get onto C, one on the outside with no cover, and on to the right which is a small tunnel. RED has a choice of 2 doorways to defend from, one of which includes a small wall on the B side. Capturing C causes three bridges to extend to point E very slowly.
Storehouse (Point D): Point D is located directly next to RED's second spawn, on the opposite side of C. A narrow hallway with a small ledge connects C and D, but one must travel in front of RED's back spawn. RED can also see anyone moving through this hallway by way of a window above their exit to point E, but the window is closed off when the exit is. Capturing D raises guardrails on the bridges and also seals off RED spawn's closest exit to E.
Launch Pad (Point E): Point E is located in the center of the base, on a small platform above a deep pit. At first, only Scouts, Soldiers, and Demomen can effectively reach it, but once C is captured, bridges appear and allow all classes to get to the point. Point E is available from the start of the round, but capturing all the other points can make E easier to capture.
Estrategia
Ritmo de Captura
| Punto de Control A
|
×1
|
|
| ×2
|
|
| ×3
|
|
| ×4
|
|
| ×5
|
|
| Punto de Control B
|
×1
|
|
| ×2
|
|
| ×3
|
|
| ×4
|
|
| ×5
|
|
| Punto de Control C
|
×1
|
|
| ×2
|
|
| ×3
|
|
| ×4
|
|
| ×5
|
|
| Punto de Control D
|
×1
|
|
| ×2
|
|
| ×3
|
|
| ×4
|
|
| ×5
|
|
| Punto de Control E
|
×1
|
|
| ×2
|
|
| ×3
|
|
| ×4
|
|
| ×5
|
|
Historial de Actualización
August 19, 2008 Patch (A Heavy Update)
- Steel es añadido al juego.
December 21, 2010 Patch
- Corregido error que impedía cargar el mapa correctamente.
Trivia
- Las puertas que se abren al capturar A no estan completamente selladas, el fuego de un Pyro puede atravesarlas.


