Difference between revisions of "PDA"
Focusknock (talk | contribs) |
(→Trivia: removing ancient speculation) |
||
| Line 41: | Line 41: | ||
*Upon selecting the Build PDA, the Engineer flips the small red switch located at the top of the device. | *Upon selecting the Build PDA, the Engineer flips the small red switch located at the top of the device. | ||
*Upon selecting the Destroy PDA, the Engineer extends (pulls out) the small antennae located at the top of the device. | *Upon selecting the Destroy PDA, the Engineer extends (pulls out) the small antennae located at the top of the device. | ||
| − | |||
== Gallery == | == Gallery == | ||
Revision as of 19:23, 29 September 2010
| “ | I built that.
Click to listen
— The Engineer on who built what
|
” |
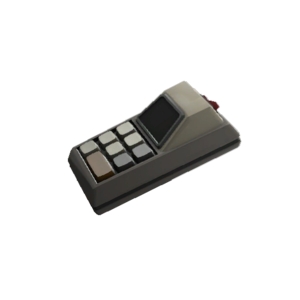
The Engineer possesses two PDAs, the Build Tool and the Demolish Tool, which he uses to construct and destroy his various buildings respectively. The Build Tool appears as calculator style apparatus, possibly for ordering parts, whereas the Demolish Tool is shown as a typical handheld detonation device.
The gadgets are not 'regular' weapons as they cannot be used to attack; they mainly serve as a visual cue to the player and those that see the player's character. While the player is using a PDA, a special on-screen menu appears to allow the player to build or destroy available buildings.
Contents
Usage
By default, the player uses weapon slot 4 to build and weapon slot 5 to demolish (destroy). A superimposed HUD graphic then appears which lists all four buildings.
When the player selects the build or demolish weapon slot, the number keys 1 - 4 map to the building types (PC version). There is also a cancel key (Default key: Q) to exit the PDA menu; this key is whatever is mapped to "Last weapon used" in settings.
- 1 key: Sentry Gun / Combat Mini-Sentry
- 2 key: Dispenser
- 3 key: Teleporter Entrance
- 4 key: Teleporter Exit
- Last weapon used key: Cancel building / demolition. (Default key: Q)
These keys will only function on the appropriate PDA under the right conditions. If you have insufficient Metal, you will be denied access to certain buildings on the Build tool. When you gather metal, the PDA will enable building choices that would have their cost met. The PDA will not allow a player to build more than one of any building type. Similar to the Build PDA restrictions, the Destroy PDA will only destroy builds that have already been constructed. The Demolish tool cannot be used to destroy buildings currently being sapped by the Electro Sapper.
If a player chooses to construct an available building from the Build tool, the player model will then hold a toolbox, and the player will see a template on the ground in front of them showing the orientation of the chosen building. While the template is visible, right-clicking adjusts the building's orientation by 90 degrees anti-clockwise, left-clicking starts the build and "last weapon used" cancels the build.
Note: The console versions do not have a separate Demolish tool. Instead, both are handled by the Build Tool, serving as a single PDA. After choosing the proper weapon slot to activate the PDA, the player uses the right trigger/R2 to construct the selected building (if you have enough Metal) and the left trigger/L2 to demolish the selected building (if it is already built).
Trivia
- The PDAs possess a normal weapon variant.
- There is a PDA Token in the items_game.txt file, but it is currently unused. Internally, the Engineer's Build tool and the Spy's Disguise Kit fall under this slot.
- The PDA2 token is used for crafting the Spy's unlockable watches, which fall into the PDA2 slot, and can be made by crafting together 3 Spy watches. This is the only use for the token as of yet.
- Upon selecting the Build PDA, the Engineer flips the small red switch located at the top of the device.
- Upon selecting the Destroy PDA, the Engineer extends (pulls out) the small antennae located at the top of the device.
Gallery
- Build Tool 1st person cropped.png
Build Tool 1st person view.
- Build Tool with Gunslinger 1st person red cropped.png
Build Tool RED 1st person view with Gunslinger.
Build Tool Full RED 1st person view with Gunslinger.
- Build Tool with Gunslinger 1st person blu cropped.png
Build Tool BLU 1st person view with Gunslinger.
Build Tool Full BLU 1st person view with Gunslinger.
- Demolish Tool 1st person cropped.png
Demolish Tool 1st person view.
- Demolish Tool with Gunslinger 1st person red cropped.png
Demolish Tool RED 1st person view with Gunslinger.
Demolish Tool Full RED 1st person view with Gunslinger.
- Demolish Tool with Gunslinger 1st person blu cropped.png
Demolish Tool BLU 1st person view with Gunslinger.
Demolish Tool Full BLU 1st person view with Gunslinger.
- Toolbox 1st person red cropped.png
Toolbox RED 1st person view.
- Toolbox with Gunslinger 1st person red cropped.png
Toolbox RED 1st person view with Gunslinger.
Toolbox Full RED 1st person view with Gunslinger.
- Toolbox 1st person blu cropped.png
Toolbox BLU 1st person view.
- Toolbox with Gunslinger 1st person blu cropped.png
Toolbox BLU 1st person view with Gunslinger.
Toolbox Full BLU 1st person view with Gunslinger.


