Difference between revisions of "Well"
(→Trivia: Holy Doolay...) |
(Undo edit by Lancer anti-tank Rocket (Talk) (336686) Not really noteworthy) |
||
| Line 131: | Line 131: | ||
* Well is one of the maps designed after existing [[Team Fortress Classic]] maps, the others being [[2Fort]], [[Dustbowl]], and [[Badlands]]. The original version was significantly different, with this version focusing more on a train station then any actual well. | * Well is one of the maps designed after existing [[Team Fortress Classic]] maps, the others being [[2Fort]], [[Dustbowl]], and [[Badlands]]. The original version was significantly different, with this version focusing more on a train station then any actual well. | ||
*According to the Map of Mann's Land, Well (called The Well) is southwest from [[Gravel Pit]]. A sea of gravel (called The Gravel Sea on the map) lies north. | *According to the Map of Mann's Land, Well (called The Well) is southwest from [[Gravel Pit]]. A sea of gravel (called The Gravel Sea on the map) lies north. | ||
| − | |||
==See also== | ==See also== | ||
Revision as of 00:16, 31 January 2011
| Well | |
|---|---|

| |
| Basic Information | |
| Developer(s): | {{{map-developer}}} |
| Map Photos | |
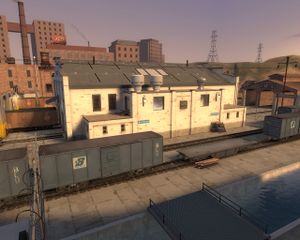
Well is a standard Control Point map. There are three buildings, the first and last of which hold 2 control points. The second building holds a neutral control point. The map is symmetrical from both sides of the center building.
There are 6 train tracks - 2 in each yard and 2 going through the neutral building. Only the 2 in the neutral building actually have trains traveling on them, as at a random time of about 5 minutes, a train passes through which will instantly kill any player it comes in contact with.
TF2's Well drastically changes from TFC's version, but keeps the two bases, Sniper ports, and the neutral building.
Contents
Introduction video
Goal
In Well, you must capture all 5 control points to win the round. Each team starts with 2 control points closest to them and 1 neutral control point in the middle of the map.
Keep in mind that like all other standard control point maps, such as Granary, only the 2 control points nearest to each other can be captured by the enemy side. All other control points have a lock symbol on them in the HUD and cannot be taken by one side or another.
Locations
Control Points 1 & 5
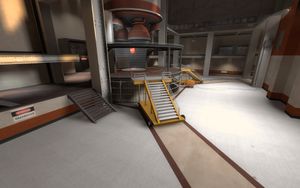
Control Points 1 & 5 (more easily referred to as '1' and '5') are the control points closest to each team's respawn. At the start of the map they belong to the team they are closest to the respawn of. They are on a raised circular platform in a large room, and behind it is the rear-most respawn of the point's corresponding team. The large room the point is situated in has two exits on each side of the wall opposite the respawn. Almost directly above these two exits are another two exits (one on each side) that quickly join together and lead to an area overlooking points 2 and 4. The platform and the room it is in would be the flag room from the original Well from the original Team Fortress. These points have a short capture time.
Control Points 2 & 4
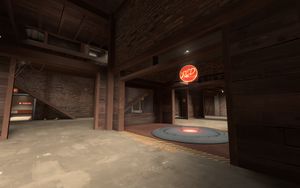
Control Points 2 & 4 (more easily referred to as '2' and '4') are the control points second closest to each team's respawn and are located inside the lower lobby of the corresponding team's building. It is accessible from two sides (the left and right), with the other two sides being a wall and a bulletproof glass window. These points have an average capture speed.
Control Point 3
This point is arguably the hardest point to capture and the point at which most of the map's action happens. The building the control point is located in is accessible from any direction in 3 ways:
- There is a single Water tunnel in the yard of a team that goes straight to an open room directly connected to the interior of the neutral building.
- There are two ground-level side entrances on the left and right side of the point. The side entrances of both one team and their enemy are separated by a stationary train car. When entering these entrances, though, watch out! There are train tracks that go right through these entrances; If the train hits you, you're dead.
- There is a Sniper deck on the 3rd point that has corners with no roof or walls- This means that a Demoman or Soldier can sticky or rocket jump up here and go right onto the Control point without walking up a platform. A Scout is also able to make it up to this platform through a slightly tricky move. Under each platform there are two windows with windowsills. A Scout needs to double jump in front of one of them (standing a little bit out from the wall), and at the height of his double jump press the crouch key as well as forward key to move onto the ledge. Then another double jump with a crouch at the top will put him on the top platform. With practice this can be done on the run. If a Scout is on the RED team, he can jump onto this platform and with careful practice and timing, double jump onto a lamp-post which is on the left side of the map and then (providing that they don't fall off) they can double jump onto the stationary train car and reach the other side before the match starts. This platform is great for ambushes with any of the mentioned classes.
The point itself is situated on a bridge over the rail lines that is accessible from four platforms - one going to each corner of the room. The platform connects the walls closest to each enemy base together and there is a small opening in the wall on each end of the platform leading into the Sniper deck.
Common strategies
Defending Control Point 1 or 5
If you build a Sentry Gun on the point, the gun is vulnerable from both entrances into the room but covers a large area, so it can push back or slow down invading forces long enough for players to confront them directly. If you do this, make sure you build a Dispenser near the Sentry to allow the guns to be repaired by an Engineer very quickly. It is also possible to put a Sentry Gun or player on the wall between the 2 entrances, but the player or sentry in question would have to cover and be vulnerable by 180°. The sentry would also be incapable of attacking players hugging the wall on either side.
Defending Control Point 2 or 4
There is no definite place to defend here, as it is a medium-sized open room, and in a chaotic situation you may find enemy defenders scrambling about in different areas, but some areas are significantly more advantageous than others. Here are some of the points:
- The yard is a somewhat large area in front of the base and between the base and the neutral building, and contains a few good places to defend:
- A Sentry Gun or player can go behind one of the train cars on either side of the yard to hinder invaders coming through the center. It is very hard to assault this position without poking your head out to shoot unless you sticky or rocket jump onto the train car. It is even harder to assault when there is a sentry on both sides.
- A Sentry Gun or player can also go to the side of the base's entrance next to the gate. While this works poorly on invaders coming in, it works very well on enemies coming out. By the time they open the gate and realize they are being shot, it is usually too late- The victim of the attack will either die or have to waste time going back for health.
- As a less common defense approach, you can defend in the general area of the yard on the side of the train cars closest to the neutral building. This way, you will be close to the exits of the building to catch any exiting invaders off-guard. The only things to watch for then are enemies jumping down from the Sniper deck onto your head (almost quite literally), and enemies on ground level that just came from the opposite exit.
- The inside of the base has about as many places to defend as the outside.
- Standing next to the entrances will ensure a close-combat situation with an entering invader.
- Standing on the elevated ledge around the lower lobby of the interior can be good for long-ranged classes like Soldiers, Sentry Guns, and Snipers, but it does not support a very large area of defense. That is, there is not a lot of visible area that the enemy traffics that is easy for you to defend. Jumping down and ambushing someone from here may work, though.
- Right in front of the door is a popular place to put a Sentry Gun, but it is easily taken out by a team of two: a door opener and a Sniper to shoot the Sentry Gun while the door is open.
- If you go upstairs, there is a Sniper deck that overlooks that team's yard and the Sniper deck of Control Point 3.
Defending Control Point 3
This Control point is the most active one, so defending it is key to a quick victory. There are many ways in which to defend it, and many that must be utilized.
- There is a Water tunnel in a small room under the Sniper deck that classes such as Spies like to come through. Just keep an eye on this at some points, even though it is not a very common way to travel.
- The side entrances to the point are easily defended by a player (usually not a Sentry Gun, for they are too vulnerable at such an active point) on the lower level, or better yet standing on the control point.
- The actual control point is most easily defended by a player or Sentry Gun standing on the Sniper deck facing the control point. Another good way too defend here is to place some Sticky bombs here if you are playing Demoman. This leaves you little cover from your left, right, or rear, though, if you are watching the point. If this is the case, then keep moving around to avoid Spies and watch out for any enemies coming from the side entrances. If you are on the enemy side of the neutral building, watch out for enemy Snipers on the Control Point 2 or 4 Sniper deck.
- During the set up period, soldiers and Demomen can propel themselves over the train cars on the outside of the neutral building, and into the midst of the enemy. Depending on the Soldier or Demoman's ability he might be able to wreck havoc upon the enemy, especially if he targets the Medics and preferably kills them before the enemies realize they're being attacked. However this is usually suicidal against well-coordinated teams.
- There is a small Sniper deck with open sides that a Sniper, Demoman, or Soldier can defend from. This area is most vulnerable from the Control Point 2 or 4 Sniper deck or the yard itself.
Assaulting Control Point 1 or 5
This Control point is usually the easiest to capture because the enemy makes bad moves due to their lack of coordination and panic at this time. It is important to know that even though there is a lot of the enemy in the area, there is the same number of allies. Don't let that go to your head, though, or it can ruin a perfect strategy.
- There are 2 tunnels leading to the room that control points 1 or 5 are located in. Be sure to watch for Sentry Guns in this area (specifically around the corner, as this is a very popular place to build them. If you manage to take out all the Sentry Guns in this area, there is usually no way for an enemy Engineer to rebuild a Sentry Gun due to your team's occupying this area.
- This is a great map for Spies to win capture points on, especially points 1 and 5. The point closest to the enemy spawn will often remain unguarded when the fighting is concentrated toward the middle of the map. A Spy can slip undetected to the rear of the enemy base, and if a quick push to take the second point is accomplished by the rest of the team, the Spy can simply step out of hiding and snatch the final point without taking a bullet. Spies can also have a fairly decent run of the enemy base if the Engineers are pushing forward with the rest of the team. Often, there will be unattended Teleporters near the enemy spawn points than can be sapped for easy points. This will slow down the enemy's forward advance and keep their Engineers busy.
Assaulting Control Point 2 or 4
These control points hold the easiest points for the defenders to take back. Since it is so easy to defend, Engineers must make sure to build Teleporters on the front lines so that the offense does not take too much time to get back to the front lines after respawning.
- Make sure to look out for Sentry Guns when entering the building, as the hallway that you see when you first come in is a popular place to build guns, as is the room directly in-between the 2 hallways.
- During the set up period, it is possible for Scouts to leap over into the enemy team's half of the map, by jumping onto the third point's Sniper balcony, then double jumping onto the train cars and over the enemies. If you trust your team to capture the third point, an unnoticed Scout can easily capture the second and first points before the enemy can respawn and establish defenses, or at the very least stall them long enough for heavier weapons to arrive. In a pinch Soldiers and Demomen can achieve this with rocket jumps, but they are more likely to be noticed and are sitting ducks against the team likely huddled around point 3.
Team Balance
Well is a tough map to get a good balance. All classes are useful here as you need a good mix of offense, defense, and support but a couple of classes are vital for success:
- Engineer: The shortage of Ammo and Metal on this map makes Dispensers at the front line vital to pressing an advantage or defending an attack.
- Medic: Again that shortage of Health makes a good Medic vital to success and as you press forward into heavily defended areas ÜberCharges may be required.
- Spy: Sentry placements can be really hard to overcome on this map so sapping is required.
Control Point Timing
Related Achievements
General
|
|
Scout
|
Update history
- Increased starting round timer to 10 minutes in Well
- Fixed players blocking doors in Well.
- Fixed Engineer building in exploit areas on final caps in Well.
Trivia
- Well is one of the maps designed after existing Team Fortress Classic maps, the others being 2Fort, Dustbowl, and Badlands. The original version was significantly different, with this version focusing more on a train station then any actual well.
- According to the Map of Mann's Land, Well (called The Well) is southwest from Gravel Pit. A sea of gravel (called The Gravel Sea on the map) lies north.
See also


