| Well (Capture the Flag)
|
| 300px
|
| Basic Information
|
| Variants: |
Arena and Control Point
|
| Developer(s): |
Unknown
|
| Map Photos
|
|
|
| Map Overview
|
|
|
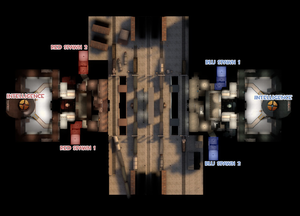
Well is a Capture the Flag map and was released in the January 25, 2008 Patch as the first official map added after the game's initial release. The map is a variant of its Control Point form. The major difference between Well (Capture the Flag) and Well (Control Point) is the middle building present in has been completely removed and replaced with a much smaller shed, with only one train passing through the center rather than two. The map is symmetrical from both sides of the train track. Another noticeable difference are the respawn rooms. In the CTF version they are only found where the second Control Point would be, in other words not far from the entrance to the team's base.
To win your team must capture the opposing team's Intelligence continuously until you reach the game's capture limit (default limit is 3) whilst preventing the enemy from achieving the same.
Introduction Video
Locations
- Rocket Silo (Intelligence room) - The furthest rooms in RED and BLU's bases. Central feature being the launch platform on which the Intelligence sits (floating above a small cart-like map object) Above this is a massive rocket, which looks to be prepped for launch. Their are two yellow staircases on either side of the circular platform leading up from the ground floor. The room is entered by four entrances, two of which lead from the 'Attic' to the catwalks around the perimeter of the room, and above the rocket launch platform. A medium medpack and Ammo crate sit behind the Intelligence platform, near the back wall, and small ammo packs lie at the far left and right sides of the room.
- Attic - The third floor of each team's base. A wooden floor runs the perimeter of the room, leading to a brickwork corridor to the Sniper Deck on one side, and an open doorway to the Silo on the other. The center of the room opens up to the ground floor, and is popular with Engineers for setting up Sentry Guns to cover the area, due to the guns being difficult to hit from the ground floor. Medium Medpacks and Ammo Crates lie at either side of the room.
- Sniper Deck (Second Floor) - A long, windowed corridor that runs the width of each team's base. Most commonly referred to as the Sniper Deck simply because of its popularity with Snipers. A brickwork corridor in the center leads to the attic, and a corridor at either end leads to the Atrium catwalks.
- Ground Floor (The Atrium) - The main room of each team's base. Two wide corridors leading to large roll-up doors are situated at each end of the room. A small room sits between the corridors, with a staircase to the Sniper Deck and a one-way hatch to the moat outside the base. The spawn rooms are at either end of The Atrium; (coming from the Silo) the Right Spawn-Room faces square-on with the roll-up door at the end of the corridor, whereas the Left Spawn-Room door is set perpendicular to roll-up door. The area that would normally house the Control Point on cp well is replaced with wooden walls. Catwalks run the perimeter of the atrium, leading to the Sniper deck by way of short corridors to the left and right.
- The Yard - The area between RED and BLU's bases. Outside each base is a deep moat, accessible from inside the base by way of a one-way hatch. Two bridges outside each roll-up door cross the moat, leading to the central area of the yard. This area is dominated by parked traincars, stacks of crates, and a single, long shed that covers a set of rails. A single train passes through this shed on a semi-regular basis, making the interior of the shed hazardous. Two small ammo crates and 2 medium medpacks lie at either end of the shed.
Strategy
- Spies and Scouts work wonders here. Due to the sparse nature of the map, a Spy can sap defensive Sentry Guns while the Scouts dart past to pick up the Intelligence.
- Build a teleporter underwater for surprise team attacks. Be sure to warn your team, though.
- You can also add a Dispenser underwater for infinite survival underwater and a Sentry Gun for mind tricks and easy kills on anyone that tries to douse flames or escape from tight battles.
Related Achievements
General
|
|
Lightning Offense
Win Well in 5 minutes or less.
|
|
|
|
Pyro
|
|
|
Plan B
Kill 10 enemies while you're both underwater.
|
|
|
|
Heavy
|
|
Crime and Punishment
Kill 10 enemies carrying your intelligence.
|
|
|
|
Scout
|
|
Quick Hook
Kill a player in Well before the round starts.
|
|
|
The Cycle
In a single life, kill an enemy while you are on the ground, in the air, and in the water.
|
|
|
Belittled Beleaguer
Kill an opposing player that has your intelligence while holding theirs.
|
|
|
|
|
Foul Territory
Cause an environmental death by stunning or slowing an enemy.
|
|
|
No-Hitter
Steal and then capture the enemy intelligence without firing a shot.
|
|
Demoman
|
|
He Who Celt It
Use the Sticky Launcher to kill an enemy player via environmental damage.
|
|
|
|
Engineer
|
|
No Man's Land
Use a sentry gun to kill 25 enemy players that are capturing a point.
|
|
|
|
Trivia
- While there are features that have been added and removed from the map, TF2's Well (Capture the Flag) design is more true to the original Team Fortress Classic map.


