Hightower
| Hightower | |
|---|---|

| |
| Basic Information | |
| Variants: | Helltower and Snowtower |
| Developer(s): | Unknown |
| Map Photos | |
| Map Overview | |
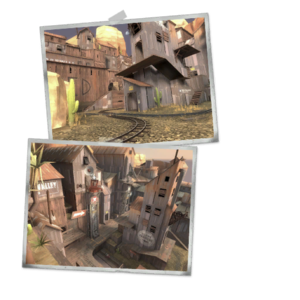
Hightower is a Payload Race map and was released with the Engineer Update as an official map. However, unlike Pipeline, it is set on a single stage. The carts must be elevated up the eponymous "hightower" in order for a team to win.
Hightower has a significantly different ending stage than to other Payload or Payload Race maps. Both teams need to move their carts up their respective tower in order to successfully capture the point and win the map. This makes the style of gameplay much more reliant on vertical movement. The platform that raises cart in the final stage will quickly lower to the bottom if no players are near it, similarly to encountering steep slopes on maps such as Pipeline.
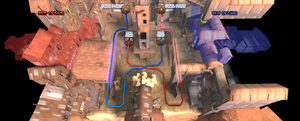
The goal of the map is for RED and BLU to simultaneously push their carts through enemy territory in order to reach the finishing point. At the same time, each team must prevent the other from doing the same.
Locations
Hightower contains only one symmetrical stage but two separate payload tracks meaning all the action will go on in the same area for the duration of the round. Since there is no designated attackers or defenders the map is mostly free roam, unlike Goldrush or Hoodoo. Template:Map items
- The Hightowers: The eponymous hightowers are two parallel structures with a movable platform at the ends of each track. Once the cart reaches the platform it will begin to slowly raise as long as there are any players standing on it. If the players are knocked off and the cart is unattended, the platform will quickly lower back down to the ground, killing anyone under it. If a player from the other team stands on it, the platform will halt until one side regains sole control of it. Once the platform reaches the top, it will detonate the cart and end the round.
- Central Tower: The main feature of the map is the giant tower located in the center. It has sets of winding ramps that lead to the top which serves as a vantage point for the whole map.
- The Crossing: In the beginning of the map, both carts move slowly to a crossing in which both payloads will pass by each other. This is usually the focus of combat for the first section of a round. Any cart directly on the crossing moves automatically until it is off the crossing. If both carts arrive at the crossing simultaneously, the RED cart goes first.
- The Ramp: After passing through the Crossing, the cart will move along the track to a ramp located directly outside the enemy team's spawn. The cart must be continuously pushed up the ramp, which is similar to the ramps present in Pipeline Stage 3. If the cart is not pushed when on the ramp, the cart will roll back down.
- Cliff-House: A small house that hangs over the ledge at the far end of the map. Useful for Spies.
- Balconies: At the very end of the spawn hallways are small balconies that overlook the Hightowers, the Central Tower, and most of the battlefield.
- Tower Corridors: Behind the Hightowers is a long straight corridor that leads to each teams cart starting area. The main entrance is between the capture platforms.
- Hightowerplatforms.jpg
Capture platforms
- Hightower cliffs.jpg
The cliffs/canyon
Strategy
- The balconies near the spawn room are a common but exposed position for Snipers to easily pick off enemies going up your team's ramp, the tower, or crossing. It is right across from the other team's balcony, so you would do well to clear enemy Snipers before. However, Spies will usually swarm this area, so Spy-checking is necessary.
- The knock back from weapons such as the Force-A-Nature or the Pyro's compression blast can send an enemy off the cliff, resulting in a kill.
- Crouching beside the cart on the platform facing the tower's side will protect you from damage coming from the enemy base. However, enemies can still get you if they are on your team's side of the crossing or the tower.
- The cart will fall rapidly if it was left unattended at height. You can lure absentminded enemies to a quick death if they stand underneath it.
- As long as you keep the enemy cart at the bottom at the ramp, you will have a great defensive position. The chokepoint is close enough to the cliff to use knock back or compression blasts, the proximity to the base means reinforcements can arrive quickly, the balcony sniping position covers it, the Sentry Guns also have a vantage point, and if the enemies accompanying the cart partway up die, the cart will move quickly down the ramp.
- Use Spies in the beginning of the map and backstab the swarm of enemies pushing the cart. This also works with a Backburner-equipped Pyro, who can most effectively do this by dropping from the central tower.
- The buildings for the large and medium health packs on ground level serve as ideal Pyro ambush spots as they are in small narrow areas and a magnet to low health enemies.
- The central tower serves as an excellent spot for Soldiers to rain rockets down from at enemies pushing the cart.
- A Demoman using stickies can very easily stop a group of enemies from capturing the final point as they must stay on a very small platform leaving them very susceptible to explosive damage.
- Mini-Sentry Guns can be very effective on Hightower. Placing a Mini-Sentry on the opposing team's side of the central tower is a usually unexpected tactic. If the enemy team's cart is going up the tower, then you can use a Mini-Sentry and the Wrangler to damage and kill enemies from the opposite side of the map.
Update history
- Fixed players building in the RED spawn room.
- Fixed players building on the back window decks of the barns.
- Fixed players getting on the satellite dish platform.
- Fixed players building on the elevators.
- Reduced the ammo packs in the barns down to small ammo packs.
- Increased the hill speed modifier to 1.2 (up from .95)
- Fixed explosion particle effects playing in the skybox.
- Mine cart "window" collision fixed.
- Upped Scout-loop health to large.
Bugs
- There is a glitch that disables one of the teams' ability to push the cart, while the other team can still push theirs.
External links
| |||||||||||||||||||||||


