Cowerhouse
| “Let's go, let's go, let's go!” This article documents a recent addition. It may contain speculation, broken links or errors. You can help improve it by editing this page to include new information. |
| Cowerhouse | |
|---|---|

| |
| Basic Information | |
| Map type: | Control Point |
| File name: | cp_cowerhouse
|
| Released: | October 9, 2025 Patch (Scream Fortress XVII) |
| Variants: | Powerhouse |
| Developer(s): | CanadianBill Alex "FGD5" Stewart Patrick "Zeus" Hennessy Liam "Diva Dan" Moffitt PearForceOne |
| Map Info | |
| Environment: | Halloween Castle & Bavarian Town |
| Setting: | Night |
| Deep Water: | Yes |
| Bot support: | Yes |
| Map Items | |
| Map Photos | |
| Map overview | |
| Map Stamp | |
| Supporters Leaderboard | |
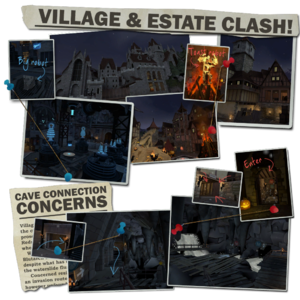
Cowerhouse is a community-created Control Point Halloween map released during the Scream Fortress 2025 update. It is set in a European mountainous region featuring two warring a Gothic castle estate on the BLU side and a Bavarian village theme on the RED side.
The map is littered with robots, which the villagers have now protested against by way of incinerating one at the stake in the town square. The BLU castle hides a gargantuan Heavy Robot underneath its control point.
Occasionally, a route underneath the map opens up that connects to each team's final control point, as well as a one-way exit to the middle point. Additionally, the map features custom HUD elements indicating when this route opens, with floating arrows pointing towards the entrances.
Upon capture of the final control point, each side has a special event which plays out. When RED wins, the gantry over the gargantuan Heavy robot opens upward, then as the robot Heavy rises a large overhead raygun energizes the Heavy and converts him to RED. When BLU wins, a giant Heavy robot bursts up through the grate the control point sits upon, extinguishing the burning small Heavy heavy, who then jumps down and thanks his saviors.
Cowerhouse was contributed to the Steam Workshop.
Locations
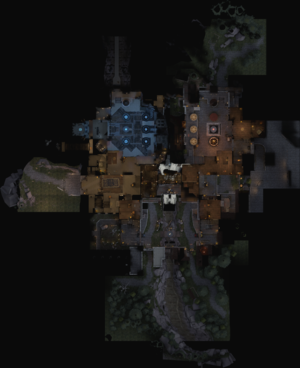
Note: If you are having trouble with finding the locations listed here, see the Helpful overview section to see their exact position marked on the map.
- Spawn: The spawn room has two exits: one in the rear to the rear of the final control point and one towards a small hallway that connects to the front of the final control point and the Main Hall.
- Final Control Point: The spawn room is attached to the side, with the timed connection to the Underground Chasm in the rear and passageways to the rest of the area in the front. There is 1 medium and 1 small health kit, as well as 2 medium ammo kits.
- Attic: The Attic is a room overlooking the Final Control point. The room provides access to one route that leads to the control point. There are doorways through on the top and on the bottom. Inside are a large health and ammo kit.
- Main Hall: The Main Hall is a large space which connects the Attic, Final Control Point, Spawn, and Middle Control Point. There is a medium health and ammo kit on the floor, and one small health kit on the stairs outside the Battlements. There is a timed one-way entrance to the Underground Chasm in the connection between the Main Hall and Final Control Point which opens only when that team controls the Middle Control Point.
- Battlements and Garage: The Battlements have three windows (1 open and 2 closed) which overlook the Middle Control Point and directly faces the opposing team's Battlements. In addition to the window there are two connections: one to the Main Hall and one to stairs leading down towards the Middle Control Point (through a side garage-like space). Inside are a small health and ammo kit.
- Cowerhouse BLU spawn.jpg
The BLU Spawn.
- Cowerhouse RED spawn.jpg
The RED Spawn.
- Cowerhouse BLU last.jpg
BLU final control point.
- Cowerhouse RED last.jpg
RED final control point.
- Cowerhouse RED courtyard.jpg
The Courtyard.
- Cowerhouse BLU hall.jpg
The Main Hall.
- Cowerhouse mid BLU garage.jpg
The BLU Garage.
- Cowerhouse mid RED garage.jpg
The RED Garage.
- Cowerhouse BLU attic.jpg
The Attic.
- Middle Control Point: The control point is located on a wooden bridge spanning a river. It is accessible from ramps on each side and from the water. Slightly to the side and above the control point is a narrow path additionally connecting each side.
- Team Sides: On both sides of the river are cobblestone paths with barriers for cover. The above battlements also lead to a narrow external ledge. On both sides there are medium health and ammo kits.
- Water: There is a small river that is deep enough to drown in. The only way back up if the player falls in is through the control point.
- Tunnel: There is a flank tunnel crossing the centerline on the opposite side from the Middle Control Point with rooms containing a health kit and an ammo kit. There is an object next to the raised platform in each room to enable crouch-jumping to get on top which was previously only accessible by classes with increased mobility.
- Cowerhouse mid facing control point.jpg
The Middle Control Point.
- Cowerhouse mid facing entryways.jpg
The Team Sides.
- Cowerhouse mid tunnel.jpg
The Tunnel.
- Exit Waterfall: At the bottom-center portion of the U-shaped space is a river which can be ridden as a one-way exit to the Middle Control Point.
- Forward Entryway Waterfalls: Near the exit waterfall are two waterfalls, one on each side, which is a forward one-way entry into the underground chasm when the door is open (timed entry, and open only on the side which captured mid).
- Path: At either end of the path are stairs leading to the rear of each team's Final Control Point with a small health and medium ammo kit.
- Chasm: The middle section of the U-shaped space is a chasm with a pitfall and one medium health kit on a stalagmite which must be jumped to reach from either side.
- Cowerhouse underground chasm waterfalls.jpg
Exit to mid, center of photo, and the Forward Entryway Waterfalls.
Helpful overview
Bottom half: Number references for named locations, top half: lines denoting area joining, X marks: Control points
1. Spawn
2. Final Control point
3. Spawn hallway
4. Attic
5. Main Hall
6. Battlements
7.Connection to middle
8. Garage
9. Middle Control Point
10. Middle flank tunnel route
11. Underground chasm flank route (timed)
Strategy
 | “Sun Tzu's got nothing on us!” This map's Community strategy page is a stub. As such, it is not complete. You can help the Team Fortress Wiki Community Strategy Project by expanding it. Notes: None added |
Control Point timing
| Control Point | Multiplier | Seconds | ||
|---|---|---|---|---|
| Control Point 1 and 3 | ×1 |
| ||
| ×2 |
| |||
| ×3 |
| |||
| ×4 |
| |||
| Control Point 2 | ×1 |
| ||
| ×2 |
| |||
| ×3 |
| |||
| ×4 |
|
Update history
October 9, 2025 Patch (Scream Fortress XVII)
- Added Cowerhouse to the game.
Trivia
- Knocking down each cow wood standee in the RED Garage (near the RED side middle point health and ammo kit) results in them returning as ghost cows.
- Shooting at the creatures' glowing eyes at the end of the rear boarded-up large passageway behind the BLU Final Control Point results in the appearance of a much larger, roaring, glowing-eyes creature.
- There is a small inset cavern hidden near the bottom of the underground chasm, containgin two jack-o-lanterns and a large frog, accessible from a well-aimed fall.
- A small wood crate slightly out-of-bounds in each spawn, when broken, reveals a jack-o-lantern.
| |||||||||||||||||||||||||||||||||||||||||||||||||
| ||||||||||||||||||||||||||||||||||||||||||||||||||||||||||||||||||||||


