Thunder Mountain
| Thunder Mountain | |
|---|---|

| |
| Basic Information | |
| Map type: | Payload |
| File name: | pl_thundermountain
|
| Released: | July 8, 2010 Patch (Engineer Update) |
| Variants: | Mannpower |
| Developer(s): | Valve |
| Map Info | |
| No. of Stages: | 3 |
| Environment: | Alpine |
| Setting: | Daylight, raining |
| Hazards: | Payload Cart explosion, Pitfall |
| Deep Water: | Yes |
| Bot support: | Yes |
| Map Items | |
| Map Photos | |
| “ | Aw, now you don't look like a happy camper.
Click to listen
— The Engineer finding the Sniper's hidden camping spot
|
” |
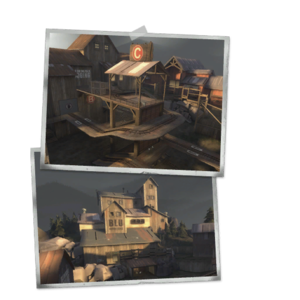
Thunder Mountain is a Valve-developed Payload map included with the Engineer Update, revealed on Day 4 thereof. It is the third official Payload map to be developed and released since the Heavy Update, and one of three Payload-based maps released during the Engineer Update, the others being Upward and Hightower (a Payload Race map).
Thunder Mountain is a multi-stage Payload map, like Gold Rush and Hoodoo. Unlike other Payload maps, Thunder Mountain features new gameplay mechanisms not used in earlier maps, including a bridge which must be raised in order for the cart to cross, and sloped rollback zones marked with yellow and black caution stripes.
The setup timer for the first two stages is 1 minute and 30 seconds, while the last stage has a setup time of 1 minute and 15 seconds.
Contents
Locations
![]() The following locations are described from the BLU perspective.
The following locations are described from the BLU perspective.
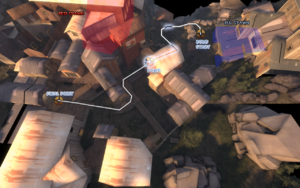
Stage 1
Checkpoint A
- BLU Spawn: A spawn with two exits, one on the left and one on the right wall, both lead to the Plateau.
- Plateau: A small patch of elevated ground right outside the BLU spawn. It overlooks the Courtyard, but is partially separated from it by a small rock face with fences.
- Courtyard: The cart first passes through a courtyard next to a large pitfall. The BLU side is lined by a rock face with fences, and the RED side is lined by the two stables.
- Log House and Shed: Two buildings, one larger, in the Courtyard. The cart must pass through the Log House, which has a small rafters section opposite the entrance and an opening to the pitfall. The back exit of the Log House leads to the Multi-storey Villa.
- First Ramp: A large rollback incline leading up to checkpoint A, overlooked by a small catwalk above connecting the two stables.
- Right Stable and Left Stable: Flanking the checkpoint A on both sides are two tall buildings with three floors. The lowest and the top most floors contain medium health packs, while the second floor of the Left Stable has a large ammo pack. The backside of the Right Stable connects to the Multi-storey Villa, while the backside of the Left Stable leads down to the Ravine. Both stables are connected at their upper most floor via a small catwalk.
- Multi-storey Villa: Stretching from the Right Stable until the pitfall is a horizontal structure with a long balcony that overlooks the Courtyard. It also houses the RED Spawn.
Checkpoint B
- Raised Bridge: Just behind the checkpoint A is a bridge that begins to rise once the previous checkpoint is captured. Below the Raised Bridge is the Ravine, while on the other side of the bridge is the Chicken-Wire Shed.
- Chicken-Wire Shed: A two-storey building separating the checkpoints A and B. Its second floor is connected to the RED Balcony, which then extends to the RED spawn exit.
- Ravine: A depression in the ground that extends from the Raised Bridge all the way to the Basement's entrance. The Ravine ramps up towards the Platform, eventually becoming level with the cart.
- Wooden Catwalk: Connecting the Chicken Wire Shed and the Basement is an elevated path that passes over the Ravine.
- Basement: Located on the left most edge of the map is a building with two floors. The lowest floor is accessible from the Ravine and it leads to the Barn, while the upper floor (accessible via the Wooden Catwalk) contains a small health pack.
- Platform: A raised platform containing checkpoint B, which the cart must reach after crossing the Raised Bridge and rounding the Chicken-Wire Shed.
- Second Ramp: Another rollback incline, this one leading to the Platform housing the second checkpoint.
- Barn: A large, multi-storey building opposite RED Spawn, with windows overlooking checkpoint B.
- RED Spawn: A large spawn room with windows. It has a single exit that leads into a stairwell connecting it to the Platform.
- RED Balcony: Branching off from the spawn exit is a corridor that leads to a balcony overlooking checkpoint B. The Balcony further connects to the Chicken-Wire Shed.
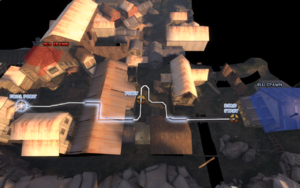
Stage 2
Checkpoint A
- BLU Spawn: A large spawn room at the opening of a mineshaft. It has two main exits, with one exit on the left and right walls, respectively.
- River: A small watercourse separating BLU Spawn from the rest of the stage. The cart passes over the truss bridge in the middle, while a log trestle to its right leads to the larger Rocky Flank.
- Rocky Flank: A flank route on the far right that goes along the Sawmill.
- Choke: A narrow coil of track leading to checkpoint A, surrounded by the Sawmill on the right and the Elevated Shed on the left.
- Sawmill: Located in between the Choke and the Rocky Flank is a large building housing stacks of wooden logs. Found in front of its porch is the first checkpoint.
- Elevated shed: On the map's left edge is tall, T-shaped structure connected to the Tunnel House. It overlooks the entire first checkpoint.
- U-Bend: After passing the Choke, the cart enters an open clearing and does a U-turn right in front of the Sawmill, before reaching checkpoint A.
Checkpoint B
- Tunnel: The cart must pass a bottleneck out from checkpoint A, with a blind turn and alternate routes above and below.
- Tunnel House: Located above the Tunnel is an enormous building containing many alternate routes that circumvent the Tunnel. One of the building's entrances starts out closed, but becomes unlocked once the first checkpoint is captured.
- Lobby: The central room of the Tunnel House. It is accessed by taking a flight of stairs located next to the Elevated Shed.
- Metal Platform: To the left of the Lobby and separated from it by a guardrail is an elevated platform with a medium health pack atop it. It can be entered from the direction of the Elevated Shed or by blast jumping onto it.
- Dropdown: To the right of the Lobby is a hole in the floor going down to the Tunnel. A small health pack can be found at its bottom.
- Large Balcony: The side of the Tunnel House facing the second checkpoint has a large balcony overlooking the Courtyard. Below the Balcony is also the cart's exit out of the Tunnel.
- Courtyard: A large downhill area extending from Tunnel to checkpoint B, with the Hay Buildings on the left side and the RED spawn buildings to the right. The cart descends down a forward-inclined ramp next to the Cubby Hole.
- Hay Buildings: Following along the map's left edge is a row of tall buildings connected to the Tunnel House. They can be entered through a variety of entrances and have multiple floors.
- Fourth Floor: The tallest part of the Hay Buildings is a room with chicken-wire fencing that directly overlooks the Battlements and RED Spawn's left exit.
- Cubby Hole: Located besides the cart's tracks is a shack housing a small health pack.
- RED Spawn: A spawn room with two exits. The left exit leads to the Battlements and to a dropdown onto checkpoint B, and the right exit leads inside a sheltered passage to the Tunnel's end.
- Battlements: A platform that connects the RED's spawn left exit with the Hay Buildings, passing over the cart's tracks.
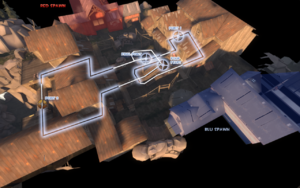
Stage 3
- BLU Spawn: A spawn room that leads to two small areas via two staircases. Each room has two exits, the left room leads to checkpoint A and the right room leads to checkpoint B.
- Apse: BLU Spawn's central exit that leads directly to the cart's starting position is covered by a piece of roofing resembling a semi-circle.
- RED Spawn: A spawn room with a similar design to BLU's spawn, though with more shallow staircases. The left room leads to a shortcut to checkpoint B, and the right room to a shortcut to checkpoint A. Similarly to BLU's spawn, there are also two doors on each side that head towards the final tower.
- RED Courtyard: Directly outside the RED spawn is a wide open area stretching from the Warehouse to the Binksi Logging.
Checkpoint A
- Warehouse: A large and spacious warehouse set lengthwise along the track's right section, housing the checkpoint A. Its walkways connect to a number of smaller rooms.
- BLU Shortcut and RED Shortcut: Both BLU's and RED's right spawn exits lead to a one-way gate only openable from the outside that offers quick access to the Warehouse.
- Staircase: In the Warehouse's right-most corner closest to the BLU spawn lies a staircase connecting the two Warehouse floors.
- Catwalk: Spanning over the cart's tracks is a wooden catwalk connecting the Staircase with the Terrace.
- Terrace: On the side of the Warehouse facing the Spiral is a platform offering good view of the central area.
Checkpoint B
- Binksi Logging: With checkpoint A captured, the cart exits the Warehouse, passes underneath the central Spiral and continues on into a two-storey building with the cart's tracks on the bottom level and a number of outer entrances on the top. Checkpoint B itself hangs above a pitfall at the rear of this building, overlooked by a large open-air deck on the second storey.
- BLU Shortcut and RED Shortcut: Much like with the Warehouse, both teams have a dedicated spawn exit that leads to a one-way gate providing access to the Binksi Logging.
- Foyer: The central room of the Binksi Logging. It connects to both team's Shortcuts and it also has an exit leading to the Connecting Platform.
- Main Staircase: A large staircase, this one located on the side that is closer to RED spawn, connects the two floors of Binksi Logging.
- Storage Room: On the side of Binksi Logging nearer to BLU spawn is a large room with shelves.
- Deck: Directly connecting the two aforementioned rooms is an outside section of the Binksi Logging building overlooking checkpoint B.
- Hunker-down: Found below the Deck is a small enclosed room on the same level as checkpoint B.
Checkpoint C
- Spiral: With checkpoint B captured, the cart turns around and exits Binksi Logging facing the opposite direction it entered it, after which it finally begins ascending the large spiral mining tower in the centre of the stage that it had passed by before. The Valley at the base of the Spiral is largely barren with a number of dead ends, however health and ammo packs, as well as cover become, more plentiful as one moves towards the peak.
- Valley: The Spiral itself is located in the midst of an empty depression in the ground, sandwiched in between the BLU and RED spawns on two sides, and Warehouse and Binksi Logging on the other two.
- Peak: The top of the Spiral overlooking both spawn areas, with checkpoint C found under a small roof that can be stood on. The cart must approach the checkpoint from below and round the final segment of the spiral before dropping down the central shaft to win the game.
- Connecting Platform: A wooden platform connects the peak of the Spiral with Binksi Loggins's Foyer. Several large crates can be found on top it. There is also a staircase that directly connects the RED Courtyard to the Peak.
Strategy
 | “Sun Tzu's got nothing on us!” This map's Community strategy page is a stub. As such, it is not complete. You can help the Team Fortress Wiki Community Strategy Project by expanding it. Notes: N/A |
Update history
- Added Thunder Mountain to the game.
- Clipped off sticky outcrops for smoother movement.
- Clipped various exploit ledges.
- Increased environment ambient exterior light level.
- Stage 1
- Fixed hole in respawn room brushes in RED spawn.
- Shifted respawn times to favor BLU by two seconds.
- Stage 3
- Clipped rocks off by BLU's spawn exit that leads to building B. (allowed Snipers to snipe the entire area)
- Removed embedded displacement. (building B interior roof)
- Removed rogue clip brush from building A balcony.
- Updated the final stage to have the train begin receding after 25 seconds. (15 seconds on the final stretch)
- [Undocumented] Reduced the cart speed on the final two ramps in the final stage to 1/2 normal speed.
- Fixed a build-in-spawn exploit in the Blue spawn room for stage 2.
- Fixed gate visible through ceiling in stage 3
- Fixed clipping in stage 3 Blu spawn
- Prevented players from building in the cliffside kill zone in stage 1
- Fixed being able to build on rocks outside of the fence by the capture points.
July 7, 2016 Patch (Meet Your Match Update)
- Fixed the first and second cap points of stage 3 each awarding 2 points to the capturing team instead of 1.
Bugs
- Players can get stuck on Stage 1 of the map if they crouch at the end of the bridge near the control point whilst it rises. The bridge rises halfway and the player rises with it, but then the player stops rising while the bridge continues on.
- On Stage 3, a player's view can glitch out if they rub against Checkpoint 3's sign on top of the roof.
Trivia
- On Stage 1, in the BLU spawn, the player may see some BLU characters in an area similar to the Soldier Training map, around a blackboard. They occasionally taunt, albeit with no weapons, and also occasionally do the Thriller taunt regardless of the time of the year.
- On Stage 2, in the RED spawn, one may see the RED team swimming in a pool.
- On Stage 3, near the second checkpoint (third dot), off in the distance the Sniper can be seen near his camper van (the same one seen in Meet the Sniper), a tent, and a fire. He only appears after BLU team has pushed the Payload past the first checkpoint.
- Thunder Mountain was originally teased on Day 1 of the Engineer Update, on the map of Badlands, an area that several game maps occupy.
- There is an actual mountain named Thunder Mountain in Sierra Nevada, California, USA.
- However, this map's name references the history of nuclear weapon development at Los Alamos National Laboratory (see also the mushroom cloud reference on the Engineer Update page), with a few underground nuclear tests occurring just north of where this map is located.
- A train can occasionally be seen pulling a logging train across a trestle outside of the playable area, near BLU's spawn on stage 1.
Gallery
External links
| |||||||||||||||||||||||


