Bloodwater
| Bloodwater | |
|---|---|

| |
| Basic Information | |
| Map type: | Payload |
| File name: | pl_bloodwater
|
| Released: | October 1, 2020 Patch (Scream Fortress XII) |
| Variants: | Badwater Basin |
| Developer(s): | Ryan "Chill" Foy Elián "iron" Rodríguez |
| Map Info | |
| Environment: | Halloween |
| Setting: | Night |
| Hazards: | Pumpkin bombs, Pitfalls, Skeletons, MONOCULUS, Payload Cart explosion, Pitfalls |
| Hazards (Underworld): | Health drain, Lava, Area Explosion |
| Magic spells: | Yes |
| Bot support: | Yes |
| Map Items | |
| Map Photos | |
| Map overview | |
| Map Stamp | |
| Supporters Leaderboard | |
| “ | Get out the Draculas, the Frankensteins and the Skeletons with the guns in their hands ! Introducing BloodWater(sic) ! (pl_badwater_event), The Brand New Remake of the EXTREMELY POPULAR Badwater Map !
— Bloodwater publicity blurb
|
” |
Bloodwater is a community-created single-stage Payload map with four checkpoints for the BLU team to capture. It was added during the Scream Fortress 2020 update.
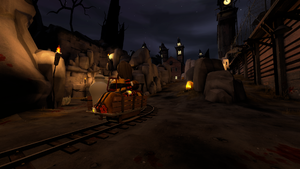
In this map, BLU must push a cart through three checkpoints all the way to RED's base. The cart drops magic spells as it moves. The clocktower shows how long until the next Witching Hour and how long until it ends. Players can try their luck in the Underworld for a chance at an advantage in the battle. The Payload cart plays Pumpkin bomb voicelines when hit by a weapon.
The setup timer is 1 minute and 10 seconds.
Bloodwater was contributed to the Steam Workshop.
Contents
Witching Hour
The Witching Hour is a timed-event feature. It occurs every time the minute hand on the Clocktower reaches 12 and lasts while the minute hand steps backward around back to 12 again. The Clocktower bells announce the Witching Hour. Clockworks clunk loudly within the tower, increasing in rate to warn players of the end of the Witching Hour.
Every Witching Hour, spells appear across the map, along with one of two bosses: the Skeleton King or MONOCULUS.
Locations
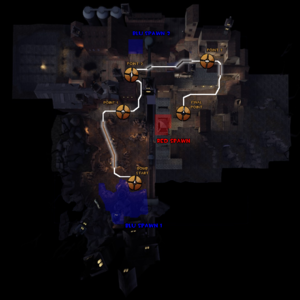
Note: If you are having trouble with finding the locations listed here, see the Helpful overview section to see their exact position marked on the map.
Checkpoint A
Time added if captured: 4 minutes
- First BLU Spawn: BLU's first spawn has four exits. A side exit on the left faces the left fork of the middle exit. The middle exit splits left and right, with the left fork facing the Side Path and the right fork leading to the cart. The right exit is the main exit and the largest exit, leading directly to the cart.
- Side Path: A small pathway that leads from BLU Spawn's left exit to the Cliffs.
- Cliffs: (also called Ridge or Above) This high ground spans from BLU's spawn to the first checkpoint. There are some rock formations for cover.
- Tunnel: The cart's track runs through a long tunnel that cuts underneath the Cliffs. The tunnel bends slightly twice, and the exit can be seen from the entrance and vice versa.
- Rocks: A U-shaped rock formation that provides cover while allowing a direct sightline towards BLU's first spawn. There is a medium health and ammo pack. Some of the rocks can be partially climbed through crouch-jumping.
- Bunker: (also Garage or The Alcove) A small concrete building sunk into the ground that opens directly onto the checkpoint A. It contains a deadly pitfall.
Checkpoint B
Time added if captured: 4 minutes
- Lobby: Underneath the Roof is a complex of several rooms.
- Roof: The top of the building that overlooks checkpoint B. Similarly to the Ridge on checkpoint A.
- Front Steps and Back Steps: The two stairways to the Roof. The Front Steps approach from the first checkpoint, while the Back Steps approach from the second checkpoint and the Back Yard.
- Back Roof: Located to the left of the Lobby is a vast expanse with several health kits.
- Back Yard: (also The Courtyard) This is the large area behind the Roof and overlooked by the Back Roof.
- Alcove: A small room tucked into the nearby building, located opposite the checkpoint B.
Checkpoint C
Time added if captured: 5 minutes
- Second BLU Spawn: Following the capture of checkpoint C, BLU spawn is relocated to a building just behind the checkpoint B. This spawn has a single exit that leads down a small staircase to B.
- Shortcut: A gate only openable by RED that leads to the area behind checkpoint B, next to the Bridge. The Shortcut's door locks when B is captured by BLU.
- Bridge: This enclosed bridge cuts across the knee-deep blood-stained water.
- Bridge Room: A room inside the Bridge with a medium health pack and a large ammo pack.
- Side Room: This room provides a path from checkpoint B onto the Bridge. It lets out onto a deck looking towards the checkpoint C.
- Attic: (also the Loft or the Balcony) A two-story building that BLU cannot easily access without capturing C. The Loft generally refers to the back area of the attic, while the Balcony generally refers to the front areas of the Attic.
Final Checkpoint
- Alley: The last chokepoint before the final checkpoint.
- Pit: The area with the final checkpoint. A ramp with the cart's track leads from the Alley to the Pit. Under the defending spawn is a tiny room with a large health kit. The final checkpoint itself is located inside a closed pit with a deadly portal at its bottom.
- Map Room: These two rooms branch off the Alley and lead to open windows that overlook the final checkpoint. The room between the Map Room and the third checkpoint is also called the Outer Map Room.
- Window Room: This is the room located between the third checkpoint and the Sniper Hut.
- Sniper Hut: (also Sniper Tower) Located up a short flight of stairs leading from the Window Room, with an open window overlooking part of the Pit.
- Overhangs: (also Garages) Underneath the Map Room and underneath decking across from the Map Room are two sheltered areas that face the final checkpoint.
- Spiral: (also Spiral Staircase) A spiral staircase rising from the lower level of the Pit to a deck off to the side of the Sniper Hut. It serves as a flank route to the Courtyard and Window Room. The deck is elevated enough to limit the classes on BLU that can access this flank from the Courtyard.
- Courtyard: This is the area between the Sniper Hut and the Spiral. Located in its middle is a deadly pitfall.
- RED Spawn #1: RED team has two separate spawns for this map. The first is located on the top floor, with two exits. One exit leads to the Shortcut for checkpoint B and the staircase to checkpoint C; the other exit to checkpoint D.
- RED Spawn #2: A small, single spawn located on the floor below the first spawn, with a single exit leading to a slope behind checkpoint D. RED players do not spawn here until checkpoint B has been captured by BLU.
Pushing the cart into the final checkpoint produces a deadly explosion, as well as filling the entire map with green ghosts.
Helpful overview
1.Side path
2.Cliffs
3.Rocks
4.Bunker
5.Front Steps
6.Back-Roof
7.Roof
8.Backyard
9.Back Steps
10.Alcove
11.Side Room
12.Bridge
13.Attic
14.Map Room
15.Alley
16.Window Room
17.Sniper Hut
18.Back Yard
19.Pit
20.Platforms
Underworld
Bloodwater's Underworld features two areas, one made up of small islands and one with one big island with a giant horned skull. It can be accessed through the portals left by MONOCULUS whenever it teleports or dies. The portals created when it teleports take players to the small islands, and the one created when it dies takes players to the giant skull island. When players appear in the Underworld, they are fully healed and are briefly invincible.
The small islands portion features several regular and three rare magic spells (one on each side of the white portal and one behind it), as well as a health draining effect. The giant skull island does not feature a health draining effect or magic spells, but offers a short distance from its spawn point to its exit; players should still be quick, however, as the island is engulfed in a series of explosions if they take too long to leave. Going through the white portals takes players back to their spawns with temporary invincibility, speed boost, Crits, double their maximum health, and a random rare magic spell.
Strategy
 | “Sun Tzu's got nothing on us!” This map's Community strategy page is a stub. As such, it is not complete. You can help the Team Fortress Wiki Community Strategy Project by expanding it. Notes: None added |
Update history
- Added Bloodwater to the game.
- Fixed misaligned textures.
- Sealed displacement hole to the skybox near BLU spawn.
- Brightened up point A.
- Brightened up ambient lighting.
- Fixed pumpkin bombs not spawning at point C and D.
- Brightened up lighting behind point B.
- Fixed exploit using the Power Up spell at point A.
- Fixed being able to build as an Engineer in lava pits.
- Bosses no longer get stuck in lava pits.
- Reduced the chance of the Horseless Headless Horsemann and Monoculus spawning.
- Updated all railings to not collide with projectiles and bullets.
- Removed normal-sized skeleton spawn locations.
- Removed an unintended clip brush passing through a BLU spawn wall.
- Added occluders.
- Fixed a Power Up spell exploit at point A.
- Removed the Horseless Headless Horsemann from the map.
- Updated the underworld to give a rare spell when escaping.
Changelog
RC1 Changelog (September 22, 2016)
- Added blood ponds!
- Fixed and lowered the pitch of the carts voicefiles!
- Added some detail to skybox, last point capture, and to some parts in the map!
- Fixed some weird prop's shadows!
RC2 Changelog (September 23, 2016)
- Added a room in 3rd cap point!
- Added a fence in 2nd cap point!
- Replaced some textures!
- Changed payload props!
RC3 Changelog (September 25, 2016)
- Updated RED's Mansion model!
- Added sharp tooths to some deadly pits!
- Lit a dark area in last point & corrected some misplaced displacements!
- Adjusted cart's props placement!
Notes
- The Clocktower's clock begins moving as soon as the setup phase starts. Once the BLU doors open, the clock's hand will already be on 8, leaving only about 30 seconds until the first Witching Hour begins.
- If the skeletons (including the Skeleton King) so much as touch the cart from certain angles, they die instantly. This always happens if they touch the front, even if the cart is completely stationary.
Trivia
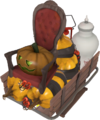
- The Payload cart features the jack-o'-lantern made by Medic and Engineer in the comic Gargoyles & Gravel.
Gallery
The jack-o'-lantern from Gargoyles & Gravel.
| |||||||||||||||||||
| ||||||||||||||||||||||||||||||||||||||||||||||


