| “ |
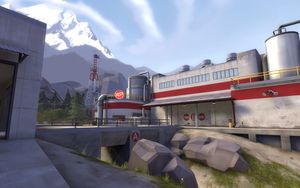
Cp_gorge is a top secret alpine facility diabolically masquerading as something else entirely: in this case, a sinister weapons factory disguised as an innocent water purification plant, and a large-ish hole not big enough to meet the U.S. Geological Survey’s standards for a gorge, disguised as a by-the-book, nothing-to-see-here gorge.
Cp_gorge is an attack/defense map with only two control points, designed for quick rounds and fast, frantic play. It has more lateral game space than previous Control Point maps, allowing for more maneuvering options.
|
” |
Gorge is a single-stage Attack/Defend Control Point map. It was released with the WAR! Update as an official map. While similar to Attack/Defend style maps like Dustbowl and Egypt, Gorge features a single large stage, as opposed to three smaller stages. Gorge was the first official Attack/Defend map with a moving BLU spawn point. The map's layout allows for more attacking choices for BLU and fewer high-traffic choke points.
A Halloween version of the map was released in the Scream Fortress 2015 update.
The setup timer is 1 minute and 15 seconds.
Locations
 The following locations are described from the BLU perspective.
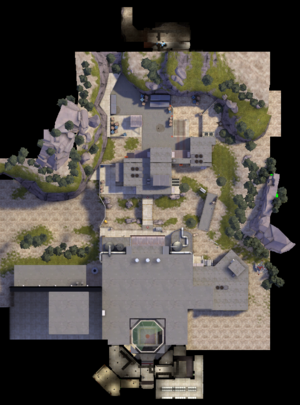
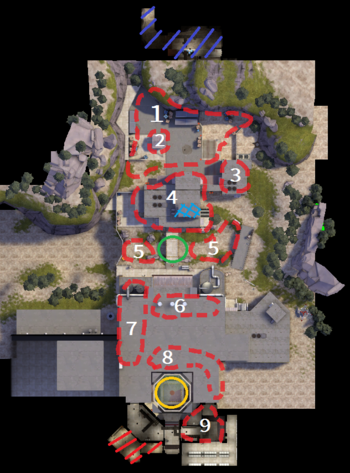
Note: If you are having trouble with finding the locations listed here, see the Helpful overview section to see their exact position marked on the map.
Point A
- Entrance Yard: The entrance yard is located outside of BLU's initial spawn area. It is entered by BLU from three different exits that are all respectively located at the far left, right, and center of the BLU spawn mountain wall. The entrance yard is mostly open without any cover except for the toll booth and a small wall on one side. Located up against the side of the BLU spawn is a pile of shipping crates, on top of which is a small health pack.
- Toll Booth: The toll booth is the small building to one side of the Entrance Yard. Inside is a large ammo pack as well as a medium health pack; the roof can be accessed by walking up a ladder leaning on it.
- Checkpoint Building: The checkpoint building is the large building separating the Gully area and the Entrance Yard. From the front, it has one main entrance walled off, leaving entrances from two sides. The building's interior is mostly empty, except for a few barrels and water tanks lined up on the walls. There are two exits on the far walls, each of which exits out to the far sides of the Ditch. The main exit is atop a twin staircase that exits out in front of control point A. Located underneath the twin staircase is a medium health and ammo pack.
- Upper Deck: Attached to the Checkpoint Building's left side is a second-floor route with two rooms and staircases at each end, acting as a flank route towards Gully. Found inside it is a large ammo pack and a medium health pack.
- Bridge: Control Point A is located on a level bridge over the Gully. The gorge landmark itself is accessible from various entrances from all directions. The outcrop of the Main Building sports a peephole that can be used to observe the capture point.
- Gully: The Gully runs through the entire capture point area, from wall to wall and under the Bridge. There is a medium health pack underneath the Bridge in the Gully. BLU's side of the gully generally slopes to the water while the RED side has some defensive walls that block classes that cannot blast jump.
- Maintenance Area: Located at the far left end of the Gully and besides the Main Building, is an open area containing a large ammo pack and a medium health pack.
- BLU Forward Spawn: Once BLU captures Control Point A, their spawn room moves to the top of the Checkpoint building, in a position overlooking the Gully and the Main Building.
The area outside BLU spawn.
Checkpoint Building; BLU view.
Checkpoint Building; RED view (BLU forward spawn visible on top).
The main room of the Checkpoint Building.
The Gully and the Bridge.
Point B
- Main Building: Behind Point A and the Gully is a large building housing the entirety of the second control point and the area surrounding it.
- Main Hallway: The Main Hallway is the long hallway connected to the right entrance, the one nearest the Bridge. It runs through the Main Building from the entrance to the Choke Room. It is connected to the Flank Hallway and has a set of stairs at the end that leads up to platforms above the hallway and the Choke Room.
- Flank Hallway: The Flank Hallway runs through the Main Building starting at the left-most entrance, going perpendicular to the Main Hallway. It connects to the the Main Hallway near its entrance and is also connected to the Maintenance Area. There is a staircase at its far end that leads to the Second Floor.
- Second Floor: The Second Floor runs all through the hallways and Choke Room. It is accessible from a set of stairs at the end of the Main Hallway and a set at the end of the Flank Hallway. It runs above the Flank and Main Hallways. From the flank, it leads to a drop-down to the Choke Room.
- Choke Room: The choke is the room before the final point, separated from it by a chokepoint. Above the barrels lining the wall is the second-floor balcony. There are six entrances/exits: one from the Main hallway, one above that from the Second Floor (closed until the first point is captured), two from the Second-Floor flank, and two exits to the Final Room.
- Flank Room: This far flank between the Choke and the Final Room is closed off until the first point is captured.
- Final Room: The final room is marked by a lower floor in the center where the point is located. Surrounding the lower floor are walkways on the walls that curve around the area.
- Catwalk: Lining the sides of the Final room is a long L-shaped catwalk. It is accessible from the Main Hallway stairs or by classes with high vertical mobility.
- RED Spawn: RED spawn is located to the right of the final room.
- Spawn Flank: From RED Spawn, a flanking hallway runs all of the way around the control point, left and right, and has a number of locations from which to fire into on the control point and into the Choke Room.
- Control Point: The final capture point of the map is situated in the heart of the Main Building. The point itself is set deep in a lower open floor, putting it at a height disadvantage. In the right corner of the room is the RED spawn room, and in the other is a similar overlook to the point. Beneath the overhanging ledge within the lower floor are two medium ammo packs.
The Main Hallway that leads to Point B.
The stairs to the Second Floor.
The Flank Room connecting Choke Room and Point B.
The Catwalks surrounding Point B.
Helpful overview
1.Entrance Yard
2.Toll Booth
3.Upper Deck
4.Checkpoint Building
5.Gully
6.Flank Hallway
7.Main Hallway
8.Catwalks
9.Spawn Flank
Red/blue diagonal lines: Red/Blu first spawn
Blue double diagonal lines: Blu second spawn
Green circle: First control point
Yellow circles: Second/final control point
Strategy
Control Point timing
| Control Point 1
|
×1
|
|
| ×2
|
|
| ×3
|
|
| ×4
|
|
| ×5
|
|
| Control Point 2
|
×1
|
|
| ×2
|
|
| ×3
|
|
| ×4
|
|
| ×5
|
|
Update history
December 17, 2009 Patch (WAR! Update)
January 27, 2010 Patch
- Updated
CP_Gorge
- Added more cover outside of the initial BLU spawn area.
- Added a forward spawn for the BLU team after Cap1 is captured.
- Added another access point to the upper level from the front of the RED base.
- Added more cover in the room just before Cap2.
- Decreased RED team's respawn time while they own Cap1.
- Fixed a few areas where players would sometimes become stuck.
May 20, 2010 Patch (Second Community Contribution Update)
- Updated
CP_Gorge
- Added
nobuilds to the awnings outside BLU's forward spawn to preventing players building up there.
- More clip work and model collision work based on community feedback.
- Fixed BLU forward spawn door appearing through roof.
October 13, 2011 Patch (Manniversary Update & Sale)
- Added team-specific
func_nobuild brushes in elevated forward spawn areas.
July 10, 2013 Patch
- Players can no longer build in Blu's first spawn room.
- Changed scale of water texture.
December 6, 2013 Patch
December 20, 2013 Patch
Bugs
- Demomen can place stickybombs on the exterior side of the setup gates, causing them to float in midair after the gates have opened.
- After the first point is captured, BLU bots do not leave the spawn room.
- RED Engineers are still able to build on the forward spawn ledge if they stand on an outcropping below the ledge while doing so.
- If a teleporter is placed on the balcony to the right and down the hallway from RED's spawn, BLU bots use said teleporter and become unable to escape it, as their path finding AI directs them all into a corner. Note that this balcony is only accessible via sentry jump, sticky jump, or rocket jump.
Trivia
- "Gorge Herald" was the title of the newspaper seen in the WAR! Update, as well as the map being featured in both the Soldier and Demoman update pages before the map was officially revealed in the update.
Gallery
External links

![]() The following locations are described from the BLU perspective.
The following locations are described from the BLU perspective.


