Pipeline
| Pipeline | |
|---|---|

| |
| Basic Information | |
| Map type: | Payload Race |
| File name: | plr_pipeline
|
| Released: | May 21, 2009 Patch (Sniper vs. Spy Update) |
| Developer(s): | Valve |
| Map Info | |
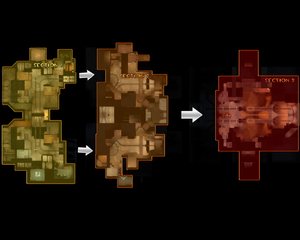
| No. of Stages: | 3 |
| Environment: | Industrial |
| Setting: | Nighttime, clear |
| Hazards: | Payload Cart explosion |
| Deep Water: | Yes |
| Map Items | |
| Map Photos | |
| Map overview | |
| “ | America's pipelines are a stirring beacon of hope. Let no man befoul their majesty with calumny or bombs.[1]
— Abraham Lincoln
|
” |
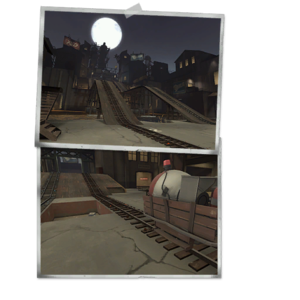
Pipeline is a three-stage Payload Race map, included in the Sniper vs. Spy Update as the first official Payload Race map.
Furthermore, upon winning the round, the victorious team will get a slight early advantage at the next stage, with their Cart starting further down the track.
The setup timer is 1 minute for the first two stages. The third stage has no setup timer.
Contents
Locations
Stage 1 (Docking Bays)
Stage 1 is located at the teams' docking bays, separated by a gate in the middle where the Payload tracks cross.
- Docking Bay: On both sides next to the spawn area and across from the checkpoint is a depression in the ground containing a large ammo pack and a medium health pack.
- Gate: In the center of the stage, underneath four large distillation tanks, lies the gate which separates each team's sides. The gate opens up once the setup time is over. Beneath the gate is also the location where the two carts cross their paths.
- Central Flank: To the right/left of the Gate is a large health pack, past which is an entrance which leads up to flanks that cover both of the teams' Platforms.
- Window: To the left/right of the Gate is another entrance, this one leading to a pair of windows overlooking the other team's side and then to a one-way gate that connects to the other team's Side Flank.
- Platform: In front of the Gate is a gentle incline that the cart must ascend and located next to it is an elevated platform housing a large ammo pack.
- Side Flank/Staircase Area: From each team's side is a winding staircase which connects to the other team's Window.
- Storage Room: Connected to the Platform is a single-room building that has a balcony overlooking the checkpoint area.
- Checkpoint: The checkpoint itself is located to the right/left of each team's spawn, down a narrow alleyway overlooked by the Storage Room.
Stage 2 (Terminal)
Stage 2 is located at a train terminal which connects to both teams' sides.
- Spawns: Each team spawns inside a large building that features one exit at the bottom floor, leading to the cart, and one exit at the top floor, connected to the Battlements.
- Battlements: Each team's spawn areas are surrounded by battlements which contain many small houses and the flank entrances.
- Train Tunnel: The two carts start out just outside a large tunnel that connects each team's Battlements area. Located inside the Tunnel is a large health and ammo pack, as well as the place where the two carts converge paths. The team which won the previous round has their cart start slightly further into the Tunnel.
- Emergency Staircase: Ingrained into both ends of the Tunnel is a staircase leading to the Observation Deck.
- Observation Room: Accessible via the Emergency Staircase is a small room adorned with tall windows that look towards the Spawn.
- Maintenance Room (Flank): Located to the right/left of the Observation Room is a major flank route featuring a staircase and a medium health pack. It has four exits: two leading to a small terrace above each team's checkpoint and two that directly connect the two Battlements.
- Catwalk: The Observation and Maintenance Rooms are connected to the Spawn via a catwalk passing over the final stretch of tracks before the checkpoint.
- Transformers: Directly atop the Tunnel entrance, below a pair of electrical transformers, is a small health pack and a medium ammo pack protected by a chicken-wire fence.
- Checkpoint: Located to the right/left of the Spawn is this stage's final checkpoint.
Stage 3 (Heart of the factory)
Stage 3 is located in the heart of the factories that surround the stages of Pipeline. The final stage contains a pair of ramps that each team must push their cart up. If a cart is left alone on one of the ramps, it slides back down. Unlike on the previous two stages, there is no setup timer.
- Spawns: Each spawn has three exits in total. The one of the left/right leads to a staircase that directly descends down to the cart's starting position. The two exits on the right/left lead to the Balcony and to the Long Corridor.
- Rock Wall: The two carts start out separated by a rock wall. The team which won the two previous rounds has their cart start at the base of the first ramp, while the losers begin all the way in the back. If both teams won one of the previous two rounds, then both teams start equally further along the track.
- Ramps/Tracks: The center piece of the stage; the two ramps are situated in the center parallel to each other. The cart has two rollback zones in total that it must climb.
- Basin: The basin is the area below the ramps containing a stream and an entrance to the Central Staircase. There is also a wooden perch here with a medium health pack and large ammo pack.
- Central Stairs: Behind the Basin is a staircase which leads to the upper flank, or the halfway point after the first rollback zone. Near where the exit for the Central Stairs is are also the exits for the two Long Corridors.
- Balcony: Hanging from the side of each spawn is a balcony overlooking the stage, with a small health and ammo pack.
- Long Corridor: Extending from the main spawn room is a long corridor that leads to just below the top of the Ramps. The exit and entrance of this corridor can only be opened by members of its respective team.
- Top: Found at the top of the Ramps are the two final checkpoints, with both tracks connecting in between to form a semicircle. Flanking the checkpoints on both sides are two tall houses. After capturing the checkpoint, the cart drives on its own until it reaches the middle of the semicircle and detonates.
Strategy
 | “Sun Tzu's got nothing on us!” This map's Community strategy page is a stub. As such, it is not complete. You can help the Team Fortress Wiki Community Strategy Project by expanding it. Notes: None added |
Update history
- Added Pipeline to the game.
- Increased the starting advantage in the third round if a team has won the first two rounds.
- Fixed carts not continuing to the second round if they're capped at the same time in the first round.
- Fixed being able to shoot pipebombs over the starting gates in the first round.
- Fixed being able to open the doors in the first round before the setup time was finished.
- Fixed players getting stuck in some doors.
- Fixed players being able to get onto rooftops and out of the map boundaries.
- Fixed other minor bugs and exploits.
May 20, 2010 Patch (Second Community Contribution Update)
- Added stairwell in Stage 1 and window access to both team's platforms by main choke point to help alleviate stalemates.
- Reverted the starting position for the cart in Stage 3 if a team had won the first 2 stages to where you no longer get a big cart-start-position advantage.
- Fixed rare cases where stage would break when cart had no nearby capper(s).
- Fixed carts not always moving to their starting locations correctly.
- Fixed respawn times in Stage 3 not being set to the proper values.
- Fixed the map not finishing correctly in Stage 3 if the two teams capture the final point at the same time.
- Fixed invisible faces.
- Handrails no longer collide with bullets and projectiles.
Bugs
- In stage A, explosions or fire by the gated wall at the starting gate can harm or kill players standing close enough on the other side.
- In stage C, there is a way to build buildings in the back of both spawns. The location is at the back of each spawn room, in the corner near the white object. For the RED spawn, this is the left corner. For the BLU spawn, this is the right corner.
- In stage C, certain parts of the Basin allow players to be set on fire, crouch and be unable to drown, despite being completely submerged in the water.[2]
- In the entirety of stage C, due to the lack of Setup phase at the start, Engineers can upgrade buildings much faster than intended, with each melee swing using 50 metal instead of 25, the same amount that is applied during Setup time in any other map.[3]
- However, this does not apply to the Medic's ÜberCharge rate, as it does not increase in the same way that it does during Setup time, therefore, functioning as intended.
Trivia
- The Sniper sent a postcard to his mother detailing his experiences fighting at "Scenic Pipeline".
- Pipeline was first seen in the background of the Bonk! Atomic Punch page for the Scout Update page.[4] The image shows the third stage of the map, but with the traditional desert theme (during the day) rather than the night time industrial style used at its release.
- Near the center of the Map of Badlands, beside the Badwater Pipeline that stretches out across the Badlands, is a drawing in profile of the center ramps with a bomb cart on the ramp, presumably locating the Pipeline game map on the region map.
Gallery
External links
References
- ↑ Greetings from PIPELINE postcard - Official Team Fortress website
- ↑ Video example.
- ↑ Video example.
- ↑ https://www.teamfortress.com/scoutupdate/energydrink.htm
| ||||||||||||||||||||||||||||||||


